
The Xero integration in QuoteWerks allows users to sync their quoting and sales processes with their accounting system. This integration helps streamline the flow of data between the two platforms, reducing the need for manual data entry and improving overall efficiency.
Here’s how the integration generally works:
-
Create and Sync Quotes: When you create a quote or proposal in QuoteWerks, you can directly send that information to Xero. This typically includes customer details, line items, prices, and totals, which then get added to your Xero account. This reduces the need to manually enter this data later, ensuring that your financial records are up-to-date.
-
Invoice and quote Creation: Once a quote is accepted, it can be converted into an invoice or quote directly in Xero. This seamless transition between QuoteWerks and Xero makes it easier to turn proposals into actionable invoices, which is particularly useful for businesses that rely on sales orders and invoicing.
-
Customer Management: The integration syncs customer data between QuoteWerks and Xero. This ensures that customer records are consistent across both systems, allowing you to manage contacts and details in one central place.
-
Product and Pricing Sync: If you have a product catalog in Xero, it can be synced with QuoteWerks. This allows you to pull products and pricing directly from Xero, helping maintain consistency in your sales process.
-
Reporting: You can pull relevant financial data into Xero for reporting, allowing you to track sales and revenue generated through quotes and invoices in one system.
By linking QuoteWerks with Xero, businesses can simplify the workflow from quoting to invoicing, ensuring better accuracy and time-saving automation across both platforms.
The Xero Integration is setup in two phases:
-
Establishing the Xero Integration Link which ties QuoteWerks to your Xero account.
-
Configuring the Xero Integration which selects the settings for the integration.
Follow the Establishing Xero Integration settings first followed by the Configuration topic.
IMPORTANT: In order to use the Xero link, you must have two items. First, you must have an active Xero Subscription and second you must have an active QuoteWerks to Xero Subscription. If you are unsure if you have the required information, please contact the QuoteWerks Sales team.
Establishing the Xero Integration Link
1. Navigate to Setup-> Options-> Accounting.
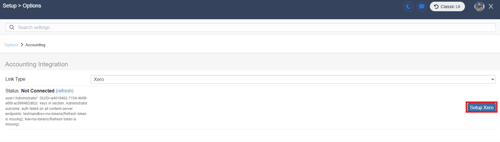
2. Under the Accounting Integration section, set the Link Type to "Xero" and click on the [Setup Xero] button.
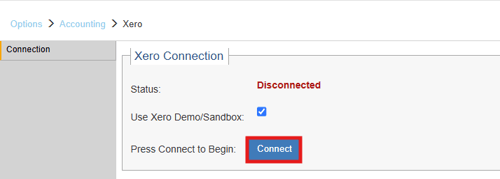
3. This brings you to the Xero Connection page. To Connect to your Xero account click on Connect.
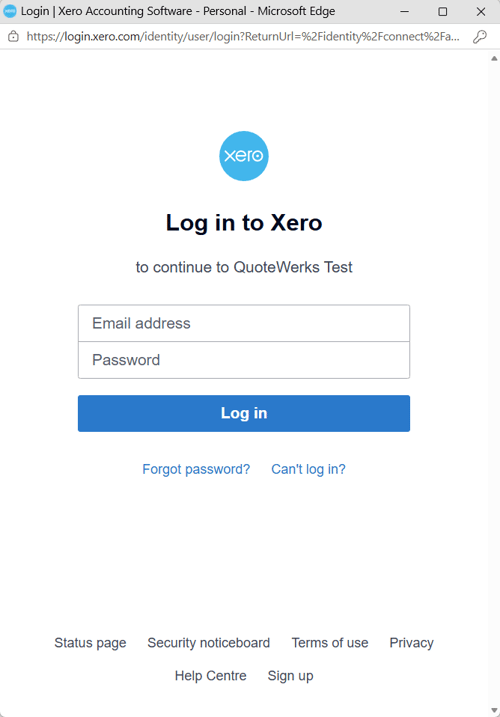
4. This opens the Login to Xero page where you should input your Email address and Password used for your Xero account. Click Login.
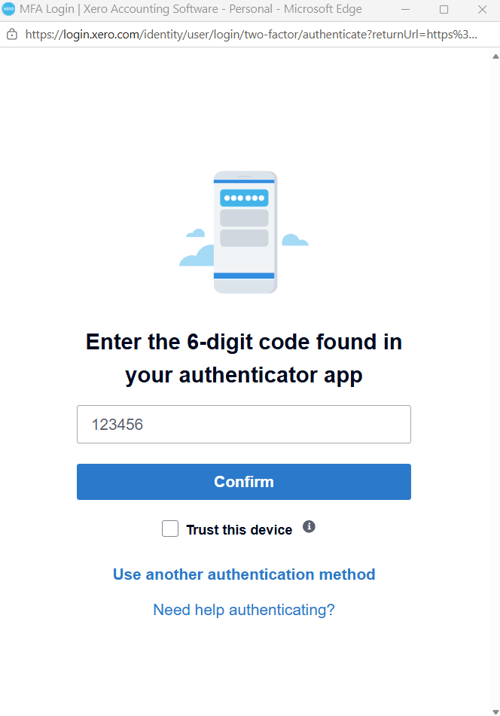
5. You may be prompted to provide 2 factor authentication. If so, insert the code found on your authenticator app. Click Confirm.
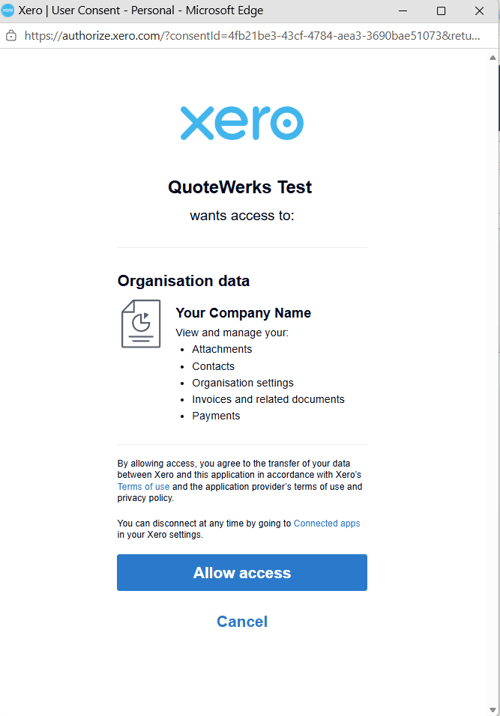
6. You will be prompted to allow QuoteWerks access to your Xero data. Review this page and click Allow access.
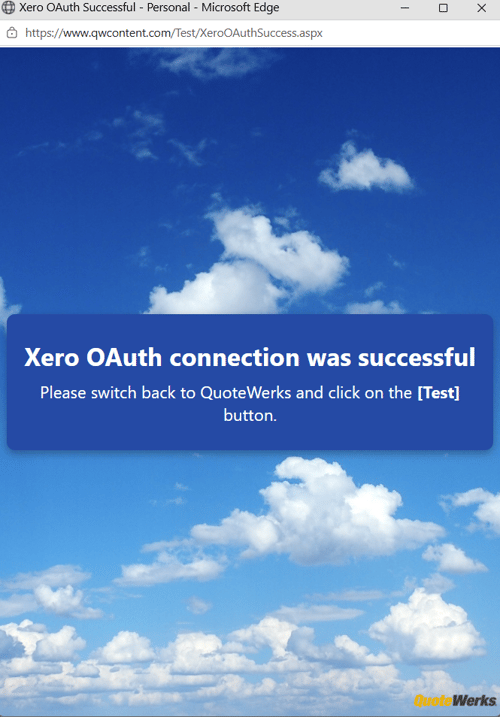
7. If your credentials are correct and you have connected to Xero you will see a page indicating that the Xero OAuth connection was successful. You can close this page.
8. Additionally, you will see a pop up that indicates that you have successfully connected to Xero. Click OK.

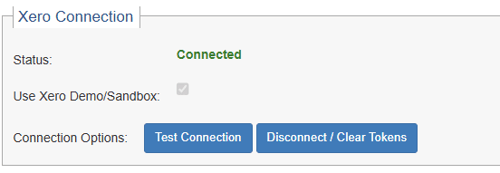
9. You should now see the status as Connected, new configuration tabs along the left of the window, and a Test Connection button that you can use to test the connection at any time.
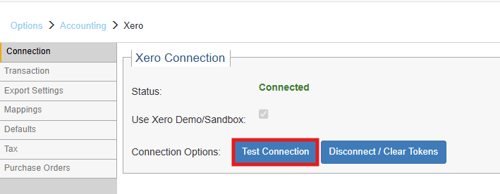
Your connection to Xero is now successful and you can now move on to configuring the integration.
Configuring the Xero Integration
The following instructions are to configure the QuoteWerks to Xero integration.
Navigate to Setup-> Options-> Accounting. Click on the [Setup Xero] button under the Accounting Integration section.

Clicking on [Setup Xero] will open the Xero Settings Window. This window has seven tabs used to configure the link and each tab's settings can be viewed in the below topics.
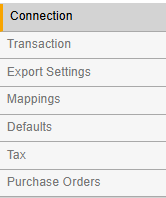
Xero Setup is done on the following pages:
Connection Tab
Here you can connect to your Xero account and/or view the connection status. You have the option to test the connection at any time by clicking on the Test Connection button.
Transaction Tab
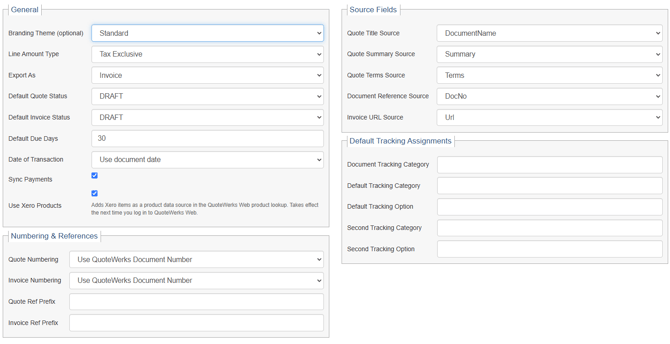
General Tab
Branding Theme
Here you can choose the Branding Theme you would like to use in Xero.
Line Amount Type
Here you can set your line amount type to be Tax Exclusive, Tax Inclusive, or No Tax.
Export As
Here you can set what type of document you would like to export to Xero. This can be set to be either a Quote or an Invoice.
Default Quote Status
This is the Default status for Quotes sent to Xero.
Default Invoice Status
This is the Default status for Invoices sent to Xero.
Default Due Days
This is the default number of days that will be set in Xero until the exported document is due.
Date of Transaction
Here you can set what you would like the Date of Transaction to be recorded as in Xero. This can be the document date or the date exported.
Sync Payments
Checking this box will allow you to sync payments received in QuoteWerks to Xero. If selected a button will appear on the Grid Toolbar to perform this action.
Use Xero Products
Checking this box will allow you to use Xero as a product source in QuoteWerks. The data source will be available to select products from the next time you log into QuoteWerks.
Numbering & References
Quote Numbering
Here you can choose how you would like to number quotes created in Xero from QuoteWerks. This can be the QuoteWerks Document Number or Autonumbering assigned by Xero.
Invoice Numbering
Here you can choose how you would like to number invoices created in Xero from QuoteWerks. This can be the QuoteWerks Document Number or Autonumbering assigned by Xero.
Quote Ref Prefix
Here you can set a prefix to be used when quotes are exported to Xero.
Invoice Ref Prefix
Here you can set a prefix to be used when invoices are exported to Xero.
Source Fields
Quote Title Source
Here you can choose what field you want to be the source of the Quote title in Xero.
Quote Summary Source
Here you can choose what field you want to be the source of the Summary field on the Xero quote.
Quote Terms Source
Here you can choose what field you want to be the source of the Quote Terms on the Xero quote.
Document Reference Source
Here you can choose what field you want to be the source of the Reference field on the Xero quote.
Invoice URL Source
Here you can choose what field you want to be the source of the Invoice URL on the Xero invoice.
Document Tracking Assignments
In Xero you can track transactions or items based on different tracking categories. This can help provide insight into the performance of the different areas of your business, such as departments, cost centers or locations. Document Tracking Assignments are the default tracking categories and options applied to items on quotes and invoices exported to Xero from QuoteWerks.
Default Tracking Option
Here you can set the default tracking option for an item exported to Xero from QuoteWerks.
Second Tracking Category
Here you can set a second tracking category for an item exported to Xero from QuoteWerks.
Second Tracking Option
Here you can set a second tracking option for an item exported to Xero from QuoteWerks.
Per-Item Tracking Rules
In Xero, you can get even more granular with your category and option mappings and assign them based on matching information contained in the Manufacturer Part Number field, or Description field if none exists. This is where per-item tracking rules apply - you can set a value to search for in the Match QuoteWerks Value field and if the Manufacturer Part Number matches based on your match type, the selected categories and options will be applied to those items. If a Manufacturer Part Number does not exist for an item, QuoteWerks will search the Description for the value in the Match QuoteWerks Value field. If you do not assign a Per-Item Tracking Rule or a match is not found, the default tracking assignments outlined above will apply to the line items.
Export Settings Tab
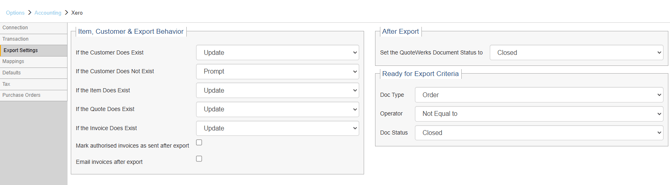
Item, Customer, and Export Behavior
If the Customer Does Exist
When exporting an estimate/invoice to Xero and the Customer in the document does exist in Xero you can select to update or not update the Customer information. It is recommended that this setting be set to Do Not Update.
If the Customer Does Not Exist
When exporting an estimate/invoice to Xero and the Customer in the document does not exist in Xero you can select Create or Prompt to Create the new customer in Xero. It is recommended that this setting be set to prompt to create.
If the Item Does Exist
If the item does exist in the Xero Item List, you can choose to have QuoteWerks update or not update the cost/price of the item. It is recommended that this setting be set to Update.
If the Quote Does Exist
If a quote with the same number exists, you can choose to have QuoteWerks update or not update the existing quote with the new quote's details. It is recommended that this setting be set to Update.
If the Invoice Does Exist
If an invoice with the same number exists, you can choose to have QuoteWerks update or not update the existing invoice with the new invoice's details. It is recommended that this setting be set to Update.
Mark authorised invoices as sent after export
Checking this box will update the Invoice's status to "Sent" for tracking and reminders without sending an actual email.
Email invoices after export
Checking this box will email invoices automatically after export.
After Export
Set the QuoteWerks Document Status to
Here you can choose what to set the QuoteWerks document status to after the document has been exported to Xero. It is recommended that you set the QuoteWerks Document Status to Exported.
Ready for Export Criteria
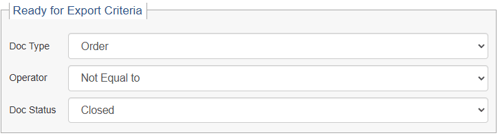
This is where users can set the criteria for which documents will be displayed in the Non-Exported Documents tab in the Xero Export Window. Only documents that match the criteria will be displayed. You can specify the DocType as well as Doc Status “Equal To”, “Not Equal To” and corresponding values like “Lost”, “Closed”, “Exported”.
In the example below only Orders that are not equal to closed will be displayed on the Xero export window. This is a recommended setting.
Mappings Tab
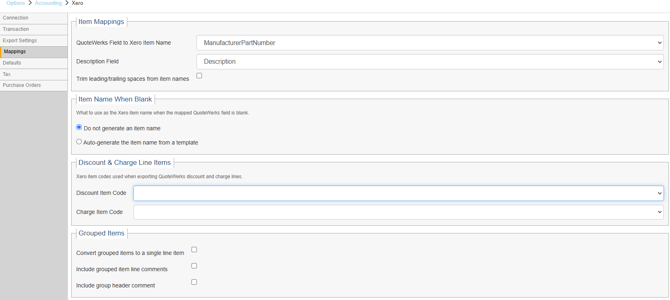
Item Mappings
QuoteWerks Field to Xero Item Name
This mapping is used to determine which QuoteWerks field will be used to map to the Xero Item Name. Typically, this would be the ManufacturerPartNumber, however if you use alternate fields for your part numbers in QuoteWerks, you can change the mapping here including FullName, Description, and PurchaseDescription.
Description Field
This mapping determines which field from the QuoteWerks line items will be used for the Xero Item Description. You can choose Description (this is the default), PurchaseDescription, FullName, or ManufacturerPartNumber.
Trim leading/trailing spaces from item names
Checking this box will remove any leading/trailing spaces from item names.
Item Name When Blank
This mapping determines what action QuoteWerks will the mapped QuoteWerks field is blank. In the example above, this would be if the Manufacturer Part Number was blank. Setting this to Do Not Generate will leave the field blank. Setting this to Auto-generate using macro allows you to use QuoteWerks macros to build what you would like that blank field to be populated with. It is recommended to set this setting to Auto-generate. The suggested Item-Name template is &DI_ItemType.
Discount & Charge Line Items
It is recommended that you pre-configure a Discount and Charge Product in Xero first before trying to export these type of lines to Xero. For more information, please see Creating Discount Products and Charge Products in Xero.
Discount Item Code
This mapping determines how a discount item in your QuoteWerks document appears in Xero. You may need to create a default discount item in Xero so you can map the QuoteWerks item to the charge item in Xero, enabling QuoteWerks Discount Items to export properly.
Charge Item Code
This mapping determines how a charge item in your QuoteWerks document appears in Xero. You may need to create a default charge item in Xero so you can map the QuoteWerks item to the charge item in Xero, enabling QuoteWerks Discount Items to export properly.
Grouped Items
Convert Grouped Items to Single Item
Select this option if you want to “roll-up” all the items that are in a group in QuoteWerks to only display them as a single line item in Xero. The TaxCode sets the taxable status of the single line amount.
Include Grouped Items as Comments
If Include grouped item line comments is selected, then the descriptions of all the group member line items from QuoteWerks will be added as comment lines below the group header line when exported to Xero.
Include Group Header Comment
If Include group header comment is selected, then the description of the Group Header line from QuoteWerks will be inserted as a comment line in Xeroabove the group member lines when exported to Xero.
Payment Account Mappings
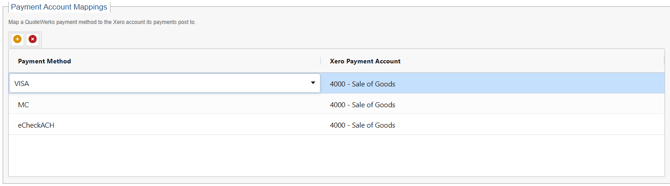
Here you can map a QuoteWerks payment method to the Xero account it's payments post to. To add a new payment click the orange plus button, choose the payment method, then the corresponding Xero Payment Account.
Defaults Tab
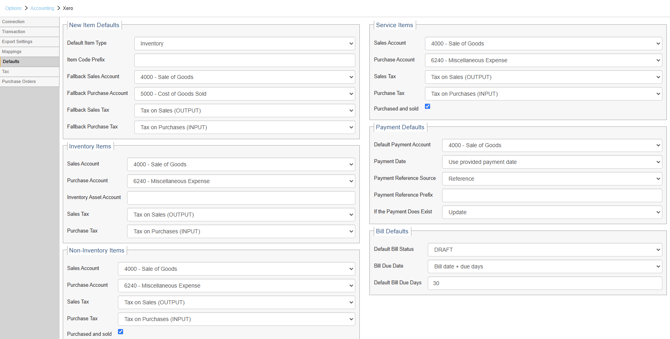
The Defaults Tab is where users can map default settings when items do not exist in Xero and QuoteWerks is prompting the user to create them. These are just default settings and are not required.
New Item Defaults
It is recommended that you configure these settings as it will speed up the process of creating new items when they do not exist in Xero.
Default Item Type
When exporting an item(s) to Xero and a new item needs to be created in Xero, you will be prompted to select the item type of Inventory, Non-inventory, or Service. Here you can select the default type. It is recommended to set this setting to Non-inventory.
Item Code Prefix
This prefix will be added to the beginning of the item code when a new item is created in Xero.
Fallback Sales Account
This is the sales account that will be used if you do not have a default specified for Inventory, Non-Inventory, or Service items.
Fallback Purchase Account
This is the purchase account that will be used if you do not have a default specified for Inventory, Non-Inventory, or Service items.
Fallback Sales Tax
This is the sales tax that will be used if you do not have a default specified for Inventory, Non-Inventory, or Service items.
Fallback Purchase Tax
This is the purchase tax that will be used if you do not have a default specified for Inventory, Non-Inventory, or Service items.
Inventory Items
Sales Account
When a new inventory item needs to be created in Xero, you will need to select the Sales Account for the item. Here you can select the default account.
Purchase Account
When a new inventory item needs to be created in Xero, you will need to select the Purchase Account for the item. Here you can select the default account.
Inventory Asset Account
When a new inventory item needs to be created in Xero, you will need to select the Inventory Asset Account for the item. Here you can select the default account.
Sales Tax
When a new inventory item needs to be created in Xero, you will need to select the Sales Tax for the item. Here you can select the default.
Purchase Tax
When a new inventory item needs to be created in Xero, you will need to select the Purchase Tax for the item. Here you can select the default.
Non-Inventory Items
Sales Account
When a new non-inventory item needs to be created in Xero, you will need to select the Sales Account for the item. Here you can select the default account.
Purchase Account
When a new non-inventory item needs to be created in Xero, you will need to select the Purchase Account for the item. Here you can select the default account.
Sales Tax
When a new non-inventory item needs to be created in Xero, you will need to select the Sales Tax for the item. Here you can select the default.
Purchase Tax
When a new non-inventory item needs to be created in Xero, you will need to select the Purchase Tax for the item. Here you can select the default.
Purchased and Sold
When a new non-inventory item needs to be created in Xero, you will need to specify whether or not the non-inventory item is “purchased and sold”. Here you can select the default preference.
Service Items
Sales Account
When a new service item needs to be created in Xero, you will need to select the Sales Account for the item. Here you can select the default account.
Purchase Account
When a new service item needs to be created in Xero, you will need to select the Purchase Account for the item. Here you can select the default account.
Sales Tax
When a new service item needs to be created in Xero, you will need to select the Sales Tax for the item. Here you can select the default.
Purchase Tax
When a new service item needs to be created in Xero, you will need to select the Purchase Tax for the item. Here you can select the default.
Purchased and Sold
When a new service item needs to be created in Xero, you will need to specify whether or not the service item is “purchased and sold”. Here you can select the default preference.
Payment Defaults
Default Payment Account
This is the default payment account that will be used when payments are exported to Xero.
Payment Date
Here you can set the default for what the payment date will be recorded as for payments exported to Xero. You can choose to use the payment date or the date exported.
Payment Reference Source
Here you can set what you want the default reference source to be for payment exported to Xero. This can be set to reference, invoice number, or payment type.
Payment Reference Prefix
Here you can opt to add a prefix to your payment reference.
If the Payment Does Exist
If you are exporting a payment that already exists, you can choose to update or do not update it at the time of payment export.
Bill Defaults
Default Bill Status
When a bill is created in Xero this is the default bill status that will be used.
Bill Due Date
When a bill is created in Xero this is the default bill due date that will be used.
Default Bill Due Days
When a bill is created in Xero this is the default bill due days that will be used.
Tax Tab

Tax Chooser Default
Here you can set the default to be used when both a configured default tax and the customer's tax are available. You can choose to prefer the configured fallback tax or the customer default tax type.
Sales Tax Codes
Taxable
Here you can choose the tax code to use when an item is marked as taxable.
Non-Taxable
Here you can choose the tax code to use when an item is marked as non-taxable.
Purchase Orders
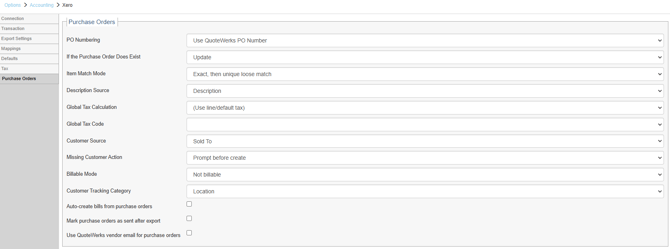
PO Numbering
Here you can set how you would like purchase orders to be numbered when created in Xero. You can choose to use the QuoteWerks PO Number or use Xero Auto Numbering.
If the Purchase Order Does Exist
If the purchase order already exists in Xero you can chose to update or not update it as a default.
Item Match Mode
Here you can choose the matching strategy you would like to use for items that are created in Xero from a PO. You can choose from disabled, exact match only or exact, then unique loose match.
Description Source
Here you can choose the source for your PO description. this can be the description, PurchaseDescription, FullName, or ManufacturerPartNumber from QuoteWerks.
Global Tax Calculation
Here you can choose the tax calculation you would like to use on POs exported to Xero. You can choose to use line/default tax, no tax generated on bill, tax excluded, use one Xero tax code, or tax inclusive, use one Xero tax code.
Global Tax Code
Here you can choose the global tax code you would like to use on POs exported to Xero.
Customer Source
Here you can choose the customer source for POs created in Xero. This can be set to the Sold To or Bill To contact from QuoteWerks.
Missing Customer Action
If there is a missing customer action you can choose to fail the export, create it automatically, or receive a prompt prior to creation.
Billable Mode
Here you can choose the billable mode to be used when POs are exported to Xero. This can be set to not billable, metadata only, or tracking only.
Customer Tracking Category
Here you can choose the customer tracking category to use on PO exported to Xero from QuoteWerks.
Auto-create bills from purchase orders
Checking this option will automatically create bills from purchase orders exported to Xero from QuoteWerks.
Mark purchase orders as sent after export
Checking this option will automatically mark purchase orders as sent after export to Xero from QuoteWerks.
Use QuoteWerks vendor email for purchase orders
Checking this option will use the vendor email as configured in Vendor Maintenance on POs exported to Xero from QuoteWerks.