
This article takes you through using your Autotask PSA with QuoteWerks. This will allow you to pull Autotask customer records into sales quotes, create Autotask opportunities, and much more using a single application: QuoteWerks.
This article includes information on the following topics:
- QuoteWerks Searches for your Autotask Contacts
- Create a Contact in Autotask from the Sold to / Ship to Tab
- Autotask Online/Offline Status
- Automatically Create and Update Sales Opportunities
- Creating or Updating a Linked Document in Autotask
- Create Autotask Quotes
- Create Autotask Purchase Orders
- Create Autotask Account To Do's
- Creating Account Notes in Autotask
- Linking an Opportunity to a Project in Autotask
- Using Auto-Links in Autotask
- Viewing a Quote in Autotask
- Create/Update a “Closed” Opportunity in Autotask
- Recurring Revenue in Autotask
- F2 Lookup Features
- DataLink Setup
QuoteWerks Searches for your Autotask Contacts
To retrieve account/contact information from Autotask into QuoteWerks, first select the Sold to / Ship to tab. Click on the ![]() button next to the Sold to, Ship to or Bill to boxes. The Lookup Autotask contact window will appear:
button next to the Sold to, Ship to or Bill to boxes. The Lookup Autotask contact window will appear:
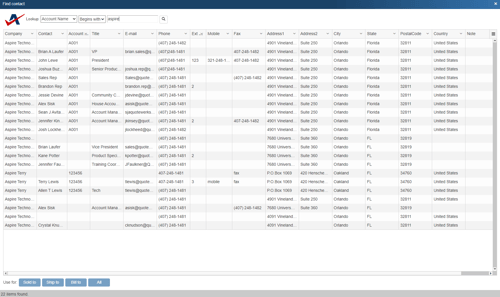
You can search for an Autotask Contact to add to the quote by AccountName, First Name, Last Name, Phone, AccountID, AccountNumber.
Select the field that you want to use in the search and then enter the corresponding value. When you click on the [Find] button, the results of your search will be displayed.
Once you have found the account or contact you are looking for, select the record and click on the [Sold To] button to use this record for the Sold to information. You can also select a record and click on the [Ship To] button to use this record for the Ship to information or you can click on the [Bill To] button to use this record for the Bill to information. When you are finished selecting records, click on the [Close] button. You will be returned to the Sold to/ Ship to tab and the selected records will be pre-filled in the Sold to/Ship to/Bill to fields.
NOTE: When pulling a contact, if the contact address is empty, the company address will be used.
Creating a Contact in Autotask from the Sold to / Ship to Tab
Under the Sold to / Ship to tab you can use the ![]() icon to create a new account and contact inside of Autotask. The Company Name, Contact Name, and Phone number fields are required in order to use this feature. Once you have filled out these fields manually, the gold button will be enabled. If the company already exists in Autotask, QuoteWerks will tell you it currently exists and will NOT create the contact in Autotask. Only if that Account does not exist will this feature then create the contact.
icon to create a new account and contact inside of Autotask. The Company Name, Contact Name, and Phone number fields are required in order to use this feature. Once you have filled out these fields manually, the gold button will be enabled. If the company already exists in Autotask, QuoteWerks will tell you it currently exists and will NOT create the contact in Autotask. Only if that Account does not exist will this feature then create the contact.
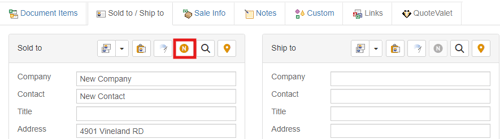
Keep in mind that for this feature to be enabled:
- The Sold to section can't already be populated with a contact you retrieved from your CRM
- The Company, Contact, and Phone fields must both be populated
There's also an Access Right called CannotCreateCRMContact you can set if you don't want specific users to be able to use this feature.
Autotask Online/Offline Status
Writing information to Autotask requires that you have access to Autotask. If you are running QuoteWerks on a laptop and are not connected to your locally hosted or Autotask hosted copy of Autotask, you will not be able to write information back to Autotask. On the Save window there is an “I’m Offline” option that enables you to save the quote and not attempt to integrate with Autotask:
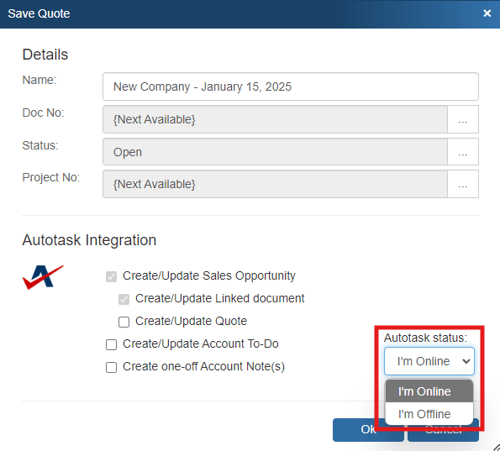
With this option, it is easy to still save quotes in QuoteWerks even though Autotask is not available. Please note, any quotes saved while offline will need to be re-opened, linked to an Autotask contact and saved in order to update Autotask online.
Automatically Create and Update Sales Opportunities
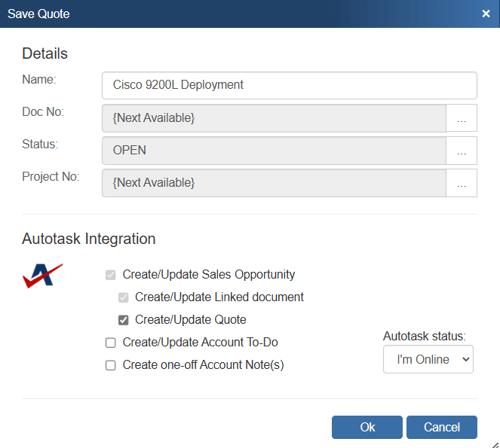
When you're saving a document, the “Create/Update Sales Opportunity” checkbox will appear on the Save window.
NOTE: This checkbox will NOT appear if you are saving a quote template.
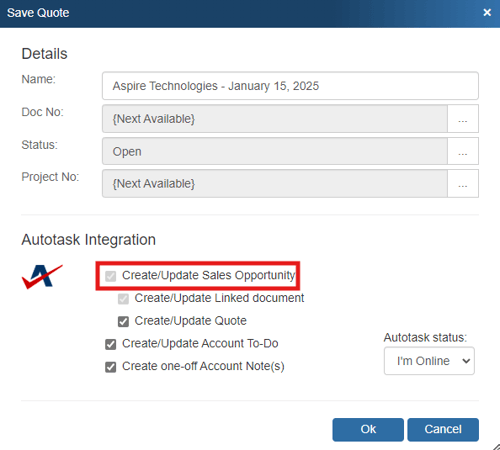
This option will create or update an Autotask opportunity or attach to an existing opportunity in Autotask.
Once you have pressed the [OK] button from the File -> Save window, the “Create/Update Autotask Opportunity” window will appear, enabling you to enter or adjust information about the opportunity such as the Opportunity Name, Owner, Stage, Status, Description, Create Date, Projected Close Date, Probability %, Rating and the Promotion Name. Additionally, if a PO Number has been added to the Sale Info tab in QuoteWerks, that PO number will flow over to the Autotask PO Number field in the Autotask quote.
The Opportunity Description field is also available if you need to provide more context and information about this opportunity in Autotask.
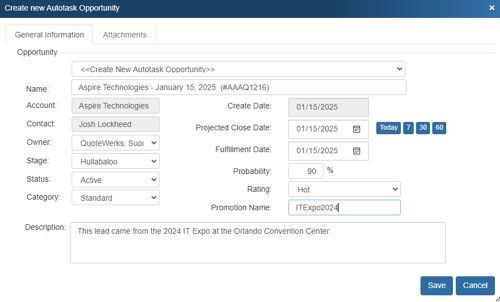
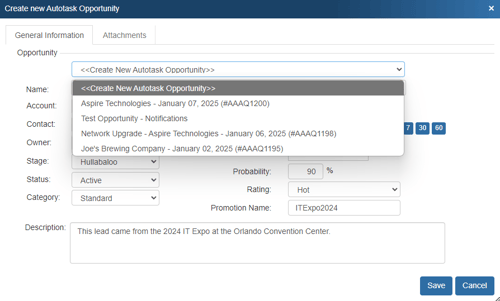
The Opportunity drop down will contain a list of all existing Autotask opportunities associated with the Autotask contact record on the Sold To / Ship To tab in QuoteWerks. If you have not already created a new opportunity for this quote, here you can select an existing opportunity to update with the current quote’s information.
NOTE: A link to open the QuoteWerks document in QuoteWerks Web will be available as a note in the opportunity.
NOTE: If you are using QuoteValet, when uploading the document to QuoteValet, a link to open the Sales Rep facing document in QuoteValet will be available as a note in the opportunity.
NOTE: When you attach to an existing opportunity, QuoteWerks will assume ownership of that opportunity.
Once the opportunity has been created, an Auto-Link will appear on the Links tab in QuoteWerks for that document as well as the Autotask Quote (if you have checked that checkbox).
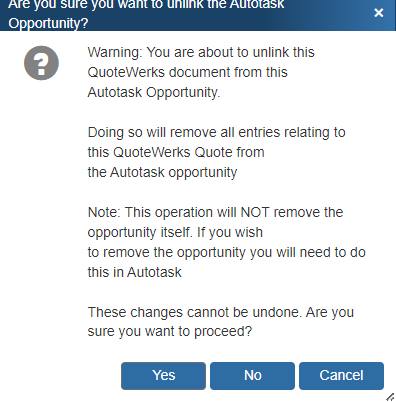
Unlink Opportunity
If you accidentally attached a quote to the wrong opportunity in Autotask, you can use the ![]() button to remove the link. All entries relating to the QuoteWerks Quote will be removed from the Autotask opportunity. This button will only be displayed when updating an existing opportunity, so if you realize you made a mistake, choose to update the opportunity, and then at that point, use this button to unlink it.
button to remove the link. All entries relating to the QuoteWerks Quote will be removed from the Autotask opportunity. This button will only be displayed when updating an existing opportunity, so if you realize you made a mistake, choose to update the opportunity, and then at that point, use this button to unlink it.
By creating opportunities in Autotask, Autotask can generate pipeline reports. This feature helps you estimate your cash flow. If you already have an opportunity for this quote, it will automatically update the existing one to reflect changes you have made to the quote.
QuoteWerks claims ownership of Autotask opportunities that were created or updated from within QuoteWerks. It is not recommended that you manually make changes to the opportunity from within Autotask as these changes may be overwritten by QuoteWerks when QuoteWerks is updating the Autotask opportunity.
Creating or Updating a Linked Document in Autotask
When saving a document, the “Create/Update Linked Document” checkbox will appear on the Save window:
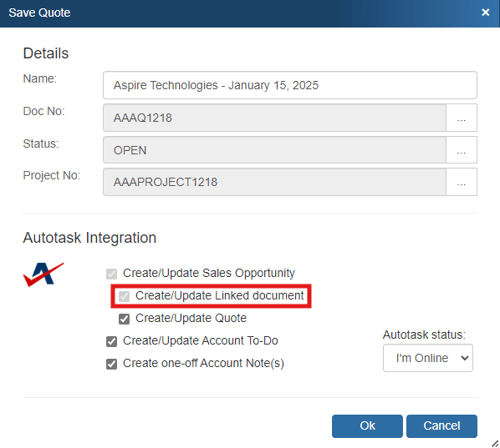
Linked Documents must be attached to an Autotask Opportunity, so if an Opportunity does not already exist for this record, you will need to also have the Create Update Sales Opportunity checkbox checked.
NOTE: This checkbox will NOT appear if you are saving a quote template and will be checked and disabled if the Look for synchronized data in dtf files option is set.
Viewing a Linked Document from Autotask
To view the Linked Document in Autotask, open the Opportunity, click on the Attachments menu option.
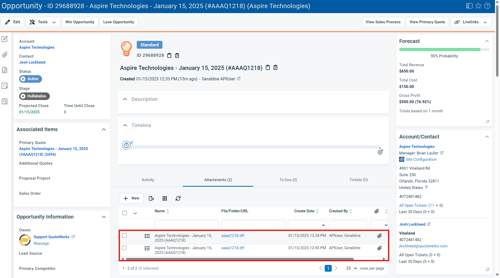
If you open the Linked Document and the document does not exist in your installation of QuoteWerks, it will be automatically imported.
Create Autotask Quotes
When you're saving a document, the “Create/Update Quote” checkbox will appear on the Save window.
NOTE: This window will NOT appear if you are saving a quote as a template.
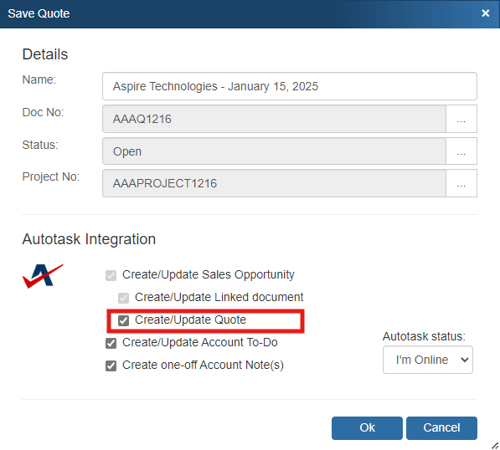
Once you have selected Create/Update Quote and pressed the [OK] button from the File -> Save or File -> Save As window, the “Create/Update Autotask Quote” window will appear, enabling you to create/update an Autotask quote. The Quote Name, Description, Effective and Expiration Dates can all be modified before saving the quote in Autotask. Additionally, when creating or updating the Autotask quote, if a PO number has been entered into QuoteWerks under the CustomerPONumber field, that number will populate the Purchase Order Number field in Autotask.

This quote will be created and appear in the “Quotes” section of Autotask and will be set as active.
NOTE: If items on a QuoteWerks quote mapped as Products do not exist in Autotask, when QuoteWerks creates the Autotask Quote, the items will be created in the Autotask databases. If they do exist, they will not be overwritten in the databases. QuoteWerks matches the Autotask Products and Services using the Manufacturer Part Number. The manufacturer part number set in QuoteWerks will also be written into the SKU field in Autotask since the part number field in Autotask is not searchable.
Additionally, if the labor item does not currently exist in Autotask, it will be created as a Cost item on the quote and in the database instead.
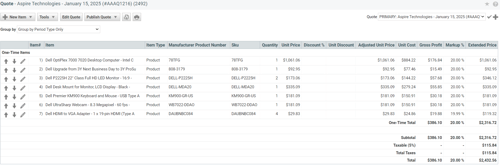
Once the quote is saved, the products and services will be populated in an Autotask Quote.
Additionally, when QuoteWerks creates the Autotask Quote, the Sold to, Ship to, and Bill to addresses from QuoteWerks will be copied into the same fields in the Autotask quote under the Terms tab.

NOTE: To disable this setting, use the Settings Manager with settings of SystemSettings\Autotask\DontSetSoldToContactInQuote=-1, SystemSettings\Autotask\DontSetShipToContactInQuote=-1, SystemSettings\Autotask\DontSetBillToContactInQuote=-1.
Create Autotask Purchase Orders
You can select items from QuoteWerks Orders to send to Autotask in a purchase order. To do this, first make sure you have enabled this integration under Contacts -> Setup Contact Manager -> Autotask -> Autotask Setup -> Purchase Orders.

Step 1: Click on Purchasing from the left navigation panel or the Purchasing Icon (![]() ) on the QuoteWerks main toolbar.
) on the QuoteWerks main toolbar.
Step 2: Select whether you want to create a purchase order based on the currently open order (if applicable) or from multiple previous orders. Select your date range, select customer, and then finally the vendor for the order.
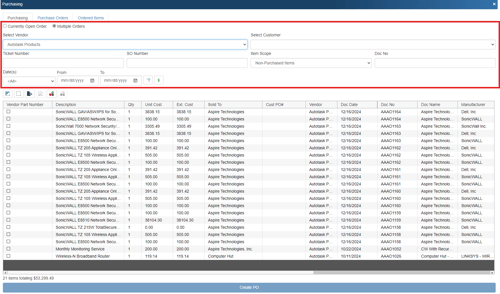
Step 3: Select your items from the results list. Check the boxes next to the appropriate items to include them in the purchase order.
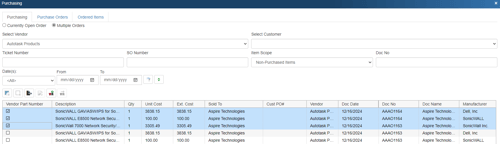
Step 4: Click Create PO at the bottom of the window:
![]()
You'll see the Create Purchase Order window appear:
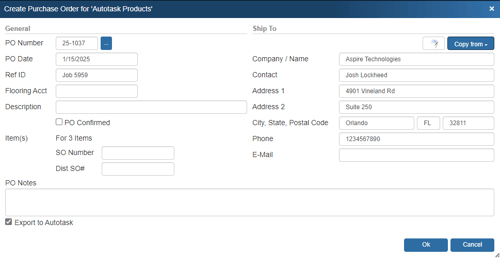
NOTE: If you enter in a PO Number that has already been used, a message will appear notifying you that the current PO number is already in use and to choose a new PO number. We do not recommend using the same PO number for multiple purchase orders.
Enter the following information:
- PO Number: You'll use this value when creating a purchase order. If you're linking to QuickBooks, Sage 50 (Peachtree), Autotask, or ConnectWise, the same PO Number will be used when exporting to that application. You can set this number manually or, if you've set a default numbering sequence under Tools -> Options menu -> Installation tab, you can click the
 button next to the Next PO number sequence field to select the next numerical value. Additionally, if you've set a PO Prefix/Postfix value under Vendors on the left navigation panel, then this value will display with the PO number. For example, if you'd set the postfix to "TD" (for Tech Data), the PO number would read, "14-1001TD," where "14" indicates the year 2014 and 1001 represents the unique numeric sequence. This field also supports the F2 Lookup List feature.
 - PO Date: The date of the purchase order. This will default to the day you're creating the purchase order, but you can manually change it. This date will also apply to any purchase order created in QuickBooks, Sage 50 (Peachtree), Autotask, or ConnectWise.
- Ref ID: In this field, you can enter a job or ticket number to group purchase orders. For example, you might create five purchase orders to purchase all the products required for the job, and by entering the same job number for each PO, you can easily group and display them together under the Purchase Orders tab. Filtering by RefID while under the Purchase Orders tab will show you the purchase orders linked by job number. Filtering by RefID while under the Ordered Items tab will show you a complete list of all the items ordered within all purchase orders.
- Flooring Acct: You can use this field to specify a flooring account when placing orders with Ingram Micro, D&H, and/or TD SYNNEX.
- Description: Here, you can enter a description of the purchase order.
- SO Number: Enter in the Sales Order number you would like to reference for all the items created in the PO.
- Dist SO#: Enter in the Distributor Sales Order number you would like to reference for all the items created in the PO.
You can also select Export to Autotask to export the purchase order to Autotask.
Click OK.

IMPORTANT: In Autotask, you can create a manual purchase order by creating a new purchase order and then selecting items from the Autotask product list to add to the purchase order. This type of purchase order does not associate the added products with any customers/Tickets/Opportunities. When QuoteWerks creates a purchase order in Autotask, it creates it the same way as described above.
Step 5: The next window will let you select the Autotask vendor to be used for the purchase order, if you didn't select a vendor that already exists in Autotask.
IMPORTANT: If the vendor on the QuoteWerks purchase order matches a vendor in the Autotask database, this Vendor Selection window won't appear; you will skip to Step 6.
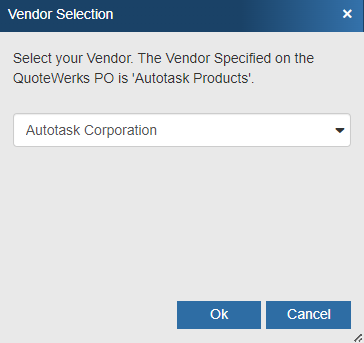
Click on the [Ok] button once you have located your vendor.
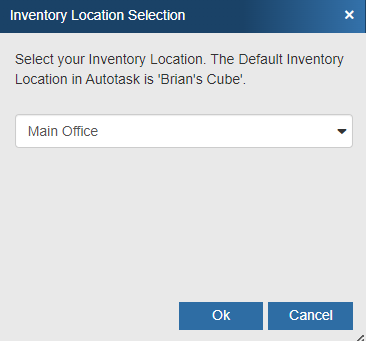
Step 6: The next window will let you select your inventory location.
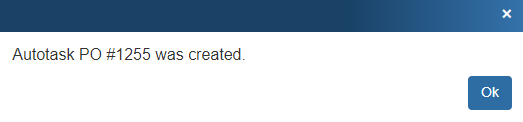
Step 7: A confirmation box will appear notifying you that your purchase order has been created for the selected vendor with the purchase order number you specified.
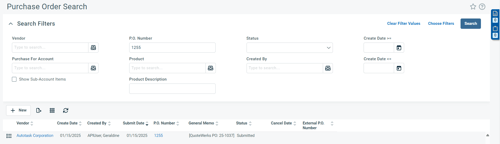
Step 8: To view the purchase order that was sent over to Autotask, open Autotask and click on the Inventory -> Purchase Orders menu. Enter your desired search parameters and hit [Enter] on your keyboard.
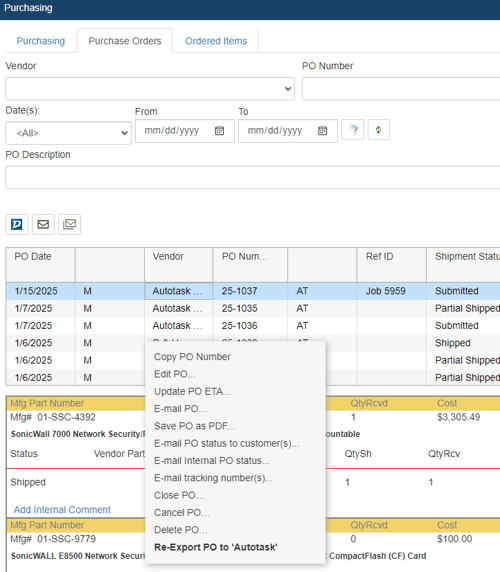
Clicking on the purchase order will open it in Autotask, listing the information about the purchase order from QuoteWerks, including a list of the purchase order's items:
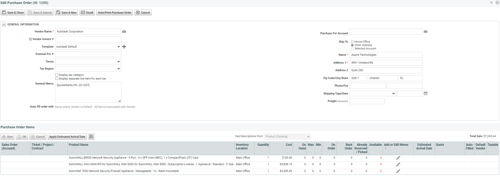
If you entered a description when creating the purchase order in QuoteWerks, that text will appear in the General Memo field in Autotask (shown above). The vendor part number will also be included.
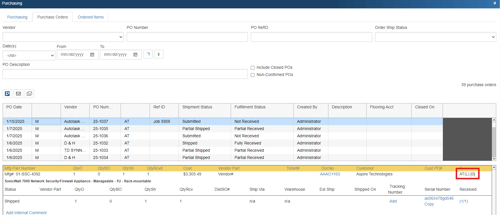
If the QuoteWerks purchase order item has been exported to Autotask as an item on an Autotask purchase order that QuoteWerks created, you'll see an indicator — "AT (L)" — on the right side of the item under the QuoteWerks Purchasing window's Purchase Orders tab. You'll also notice a numerical indicator to the right corner of the "AT (L)", which will display the quantity of that item that has been received in QuoteWerks but has not been sent over to Autotask as received yet. See Mark ItemReceipt as Exported to Accounting... for more information on doing this.
IMPORTANT: Per normal Autotask behavior, once all the items on a purchase order have been received, you will not be able to edit that purchase order in Autotask.
Re-Export PO to Autotask
Once a PO is sent to Autotask, the option to re-export becomes available. This is useful if the original PO did not export correctly and you need to send it over to Autotask again with the corrections.
To Re-Export a PO, click on the Purchase Orders tab in QuoteWerks, find the PO that needs to be re-exported, and right-click. Select the Re-Export PO to 'Autotask' menu option.
IMPORTANT: When you re-export a PO to Autotask, this will create a brand new PO in Autotask, with a new PO number. You may need to delete or close the original PO in Autotask for your accounting records to be accurate.
In QuoteWerks, when you re-export a PO, the original PO is updated in QuoteWerks with the latest version of it. For example, if you export PO #4, and then re-export it, PO #4 will be updated in QuoteWerks and will become PO #5.
Receiving Inventory from an Autotask PO
When a PO has been exported to Autotask QuoteWerks allows you to receive inventory against that PO. To learn more see Receiving Inventory.
Create Autotask Account To Do's
When you're saving a document, the “Create / Update Account To Do” checkbox will appear on the Save window.
NOTE: This checkbox will NOT appear if you are saving a quote template.
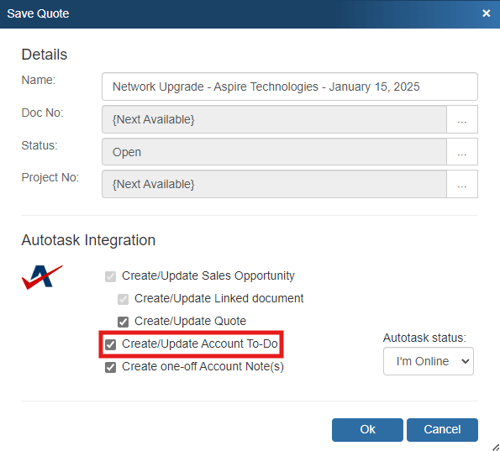
After you hit [Ok] and have created the opportunity, you have the ability to create an Autotask To Do:
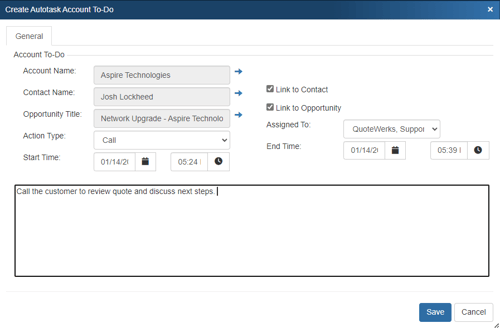
This To Do can be multiple different action types available in Autotask including calls, meetings, opportunity updates, events, and more. The To Do can be linked to the contact and the opportunity and can be assigned to other Autotask users. There's also a notes field to add more information about this To Do item.
Once the To Do has been created, an Auto-Link will appear on the Links tab in QuoteWerks for that document.
Creating Account Notes in Autotask
When you're saving a document, the “Create Account Notes” checkbox will appear on the Save window.
NOTE: This checkbox will NOT appear if you are saving a quote template.
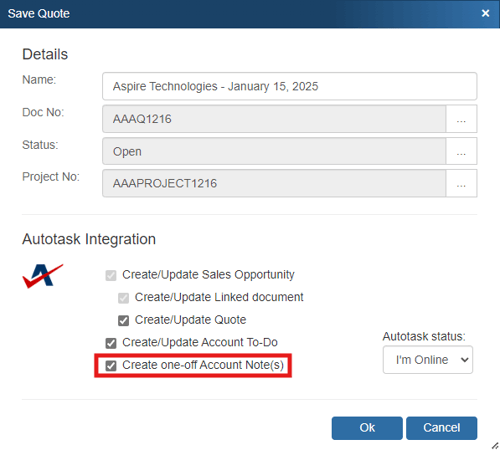
After you hit [Ok] and have created the opportunity, you have the ability to create an Autotask Account Note:

This note can be linked to the account, contact, and the opportunity. This enables users to create notes for other Autotask users about this particular quote including follow-up calls, meetings, notes, etc.. You also have the option of creating just 1 [Save and Close] or creating many [Save and New].
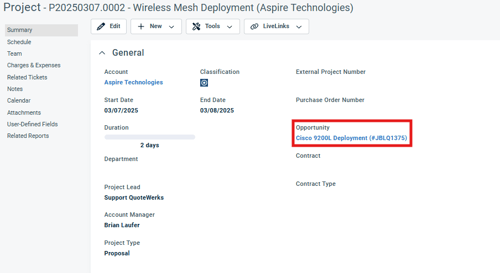
Linking an Opportunity to a Project in Autotask
When you create/update an opportunity in Autotask you have the ability to link it to an existing Project in Autotask. This is done after you save a quote on the Create new Autotask Opportunity window.
IMPORTANT: While the opportunity is used to link the Opportunity to the project, an Autotask quote must also be associated with the Opportunity. Having a quote associated with the Opportunity allows the quote's line items to flow into the Project.
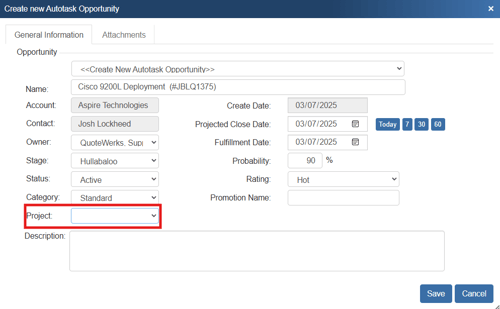
To link an opportunity to a Project the Project must already exist in Autotask and be associated with the sold to company included on the QuoteWerks quote. When you click the drop-down menu next to project you will see a list of all of the projects you have in Autotask for the sold to company.
IMPORTANT: The Project type in Autotask must be equal to Proposal for it to show on the project drop down menu.
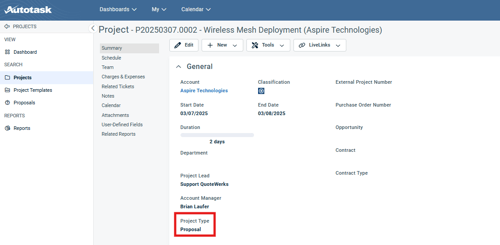
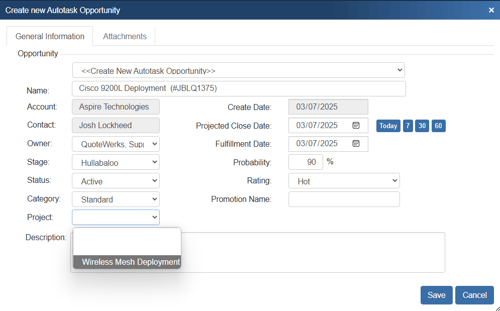
To choose which project to link this Opportunity to click the drop down menu and make your selection. When you hit Save, the Opportunity will be created in Autotask and associated with the Project you selected. You will now see the Opportunity listed in the Opportunity field in the project as seen below.
Using Auto-Links in Autotask
The Auto-Links window creates dynamically generated links on the QuoteWerks Links tab that will link to specific details in Autotask from the QuoteWerks created quote. These links are automatically created and there is no setup involved to use them.
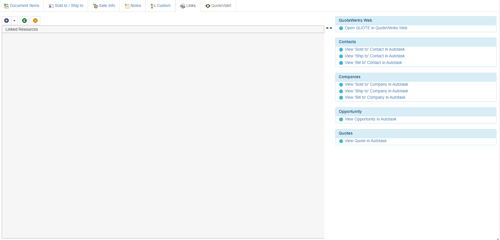
This functionality provides users with an easy way to view the contact(s) from the quote, the opportunity that was created based on this quote, the activity (such as follow up calls), and the Autotask quote associated with this opportunity. Clicking on one of these links will open Autotask and display the link information. For example, clicking on the "View Opportunity in Autotask" link would open this specific opportunity in Autotask for you.
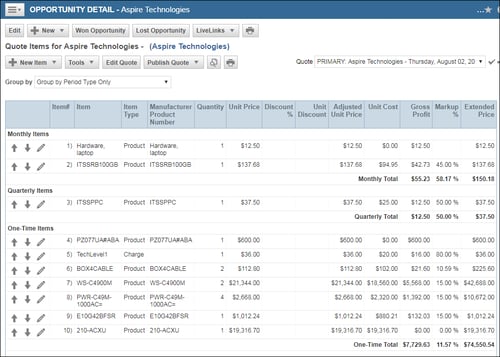
Viewing a Quote in Autotask
Once you have saved the quote to Autotask you can view the in Autotask by opening the opportunity and you will see that QuoteWerks has linked the Autotask quote with that opportunity. The quote will also be listed on the Quotes heading as well.

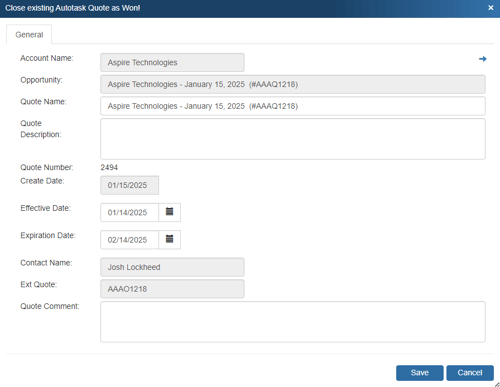
Create/Update a “Closed” Opportunity in Autotask
When a quote is converted to an order or invoice using the File -> Convert to Order/Invoice menu option, the “Close Existing Autotask Opportunity as Closed” window will be displayed IF the QUOTE has been linked to an Autotask opportunity.
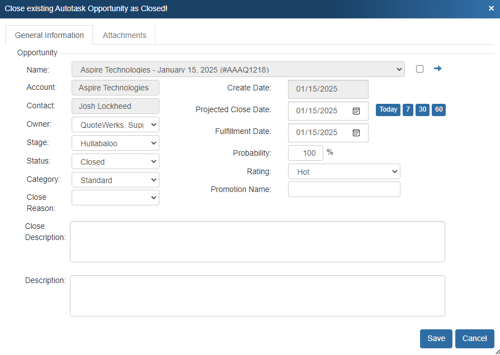
The status will then be set to Closed. This option is only available when the QuoteWerks document is saved as an ORDER or INVOICE.
This “Closed” opportunity can originate in several ways. If there is an existing opportunity for this quote, QuoteWerks will convert the existing opportunity to “Closed”. If there is no existing opportunity and this option is checked, then QuoteWerks will create a new opportunity and mark it as “Closed”.
NOTE: If the “Closed” status already exists on an opportunity and you have made some changes to the order/invoice in QuoteWerks, the opportunity cannot be updated in Autotask as closed opportunities cannot be updated.
This option will create an Autotask Quote or update an existing Autotask Quote in Autotask under the Quotes heading.
Once you have pressed the [OK] button from the File -> Save window, the “Create/Update Quote” window will appear, allowing you to adjust information about the quote such as the Quote Name, Quote Description, Effective Date, Expiration Date, and any Quote Comments:
Recurring Revenue in Autotask
In some cases, your Opportunity may have items that have recurring revenue associated with them. You can set items in QuoteWerks to be recurring by first right clicking on the product or service line item on the Document Items tab and then choose the option “Line Attributes”.
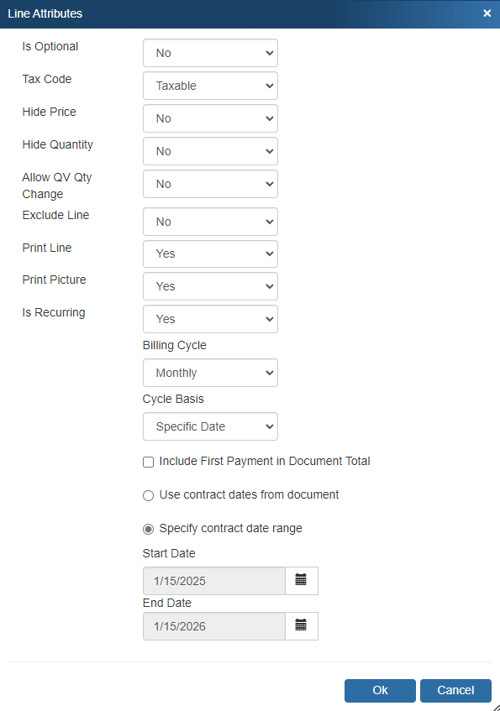
The options on this window are explained in more detail in Line Attributes.
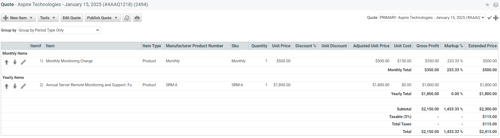
Once the recurring line item defaults have been set, you will be able to view any recurring revenue by opening the newly created quote in Autotask.
F2 Lookup Features
A list item in an F2 Lookup can be setup to retrieve information from your contact manager. For Autotask you can retrieve company or contact information. For a list of fields that you can use, go into the DataLink setup where you add a new field mapping and in the Contact Manager Field drop down you will see a list of all the available fields that can be used.
Example:
~Autotask_Macro (contact->phone_home)
NOTE: See the F2 Lookup section in Customizing QuoteWerks for more details on the F2 Lookup feature.
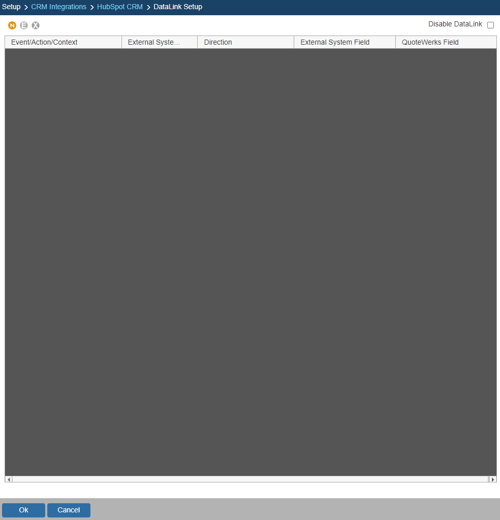
DataLink Setup
The DataLink feature allows you to pull or push additional data from specified fields in QuoteWerks and Autotask. This data from Autotask can be used to complete fields in the QuoteWerks document such as customer terms, custom fields, etc. for the customer. Additionally, by being able to push data into Autotask Opportunities, users can also control some of the data that is sent over to Autotask such as document number, document name, contract dates, and more.
Clicking on the [DataLink] button on the Contact Manager Setup window will display the DataLink setup window.
Contact manager data fields can also be inserted into the print layouts so that the data is copied from the contact manager and then printed on your quote without being stored in the quote itself.
Pulling Additional Autotask Field Data into QuoteWerks
Follow these instructions for setting up the DataLink to pull additional Autotask fields into your QuoteWerks document.
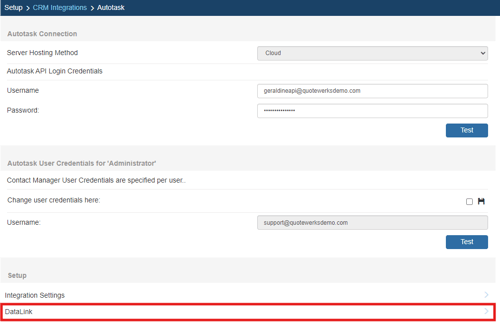
To setup the DataLink, click on Contacts-> Setup Contact Manager menu selection. Click on Autotask then click on the [DataLink] button towards the bottom of the window.
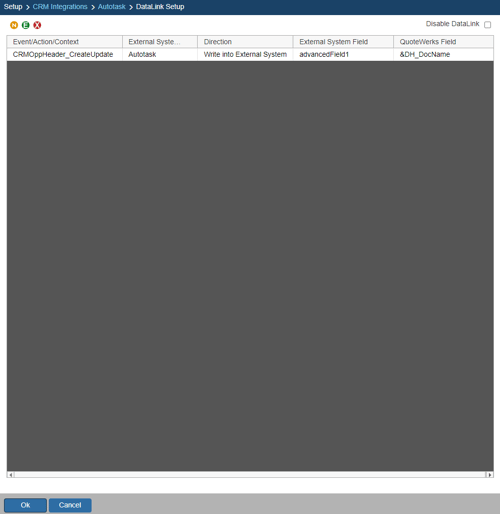
The DataLink Setup window will open. If you have not created a DataLink yet, the fields will be blank:
Create, Edit, Delete DataLinks
The three icons on the top left of the window will allow you to create (![]() ), edit (
), edit (![]() ), and delete (
), and delete (![]() ) DataLinks.
) DataLinks.
Creating a new DataLink
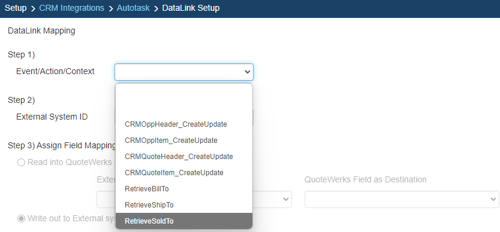
In the following example we are going to walk through how to pull the Account Name field from Autotask and have it populate a Custom Text field on the Custom tab in QuoteWerks. You can pull this and many other fields through the DataLink mapping window. You will need to create a new DataLink for each field you would like to populate however.
Step 1: Click on the create (![]() ) button.
) button.
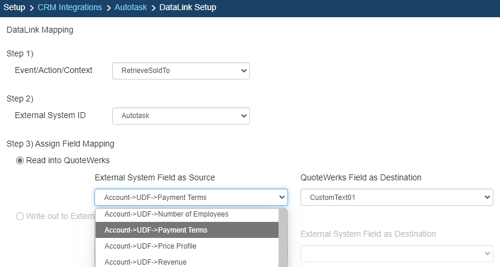
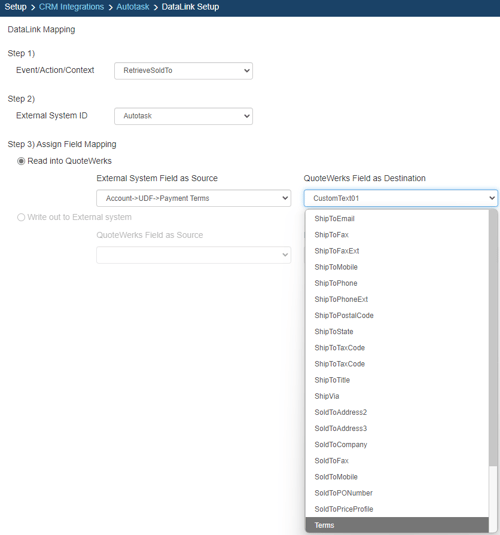
Step 2: On the next window (DataLink Mapping), change the first drop-down menu to RetrieveSoldTo, RetrieveShipTo, or RetrieveBillTo. Your selection here will determine when the field from your Autotask is pulled into QuoteWerks (i.e. the filed data is pulled in when pulling the contact details into the Sold to, Ship to, or Bill to fields).
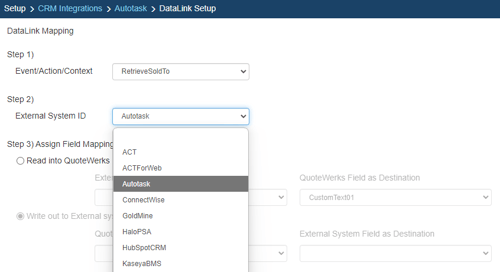
Step 3: Under the External System ID field, change the drop down to Autotask.
Step 4: On the next field of Assign Field Mapping click on the radial button for Read into QuoteWerks.
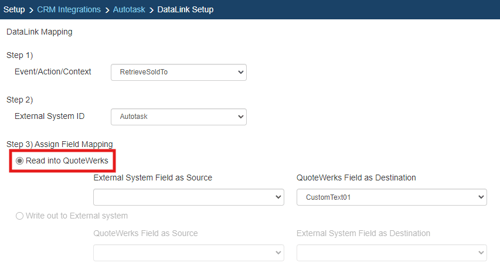
Step 5: The drop down for External System Field as Source will list the fields available from Autotask. Select the field you would like to pull into QuoteWerks.
Step 6: Once your External field as source is selected, choose the QuoteWerks field that you would like the data from Autotask to populate in the QuoteWerks Field as a Destination.
Step 7: Click [Ok] to complete the DataLink Mapping.
Editing an existing DataLink
To edit an existing DataLink, highlight the link and click on the edit (![]() ) button. This will open the DataLink Mapping window and allow you to change any of the fields previously set for that DataLink.
) button. This will open the DataLink Mapping window and allow you to change any of the fields previously set for that DataLink.

Deleting an existing DataLink
To delete an existing DataLink, highlight the link and click on the delete (![]() ) button. This will remove that specific DataLink from your system. Please note, this cannot be undone.
) button. This will remove that specific DataLink from your system. Please note, this cannot be undone.
Disabling a DataLink
Disabling a DataLink will let users disable the DataLink from working without having to remove the link. This is very useful if you need to stop a DataLink from working for a period of time, but do not want to remove it from the DataLink list.
To disable a DataLink, highlight the DataLink and click on the checkbox for Disable DataLink. Uncheck it to re-enable the DataLink.
Pushing Additional QuoteWerks Fields into Autotask
To setup the DataLink, click on Contacts-> Setup Contact Manager menu selection. Click on Autotask then click on the [DataLink] button towards the bottom of the window.

The DataLink Setup window will open. If you have not created a DataLink yet, the field will be blank:

Create, Edit, Delete DataLinks
The three icons on the top left of the window will allow you to create (![]() ), edit (
), edit (![]() ), and delete (
), and delete (![]() ) DataLinks.
) DataLinks.
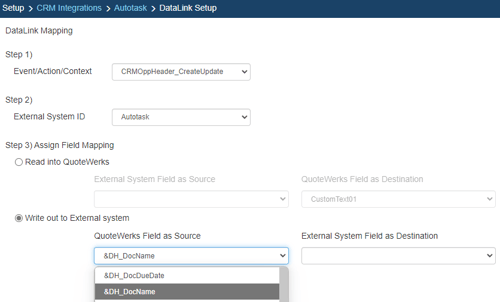
Creating a new DataLink
In the following example we are going to walk through how to push the Document Name from QuoteWerks and have it populate an opportunity field in Autotask. You can push a variety of fields through the DataLink mapping window. However, you will need to create a new DataLink for each field you would like to populate in the Autotask Opportunity.
Step 1: Click on the create (![]() ) button.
) button.
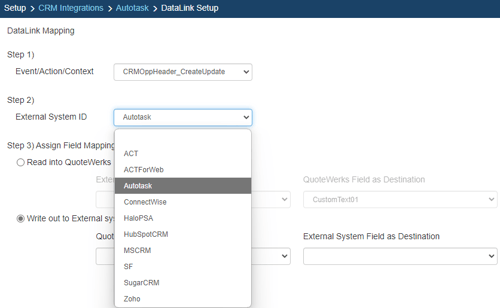
Step 2: On the next window (DataLink Mapping), change the first drop-down menu to CRMOppHeader_CreateUpdate to choose to push a DocumentHeader field from QuoteWerks to the Autotask Opportunity or CRMOppItem_CreateUpdate to push a DocumentItem field from QuoteWerks to Autotask opportunity.

Step 3: Under the External System ID field, change the drop down to Autotask.
Step 4: On the next field of Assign Field Mapping click on the radial button for Write out to External System.
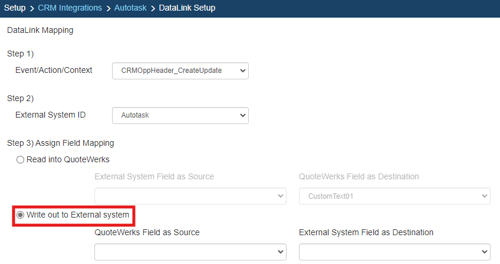
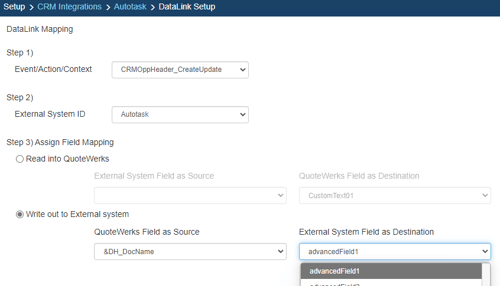
Step 5: The drop down for QuoteWerks Field as Source will list the fields available from QuoteWerks. Select the field you would like to push to Autotask.
Step 6: Once your QuoteWerks Field as Source is selected, choose the Autotask field that you would like the data from QuoteWerks to populate in the External System Field as Destination.
Step 7: Click [Ok] to complete the DataLink Mapping.
Editing an existing DataLink
To edit an existing DataLink, highlight the link and click on the edit (![]() ) button. This will open the DataLink Mapping window and allow you to change any of the fields previously set for that DataLink.
) button. This will open the DataLink Mapping window and allow you to change any of the fields previously set for that DataLink.

Deleting an existing DataLink
To delete an existing DataLink, highlight the link and click on the delete (![]() ) button. This will remove that specific DataLink from your system. Please note, this cannot be undone.
) button. This will remove that specific DataLink from your system. Please note, this cannot be undone.
Disabling a DataLink
Disabling a DataLink will let users disable the DataLink from working without having to remove the link. This is very useful if you need to stop a DataLink from working for a period of time, but do not want to remove it from the DataLink list.
To disable a DataLink, highlight the DataLink and click on the checkbox for Disable DataLink. Uncheck it to re-enable the DataLink.