
This article takes you through using the ConnectWise Integration in QuoteWerks. This will show you how to pull ConnectWise customer records into sales quotes, create ConnectWise opportunities, and more.
Most of the features described in this topic's sub-topics require that you've already pulled the account/contact information into the Sold to / Ship to tab of the Quote Workbook.
NOTE: When this is done, the ConnectWise account number embeds into the quote. QuoteWerks uses this account number to write information back to ConnectWise
This article includes information on the following topics:
- Pulling ConnectWise Account/Contact Information into QuoteWerks
- ConnectWise Online/Offline Status
- Recurring Revenue in ConnectWise
- Creating/Updating ConnectWise Sales Opportunities
- Creating ConnectWise Projects
- Creating ConnectWise Service Tickets
- Writing Grouped Bundles from QuoteWerks into ConnectWise
- Creating or Updating a Linked Document in ConnectWise
- Creating or Updating a Follow-Up Call in ConnectWise
- Creating a One-Off Activity in ConnectWise
- Sending Agreements from QuoteWerks to ConnectWise
- Starting a New Quote from Inside ConnectWise
- Using Auto-Links in ConnectWise
- Viewing a Quote in ConnectWise
- Creating Purchase Orders in ConnectWise
- F2 Lookup Features
- Accessing QuoteValet Insight from ConnectWise
- Accessing QuoteWerks Web from ConnectWise
- DataLink Setup
Pulling ConnectWise Account/Contact Information into QuoteWerks
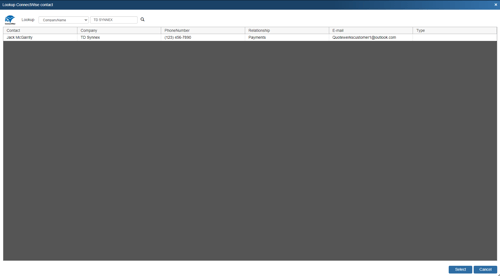
To retrieve account/contact information from ConnectWise into QuoteWerks, first select the Sold to / Ship to tab. Click on the ![]() button next to the Sold to, Ship to or Bill to boxes. The Lookup ConnectWise contact window will appear:
button next to the Sold to, Ship to or Bill to boxes. The Lookup ConnectWise contact window will appear:
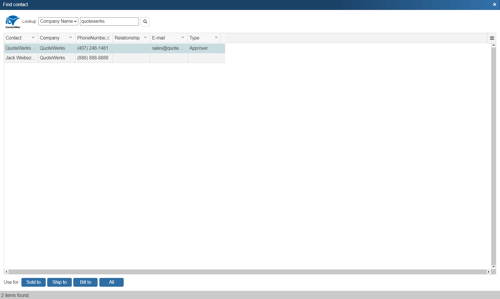
You can search for a ConnectWise Company to use in the quote, or you can search by a contact’s First Name, Last Name, Phone number, or Territory.
Select the field that you want to use in the search and then enter the corresponding value. When you click on the [Find] button, the results of your search will be displayed.
Once you have found the account or contact you are looking for, select the record and click on the [Sold To] button to use this record for the Sold to information. You can also select a record and click on the [Ship To] button to use this record for the Ship to information or you can click on the [Bill To] button to use this record for the Bill to information. When you are finished selecting records, click on the X at the top right of the window. You will be returned to the Sold to/ Ship to tab and the selected records will be pre-filled in the Sold to/Ship to/Bill to fields.

If the record you selected has multiple sites for it defined in ConnectWise, you will be prompted to choose the particular site you want to use. In ConnectWise, sites can be designated as Primary, Default Ship, Default Bill, and Default Mail. These designations are indicated within the selection list. Additionally, when selecting a Ship To contact for the quote, on the Select Address window, the ‘Default Ship’ site as defined in ConnectWise will be selected by default.
QuoteWerks will also write the Ship to and Bill to contact information into the opportunity in ConnectWise as long as the contact information is originally pulled from ConnectWise into the Ship to and Bill to QuoteWerks fields. Any manual data added or changed in the Ship to and Bill to fields will not populate in ConnectWise. This feature requires ConnectWise 2018.4 and higher.
TIP: If you want to use the ConnectWise Manage Ship to/ Bill to contact information by default instead of the QuoteWerks Ship to/ Bill to contact information, you can apply a new setting to the Settings Manager. Use the settings SystemSettings\ConnectWise\DontSetShipToContactInOpportunity=-1 AND SystemSettings\ConnectWise\DontSetBillToContactInOpportunity=-1 and when these are set QuoteWerks will not copy the Ship to/Bill to information from QuoteWerks to ConnectWise Manage.
TIP: If you want QuoteWerks to pull in the phone number from ConnectWise Manage in an un-formatted format (no spaces or dashes), add this setting to the Settings Manager: SystemSettings\ConnectWise\DontFormatPhoneNumber=-1. This is helpful for Australian users.
ConnectWise Online/Offline Status
On the Save window there is an “I’m Offline” option that enables you to save the quote and not attempt to integrate with ConnectWise.
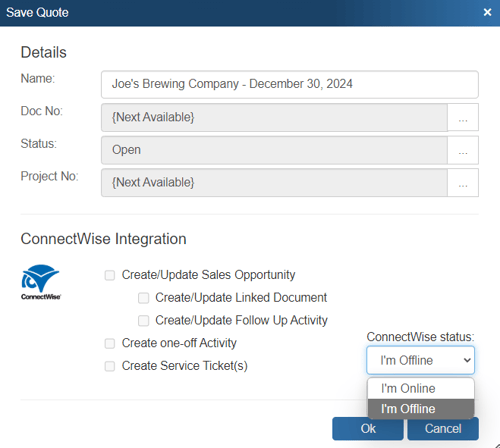
With this option, it is now easy to still save quotes in QuoteWerks even though ConnectWise is not available. Please note, any quotes saved while offline will need to be re-opened, linked to a ConnectWise contact and saved in order to update ConnectWise online.
Recurring Revenue in ConnectWise
In some cases, your Opportunity may have items that have recurring revenue associated with them. You can set items in QuoteWerks to be recurring by first right clicking on the product or service line item on the Document Items tab, and then choose the option “Line Attributes”:
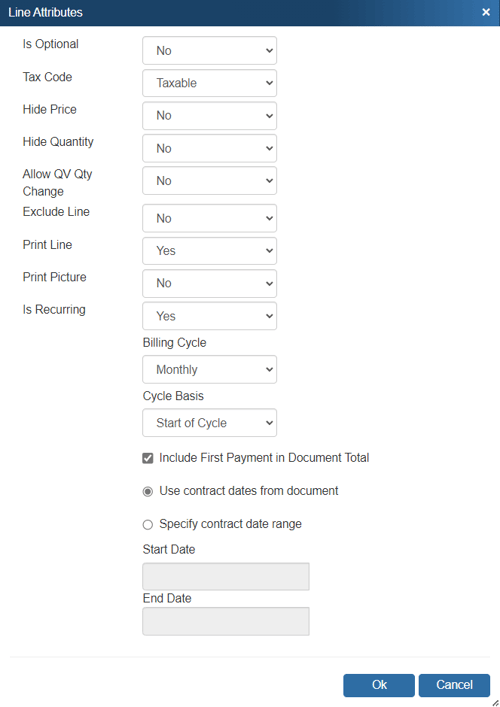
The options on this window are explained in more detail in Line Attributes. If the option "Include First Payment in Document Total" for recurring revenue is checked, the base cost and price and the recurring cost and price will be set in the line item in the ConnectWise opportunity. If it is left unchecked, the base cost and price will be set to $0.00, but the recurring cost and price will be set in the line item opportunity.
In ConnectWise, recurring revenue forecast lines cannot represent a group of individual line items under the Opportunity’s Products tab.
If you use recurring revenue lines in QuoteWerks, under the Forecast Lines subtab on the Opportunity tab you will need to check the box to create / update the individual product items checkbox. If you don’t the recurring items won’t be written over until your opportunity has been converted to an order or invoice.
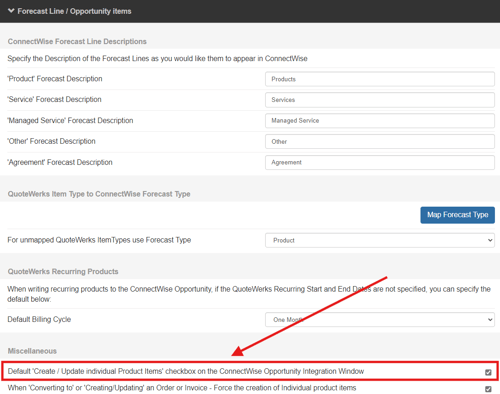
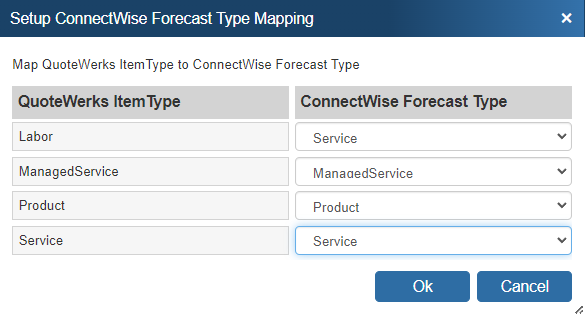
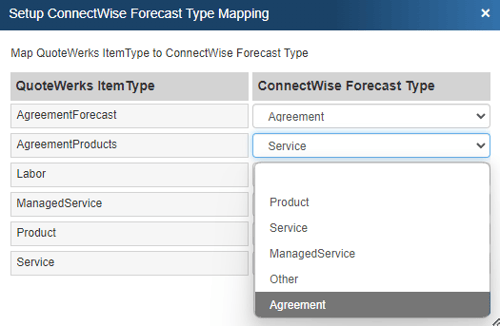
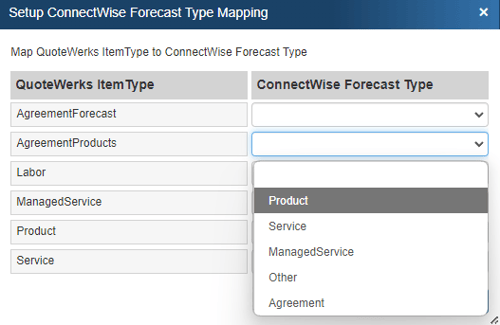
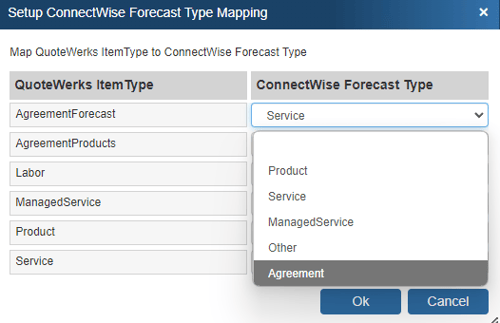
If you do not need the individual products and services to be listed, you will need to make sure to map the QuoteWerks ItemType to the ConnectWise Forecast Type of "Service', “Managed Service”, or "Other". If you want all individual lines to show up, be sure to set all the Forecast types to "Product"
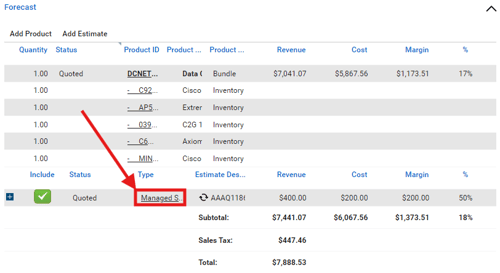
Once the recurring line-item item defaults have been set, when an Opportunity is created in ConnectWise, you will be able to view the recurring revenue. The ![]() icon represents recurring items in the ConnectWise forecast.
icon represents recurring items in the ConnectWise forecast.
Creating/Updating ConnectWise Sales Opportunities
When saving a document, the “Create/Update Sales Opportunity” checkbox will appear on the Save window:
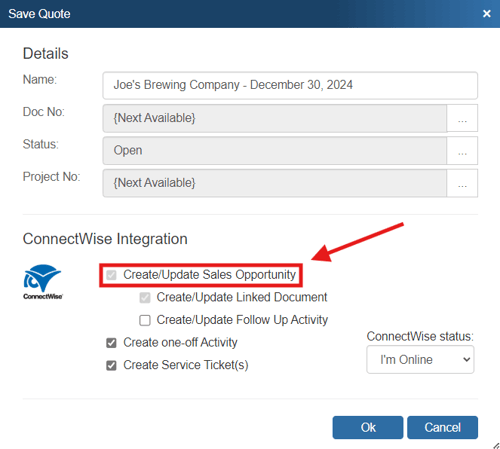
This option will create or update a ConnectWise opportunity or attach to an existing opportunity in ConnectWise.
NOTE: This checkbox will NOT appear if you are saving a quote template.
Opportunity
Once you have pressed the [OK] button from the File -> Save or File -> Save As window, the “Create/Update ConnectWise Opportunity” window will appear, enabling you to enter or adjust information about the opportunity such as the Opportunity Name, Type, Status, Description, Close Date, Rating, Sales Stage, Probability %, Source, Marketing Campaign, Location, and Business Unit:

The Opportunity drop down will contain a list of all existing ConnectWise opportunities associated with the ConnectWise contact record on the Sold To / Ship To tab in QuoteWerks. If you have not already created a new opportunity for this quote, here you can select an existing opportunity to update with the current quote’s information.
You can also set the Primary Sales Rep when creating/updating the opportunity as well as the internal sales rep.
At the bottom of the opportunity window the user can also select to create / update the individual product items. Unchecking this box will not create the products in the opportunity. This can be useful if you don’t want to send over products to ConnectWise that you might not ever sell if you don’t win the deal. This will also enable users to only create products that have been sold when converting the quote to an order or invoice. This setting can be defaulted under Contacts-> Setup Contact Manager-> ConnectWise-> Opportunity Setup-> Products.
TIP: A link to open the document in QuoteWerks Web will be added to the ConnectWise Opportunity when creating or updating the opportunity via QuoteWerks.
Forecast Lines

This section corresponds to information on the Forecast tab of the ConnectWise Opportunity. The “Forecast Status” field corresponds to the “Status” field on the Forecast tab in ConnectWise and the “Include Revenue in Total Forecast” option corresponds to the “Include” checkbox on the Forecast tab in ConnectWise.
The Forecast Prefix field is unique to the QuoteWerks integration with ConnectWise and is particularly useful as it makes it easy to identify which QuoteWerks quote is associated with each Forecast Line on the Forecast tab.
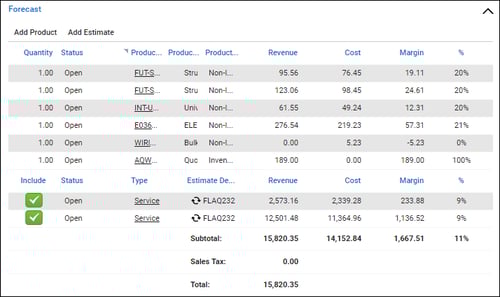
While the Prefix will default to the quote number, it can be modified manually as needed either during the creation of the Opportunity or within ConnectWise.
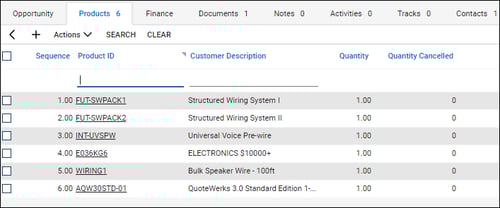
Additionally, all products from the QuoteWerks quote are written over to ConnectWise under the Products tab in the opportunity. If a negative quantity has been specified for a product, the negative quantity will also be reflected when written over to the Products tab. When creating the items in ConnectWise, if the manufacturer does not exist for a product, it will automatically be created in ConnectWise when written to the opportunity. Manufacturer part numbers will also be added to the manufacturer part number field in ConnectWise as well.
If an item from QuoteWerks contains a vendor in the "Vendor" field in QuoteWerks and it exactly matches the vendor name in ConnectWise, the vendor name will be populated to the ConnectWise procurement item. If an exact match is not found, then the vendor name will not carry over.
Opening a Selected Opportunity
The Create/Update Opportunity window includes an easy way to view an already linked opportunity in QuoteWerks. By clicking on the ![]() button, users can view the opportunity directly in ConnectWise. This is very useful if you are attaching a new quote to an existing opportunity and you want to make sure it is the correct opportunity before saving it.
button, users can view the opportunity directly in ConnectWise. This is very useful if you are attaching a new quote to an existing opportunity and you want to make sure it is the correct opportunity before saving it.

Unlinking an Opportunity
If you accidentally attached a quote to the wrong opportunity in ConnectWise, you can use the ![]() button to remove the link.:
button to remove the link.:

All entries relating to the QuoteWerks Quote will be removed from the ConnectWise opportunity, including: Forecast lines, products listed under the Products Tab, services listed under the Services Tab, the document attachment under the Documents Tab, and the Call activity under the Activities Tab. This button will only be displayed when updating an existing opportunity, so if you realize you made a mistake, choose to update the opportunity, and then at that point, use this button to unlink it.
By creating opportunities in ConnectWise, ConnectWise can generate pipeline reports. This feature helps you estimate your cash flow. If you already have an opportunity for this quote, it will automatically update the existing one to reflect changes you have made to the quote.
QuoteWerks claims ownership of ConnectWise opportunities that were created or updated from within QuoteWerks. It is not recommended that you manually make changes to the opportunity from within ConnectWise as these changes may be overwritten by QuoteWerks when QuoteWerks is updating the ConnectWise opportunity.
Creating a “Won” Opportunity
This option will mark the Forecast in the ConnectWise opportunity as Won. This option is only available when the QuoteWerks document being saved is an ORDER or INVOICE. A quote is converted to an order or invoice using the File -> Convert to Order/Invoice menu. When this menu is selected, the “Update Existing ConnectWise Opportunity” window will be displayed if the QUOTE has been linked to a ConnectWise opportunity:
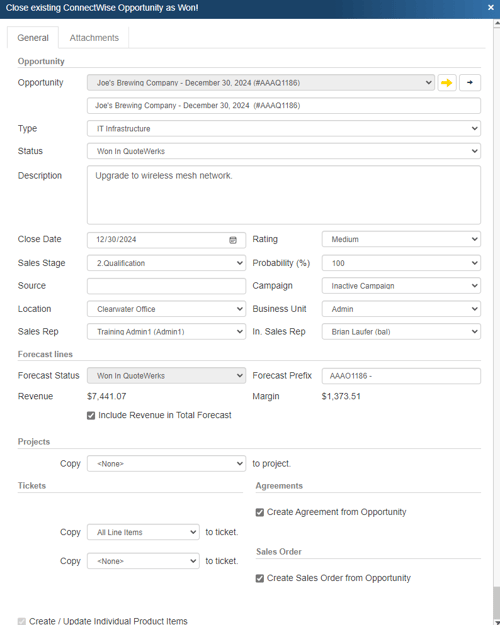
The Opportunity status can be changed to whichever opportunity status you want to select. It will use the default status set in the setup if you do not change it.
This “Won” Forecast can originate in several ways. If there is an existing opportunity for this quote, QuoteWerks will convert the Forecast line on the existing opportunity to “Won”. If there is no existing opportunity and this option is checked, then QuoteWerks will create a new opportunity, attach the Forecast and make it as “Won”. Last, if the “Won” Forecast already exists on an opportunity and you have made some changes to the order/invoice, then the “Won” Forecast record will be updated.
Once you have clicked the [Ok] button from the File -> Save, or File -> Save As window, the “Update Existing ConnectWise Opportunity” window will appear, enabling you to add new or modify existing information for the opportunity. The Status and Probability fields will not be modifiable when working with a “Won” opportunity, however.
Creating ConnectWise Projects when Converting a Quote to an Order
On the bottom of the Opportunity window there is an option to create a Project in ConnectWise Manage from this selected opportunity. You'll have the option to create a project from all the items in the opportunity, all items except Agreement items, only phased groups, or none of the items. This will convert these items into a new or existing project.
![]()
For more information on how to create projects in ConnectWise when converting a Quote to an Order, please see Creating ConnectWise Projects.
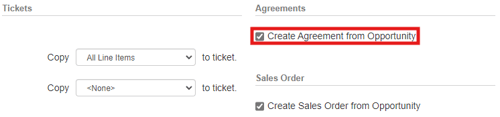
Creating ConnectWise Agreement when Converting a Quote to an Order
On the bottom right of the "Update Existing ConnectWise Opportunity" window, there is an option for QuoteWerks to create an Agremeent in ConnectWise from this selected opportunity. Checking this box will link all the products, notes, and documents from the ConnectWise Opportunity to the new Agreement in ConnectWise. This option will only be available when you are converting a quote to an order in QuoteWerks to complete the opportunity. If you need to create a new item, that is not setup as an agreement in ConnectWise, see the Sending Agreements to ConnectWise topic for proper mappings.
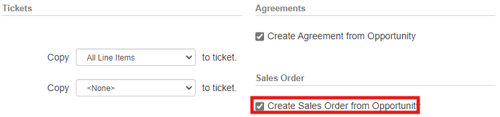
Creating ConnectWise Sales Orders when Converting a Quote to an Order
On the bottom right of the "Update Existing ConnectWise Opportunity" window, there is an option for QuoteWerks to create the Sales Order in ConnectWise from this selected opportunity. Checking this box will link all the products, notes, and documents from the ConnectWise Opportunity to the new Sales Order in ConnectWise. This option will only be available when you are converting a quote to an order in QuoteWerks to complete the opportunity.
In QuoteWerks, the ConnectWise SO number will be saved into the QuoteWerks line items that were added to the ConnectWise Sales Order in the SONumber column in QuoteWerks. This is very useful as this is a searchable column in the Open Document window and the QuoteWerks Purchasing Window.
Creating Service Tickets when Converting to an Order
Additionally, at the bottom of the update opportunity window users will be able to copy the products and services associated with the opportunity to a ticket. Users will have the options to copy products only, services only, products and services, or each service item to their own ticket.

TIP: You can set the default values of the Copy drop-down boxes under the Service Ticket Defaults section on the ConnectWise Setup window.
Once users have made their selections to create their tickets the Create/Update New Service Ticket window will open and enable the users to make their selections for the specific ticket (Product, Services, Each Service, All Line Items, etc.):
Users will also be able to link a single ticket with the opportunity in ConnectWise by checking the box. Additionally, if a ticket already exists and you wish to link with the existing ticket, simply click on the ticket drop-down menu and select the ticket you would like to link to. Once you have linked to a ticket, you will see a new icon is available (![]() ) which will let you view this ticket in ConnectWise.
) which will let you view this ticket in ConnectWise.
This window will continue to open until all tickets have been created.
As tickets are created for each line item in the quote, the ConnectWise ticket number will be written into the TicketNumber column under the Quote Workbook's Document Items tab. This number is very helpful later, when you're in the Purchasing window. Here, you'll be able to easily see all the items that need to be purchased for any particular service ticket. And after the items are ordered, you can also review Real-time order status for all items on a particular ticket number.
See Creating ConnectWise Service Tickets for more information on service tickets and Creating Purchase Orders in ConnectWise for more information on Purchase Orders.
Creating ConnectWise Projects
When converting a Quote to an Order you will be presented with the opportunity to create a ConnectWise project.

Here you can choose to copy All Items, All Items except Agreement Items, or Only Phased Groups to a project. If you select <None> a project will not be created.
If you have chosen to copy any items to a project the following window will appear after converting the opportunity:
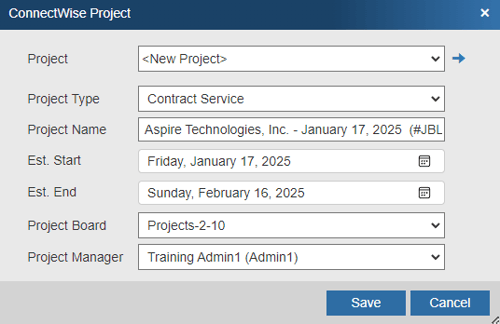
Project: Here you can choose to create a new project or link to an existing project in ConnectWise. Clicking the button will bring you to the project in ConnectWise. If you are creating a new project pressing this button will bring you to a new project in ConnectWise.
Project Type: This field pulls the project types from ConnectWise and allows you choose which one to use.
Project Name: This defaults to the document name, but can be edited to whatever makes the most sense for your business.
Est. Start: This is the estimated start date for the project and will default to the date on which the opportunity was converted.
Est. End: This is the estimated end date for the project and will default to the expiration date as set on the Sale Info tab.
Project Board: Here you can select which project board you would like this project to be associated with.
Project Manager: This is the user in ConnectWise who will be assigned as the project manager.
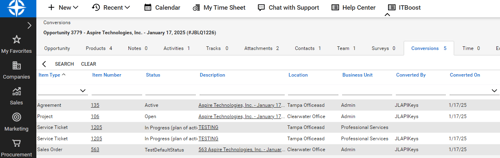
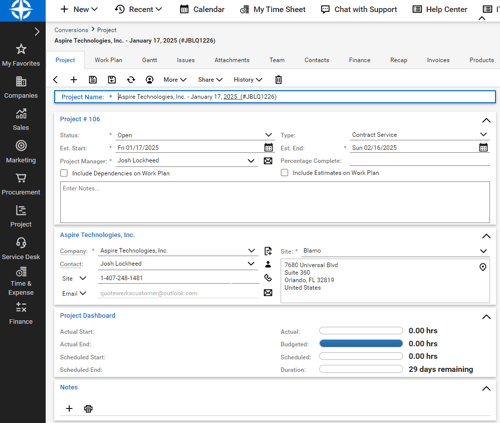
After you make your selections and hit [Save] your newly created project will then be listed under the conversions tab in the ConnectWise Opportunity:
Clicking on that project will bring up the project record as seen below:
Creating ConnectWise Service Tickets
IMPORTANT: QuoteWerks supports creating ConnectWise Service Tickets in ConnectWise 2012.1 and higher.
QuoteWerks enables you to create Service Tickets in ConnectWise. There are two different ways to create service tickets: when saving a quote and when creating or updating a "won" opportunity.
When Saving a Quote
First, when saving the quote, you can choose to create a single ticket or multiple service tickets (with or without creating/attaching an Opportunity). This is great for creating a Service Ticket for a site survey, or to initiate any processes needed when creating a new quote or saving changes to an existing quote. Often these service tickets would be created before saving the quote as an opportunity in ConnectWise.
When you save a document, the Create Service Ticket(s) checkbox will appear on the Save Quote As window.
NOTE: This checkbox will NOT appear if you are saving a quote template.
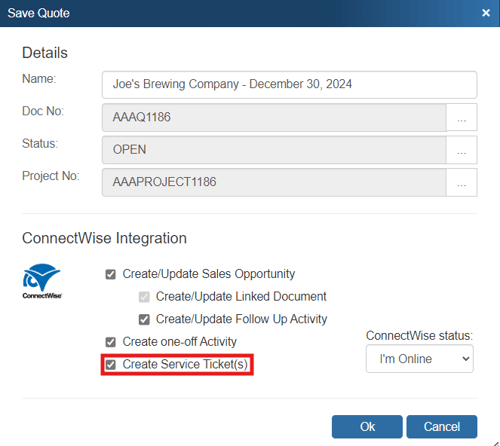
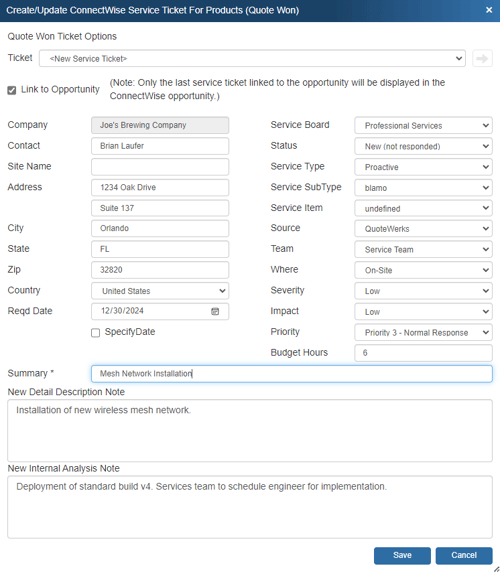
This selection will bring up the Create ConnectWise Service Ticket window. On this window, you can select your options for the new Service Ticket including Status, Service Type, Service Sub Type, Service Item, Source, Where, Severity, Impact, Priority, and Budget Hours.

There is also a Summary field. This field is required in order to save the ticket into ConnectWise. The other two fields, New Detail Description Note and New Internal Analysis Note, are not required, but enable you to add additional details about this ticket.
You then have the option to Save & New to create the new ticket in ConnectWise and begin a new one so you can enter in multiple tickets. Otherwise, just click Save to create just the ticket you're currently working on.
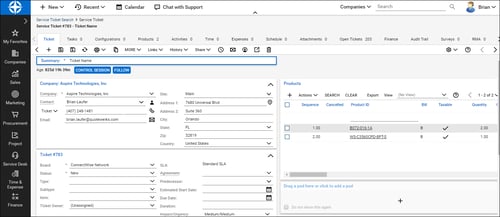
The Service Ticket will display under the corresponding company's Service tab in ConnectWise.
NOTE: Only the latest service ticket linked to the opportunity will be displayed in the actual ConnectWise opportunity.
When Creating or Updating a "Won" Opportunity
The second way to create service tickets in ConnectWise is when creating or updating a “Won” Opportunity. During this process, ConnectWise service tickets can be automatically created based on the items in the quote. See Creating or Updating a “Won” Opportunity for more information.
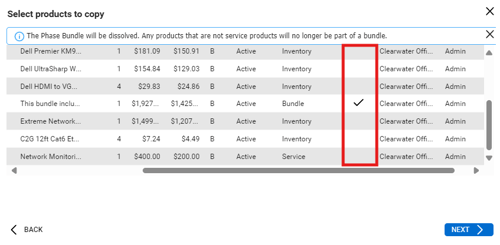
Writing Grouped Bundles from QuoteWerks into ConnectWise
QuoteWerks Grouped Bundles are supported in ConnectWise Opportunities. When creating/updating a ConnectWise Opportunity, QuoteWerks Grouped Bundles are created in the ConnectWise Opportunity as Bundles under the Forecast tab in ConnectWise. This is not an existing ConnectWise bundle - it is a new one that you're creating inside ConnectWise when you create/update the Opportunity from QuoteWerks.
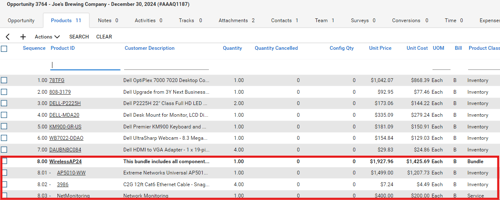
In the ConnectWise Opportunity, you'll see the Bundle header Product ID (in this case, QWBundle) and the corresponding products that make up that Bundle. When QuoteWerks creates the ConnectWise Bundle in the ConnectWise Opportunity, the ConnectWise Bundle Product ID will use the Product ID specified in the setup field ConnectWise Bundle Product ID. This is located on the Bundles sub-tab of the ConnectWise Setup window in QuoteWerks.
NOTE: The QuoteWerks Bundle item attributes of HidePrice and HideQuantity are transferred over to the ConnectWise Opportunity Bundle.
If the Group Header line item in QuoteWerks has a value entered in the field that is mapped to the ConnectWise Product ID, then QuoteWerks will attempt to use that Product ID as the ConnectWise Opportunity Bundle line Product ID. If the Product ID does not exist in ConnectWise, QuoteWerks will create it, with no items in the bundle. This is because the bundle has a blank manufacturer part number. If the items in the Bundle have a vendor and/or Vendor Part number set, that information will carry over as well.
When you send a bundle from QuoteWerks to ConnectWise, if the bundle has the same manufacturer part number (in ConnectWise, Product ID) as an existing ConnectWise bundle and that ConnectWise bundle has items in it, QuoteWerks will create the initial bundle and also add items from the existing ConnectWise bundle with the same manufacturer part number/Product ID. This will result in the bundle containing duplicate items, and/or items that weren't included in the initial QuoteWerks quote.
When you create products within a Bundle in ConnectWise, all applicable standard product mappings, such as Product Type, Category/SubCategory, and Unit of Measure, are applied.
NOTE: If you receive an error in QuoteWerks stating "You can not add a bundle class product as a component", it means there is an line item in the QuoteWerks Group that is using a part number that is defined in ConnectWise as a Bundle itself. In ConnectWise and QuoteWerks, Bundles cannot include other Bundles.
Using Project Phases
Project Phase mapping enables users to map item types as project phases. Mapping specific item types as a project phase will flag that particular item or items in ConnectWise as a job phase.
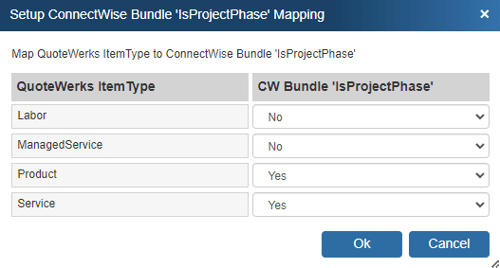
When that opportunity is converted to a project within ConnectWise, those items will now generate as ConnectWise project phases.
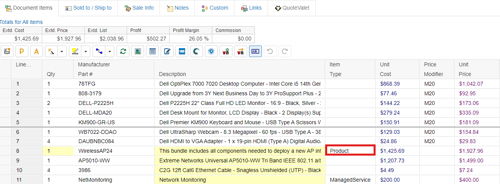
For example, below is a screenshot of how the quote might look when setup to use project phases. Notice the bundle heading lines have an item type that matches the mappings in the screenshot above:
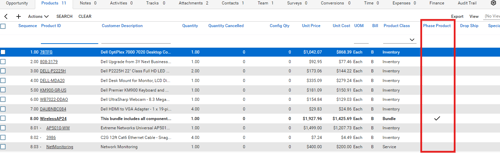
When this is saved back into the ConnectWise, the items on the Product tab in the opportunity will look similar to this:
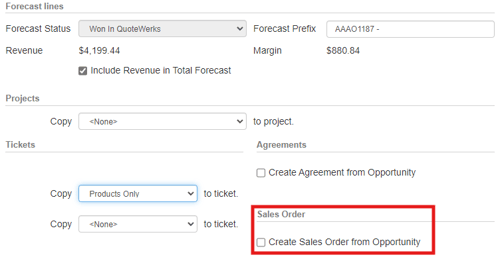
After the client has accepted the quote, convert the quote to order (File-> Convert to Order) to start the conversion process and update the opportunity as won in ConnectWise. On the Opportunity Window, ensure that the option to "Create Sales Order from Opportunity" is left unchecked.
Next, in ConnectWise, convert your Opportunity to a project and either create a new project or update an existing project, and select the products to copy to the project. The Group Header items will be marked as Phases for the project and then create the project phases in ConnectWise.
Creating or Updating a Linked Document in ConnectWise
When you e-mail a quote or proposal to your customer, the PDF of the document is automatically attached to the opportunity so other people in your organization who don't have QuoteWerks can open and view quotes. This is especially useful for technicians and service reps.
When saving a document, the Create/Update Linked document checkbox will appear on the Save Quote As window.
Linked documents must be attached to a ConnectWise Opportunity, so if an Opportunity does not already exist for this record, you'll need to also have the Create/Update Sales Opportunity box selected.

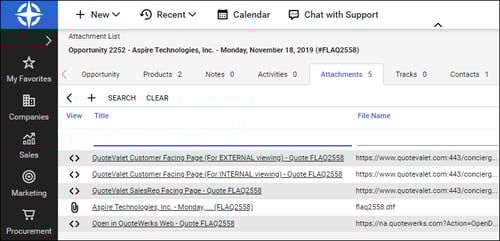
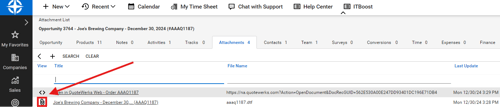
When saving a quote, QuoteWerks automatically creates a link to the quote under the Documents tab in the ConnectWise Opportunity:
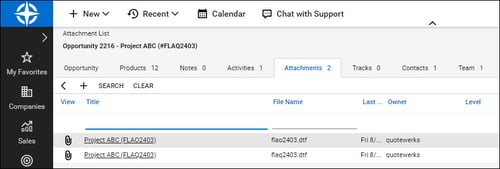
Additionally, when you're working with contacts in ConnectWise, you'll see all the quotes you've created for them. You can even click on the attachment, and QuoteWerks will open and display the quote the attachment refers to. This feature is very useful for organizing and finding your quotes from within ConnectWise. If this is a remote install or satellite office, opening that document link will import that quote into that QuoteWerks installation.
If using QuoteValet, QuoteWerks will also copy the Sales Rep facing URL, the Internal QuoteValet URL, the External URL, and a link to view the quote in QuoteWerks Web onto the Attachments tab in ConnectWise so you have an quick link to view the documents.
Creating or Updating a Follow-Up Call in ConnectWise
When you save a quote, QuoteWerks offers to schedule a call activity for you in ConnectWise. As you update your quote, you have the ability to update this same call activity in ConnectWise. By scheduling follow-up calls, you increase your chances of closing the sale!
When you save a document, the Create/Update Follow up Activity checkbox will appear on the Save Quote As window.
NOTE: This checkbox will NOT appear if you are saving a quote template.
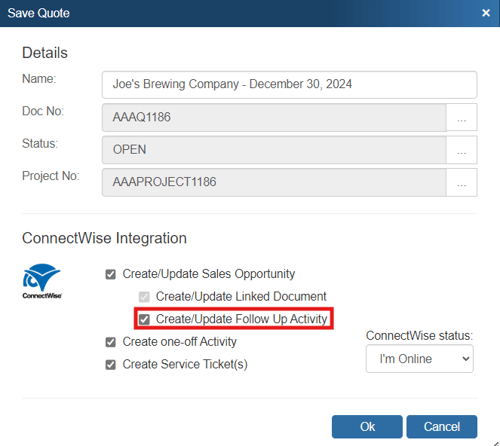
This option will create a ConnectWise Follow up Call or update an existing Follow up Call in ConnectWise under the Activities tab.
NOTE: If QuoteWerks has already created a follow-up call, keep in mind that the same follow-up call will simply be updated each additional time you save the call and choose the Create/Update Follow up Activity option
Once you've clicked the [OK] button from the File -> Save, or File -> Save As menu, the Create ConnectWise Activity window will appear, allowing you to adjust information about the activity such as the Subject, Reminder, Due Date, Start Time, End Time, and Notes. You can also choose what type of activity you'd like to schedule from the Type drop-down box, as well as who you'd like to assign the activity to from the Assign To drop-down box.
In ConnectWise, the call activity will be listed under the Activities tab of the Opportunity (as shown below), as well as the Contact.

Creating a One-Off Activity in ConnectWise
When you save a quote, QuoteWerks enables you to create additional activities in ConnectWise. These one-off activities can be one of the pre-defined activities in ConnectWise, or one you've customized for your own internal business-process flow.
When you save a document, the Create one-off Activity checkbox will appear on the Save Quote As window.
NOTE: This checkbox will NOT appear if you are saving a quote template.
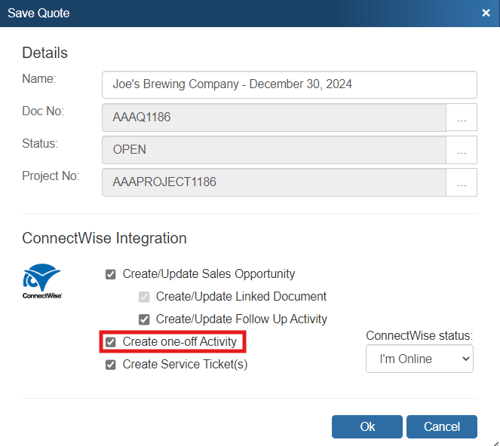
Unlike creating or updating a follow-up call, this option will create a one-off activity in ConnectWise every time you save the document with Create one-off Activity selected.
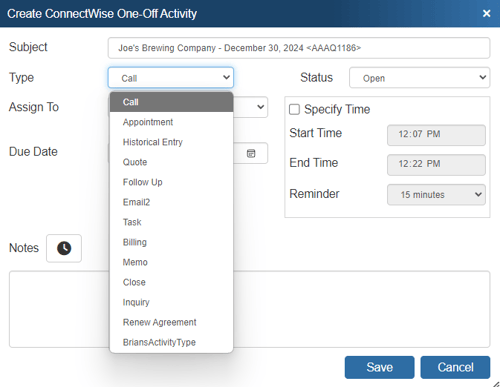
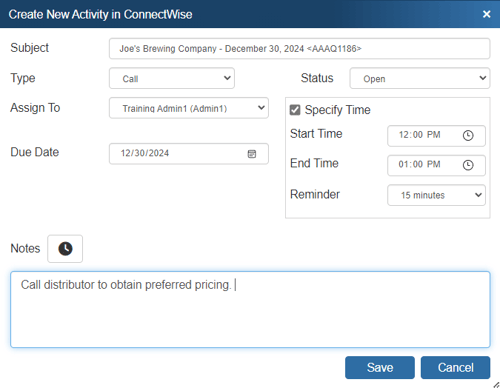
Once you've clicked the [OK] button from the File -> Save menu, the Create ConnectWise One-Off Activity window will appear, allowing you to adjust information about the activity such as the Subject, Reminder, Due Date, Start Time, End Time, and Notes. You can also choose what type of activity you'd like to schedule from the Type drop-down box, as well as who you'd like to assign the activity to. The latter is very useful if you need to assign someone to the activity who didn't create the quote.
In ConnectWise, the activity will be listed under the Activities tab of the Opportunity (as shown below), as well as the Contact.

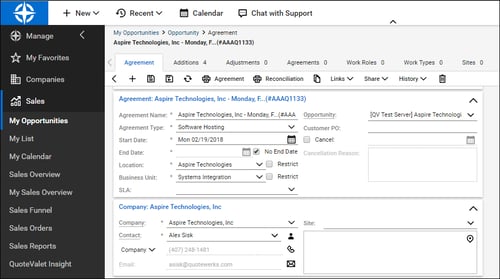
Sending Agreements from QuoteWerks to ConnectWise
IMPORTANT: Before implementing an Agreement workflow from QuoteWerks to ConnectWise, please ensure you're familiar with Agreements in ConnectWise. The best resource for this is the ConnectWise University. Integrating QuoteWerks with ConnectWise for the purpose of Agreement workflow is seamless once you understand how Product and Estimate Agreements work on a ConnectWise Opportunity.
Once you've established your Agreement workflow for ConnectWise, you can implement sending agreements from QuoteWerks to ConnectWise. Some things for you to consider when deciding how to send over agreements to ConnectWise are listed below:
- QuoteWerks has the ability to send a quoted Agreement to ConnectWise as either just an Estimate or as an Agreement Type Product. QuoteWerks enables you to quote agreement products with recurring properties like monthly, quarterly, or annual.
- For an Agreement on an Opportunity to appear in Agreement Sales, the Agreement must be a product on a Won ConnectWise Opportunity.
- If an agreement is an Estimate on the ConnectWise Opportunity, there will be no reference other than the opportunity for the person creating the agreement in ConnectWise.
Setting Up Mappings when Sending Quoted Agreement Items to ConnectWise
You will choose to either send an Agreement from QuoteWerks to ConnectWise as either a Product or an Estimate. In most cases, we recommend sending over Agreement items as Products. QuoteWerks uses the quoted item’s Item Type as the key for this mapping.
Setting Up Mappings for Sending over an Agreement as a Product
For sending over the Agreement as a Product, use an appropriate item type you defined in QuoteWerks (in this example, we defined AgreementProducts) to the ConnectWise Forecast type of Product:
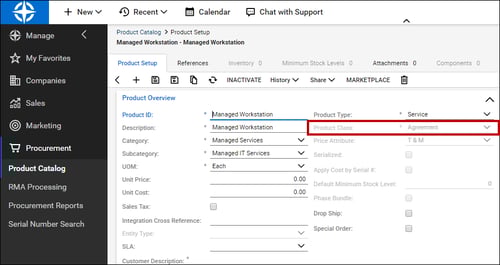
If the Product already exists in ConnectWise, you'll use its properties. If you notice that a Product is not being sent to ConnectWise as an Agreement Product when it should be, check the ConnectWise Product database to ensure the Agreement Product is setup correctly in ConnectWise. The most common issue is that the Product Class or Product Type is not set to Agreement:
Now, you'll need to map the AgreementProducts item type to the ConnectWise Product Type you're using for Agreements:
The Product Type field in ConnectWise is used to identify what type of product you want to create in your QuickBooks or other accounting item list.
You will also need to map the appropriate Category and SubCategory:
The category and subcategory are used to classify or group products in ConnectWise and also to appropriately post revenue to your accounting package.
The Product Class is the most important mapping for Agreement Products. This must be mapped to Agreement:
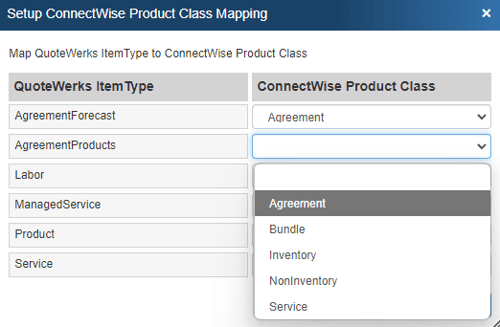
Agreement Class products are not available for purchasing in ConnectWise. If the Agreement Class Product is won on an opportunity, it will display on the Agreement Sales Screen.
Setting Up Mappings for Sending over an Agreement as an Estimate
For sending over the Agreement as an Estimate, map an appropriate item type you defined in QuoteWerks (in this example, we defined AgreementForecast) to the ConnectWise Forecast type of Agreement:
Creating a Quote to Send as an Agreement to ConnectWise
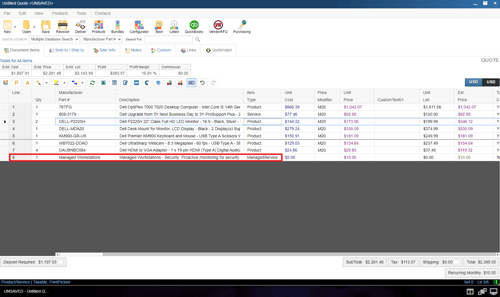
For this example, we manually add an Agreement Product to a quote with some other items:
After you've selected the contact you're quoting, save the quote and create the opportunity in ConnectWise.
Viewing a QuoteWerks-Transferred Agreement in ConnectWise
On the ConnectWise Opportunity, you now have an Agreement Estimate with the recurring details and an Agreement Product. There will also be an auto-link available for the agreement created from QuoteWerks.
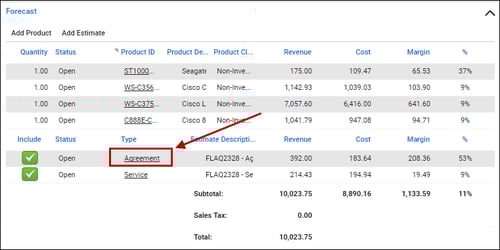
Under the Products tab, you can see the Agreement Product:

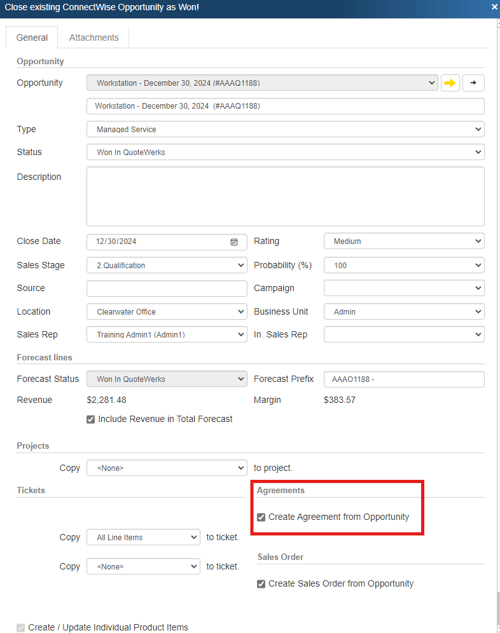
If the customer accepts your quote and you win the ConnectWise Opportunity, you'll see the option to create the Agreement from the Opportunity:
The Agreement Sales screen is a centralized location to manage all products with the class of "Agreement" for Won Opportunities. It serves as a handoff from Sales to the individual responsible for creating the Agreements after Sales has won the opportunity. On this screen, you can see the list of all companies and product additions that require a new Agreement.
The new agreement will be available from the opportunity:
Starting a New Quote from Inside ConnectWise
The ConnectWise integration has a unique feature that enables you to click on a hyperlink located on a ConnectWise opportunity or contacts window which will start QuoteWerks and copy all the account and/or opportunity information into a new quote to automate the creation of a new quote using the details from the ConnectWise window.
Using the Quote Link Button
The Quote Link button enables users to launch a QuoteWerks quote for the specific opportunity in ConnectWise. To use this feature, click on the “Quote” button on the top of the opportunity:

This will launch QuoteWerks and open a new quote based on the ConnectWise sales opportunity and pull in the contact information including the Ship to and Bill to if a contact has been set for those. If a quote for this opportunity already exists in QuoteWerks, it will simply open that quote in QuoteWerks.
Setting Up the Quote Link Button
Step 1: Launch ConnectWise and log in as a ConnectWise administrator.
Step 2: Click the Setup Tables taskbar item under the Setup option.
Step 3: Search for “Quote Link” in the Table field:
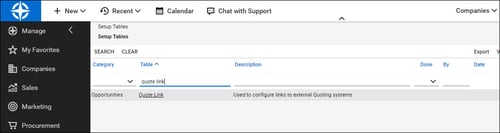
Hit Enter on your keyboard.
Step 4: Click the Quote Link table, then on the appropriate quote link in the resulting list.
Step 5: In the Button Link field, enter the following URL: https://www.qwcontent.com/QuoteWerksURLProtocolRedirector.aspx?RedirectorAction=quotebutton&source=ConnectWise&SoldToCMOpportunityRecID={recid}
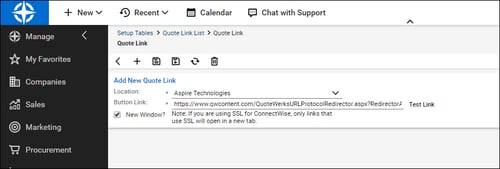
Next, select Open in new window, then click the Save and Close icon (![]() ).
).
NOTE: DO NOT click the Test button after adding the URL.
Using Auto-Links in ConnectWise
The Auto-Links window creates dynamically generated links on the QuoteWerks Links tab that will link to specific details in ConnectWise from the QuoteWerks created quote. These links are automatically created and there is no setup involved to use them.
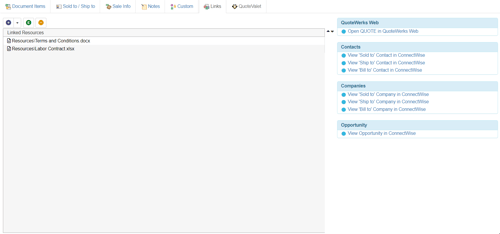
This functionality provides users with an easy way to view the contact(s) from the quote, the opportunity that was created based on this quote, the activity (such as follow up calls), and the ConnectWise quote associated with this opportunity. Clicking on one of these links will open ConnectWise and display the link information. For example, clicking on the "View Opportunity in ConnectWise" link would open this specific opportunity in ConnectWise for you.
Viewing a Quote in ConnectWise
To view the Linked Document in ConnectWise, open the Opportunity, click on the Documents tab, then click on the link in the Title column.
Click the View button next to the Document Title field to launch QuoteWerks and open the linked document.
Creating Purchase Orders in ConnectWise
IMPORTANT: QuoteWerks only supports creating ConnectWise purchase orders in ConnectWise 2013.1 and higher. To create a PO in ConnectWise, you need the ConnectWise Procurement and Inventory Module
Users are able to select items from QuoteWerks Orders to be sent to ConnectWise in a Purchase Order. To do this, first make sure you have enabled this integration under Contacts -> Setup Contact Manager -> ConnectWise -> Integration Settings > General Tab -> Purchase Orders section.

Step 1: Click on Purchasing from the toolbar on the right hand side of the screen.
Step 2: Select whether you want to create a PO based on the currently open order (if applicable) or from multiple previous orders. Select your date range, select customer, and then finally the vendor for the order (you'll have to make multiple orders if your items are from multiple vendors). You can also search by ticket number.
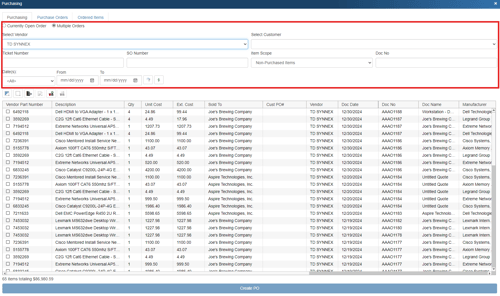
Step 3: Select your items from the list shown. Check the box next to the items to include them in the Purchase Order. To select all items right-click and choose Select All.
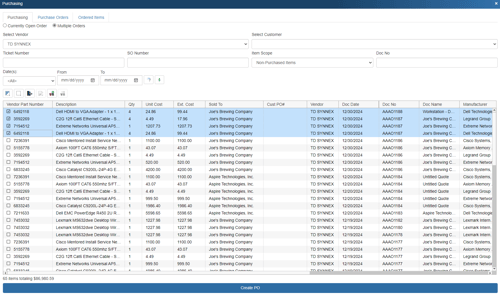
Step 4: Click Create PO at the bottom of the window:
![]()
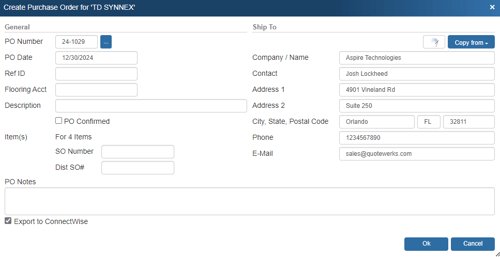
You'll see the Create Purchase Order window appear:
NOTE: If you enter in a PO Number that has already been used, a message will appear notifying you that the current PO number is already in use and to choose a new PO number. We do not recommend using the same PO number for multiple purchase orders.
Enter the following information:
- PO Number: You'll use this value when creating a purchase order. If you're linking to QuickBooks, Sage 50 (Peachtree), Autotask, or ConnectWise, the same PO Number will be used when exporting to that application. You can set this number manually or, if you've set a default numbering sequence under Tools -> Options menu -> Installation tab, you can click the
 button next to the Next PO number sequence field to select the next numerical value. Additionally, if you've set a PO Prefix/Postfix value under Vendors on the left navigation panel, then this value will display with the PO number. For example, if you'd set the postfix to "TD" (for Tech Data), the PO number would read, "14-1001TD," where "14" indicates the year 2014 and 1001 represents the unique numeric sequence. This field also supports the F2 Lookup List feature.
 - PO Date: The date of the purchase order. This will default to the day you're creating the purchase order, but you can manually change it. This date will also apply to any purchase order created in QuickBooks, Sage 50 (Peachtree), Autotask, or ConnectWise.
- Ref ID: In this field, you can enter a job or ticket number to group purchase orders. For example, you might create five purchase orders to purchase all the products required for the job, and by entering the same job number for each PO, you can easily group and display them together under the Purchase Orders tab. Filtering by RefID while under the Purchase Orders tab will show you the purchase orders linked by job number. Filtering by RefID while under the Ordered Items tab will show you a complete list of all the items ordered within all purchase orders.
- Flooring Acct: You can use this field to specify a flooring account when placing orders with Ingram Micro, D&H, and/or TD SYNNEX.
- Description: Here, you can enter a description of the purchase order.
- SO Number: Enter in the Sales Order number you would like to reference for all the items created in the PO.
- Dist SO#: Enter in the Distributor Sales Order number you would like to reference for all the items created in the PO.
You can also select Export to ConnectWise to export the PO to ConnectWise.
Click OK.
IMPORTANT: In ConnectWise, you can create a manual PO by creating a new PO and then selecting items from the ConnectWise Product list to add to the PO. This type of PO does not associate the added products with any customers/Tickets/Opportunities. When QuoteWerks creates a PO in ConnectWise, it creates it the same way as described above.
When this type of PO is received against, no customer invoice items will generate because the PO items are not associated with any customers/Tickets/Opportunities.
When you have the ConnectWise Purchasing Module, the more typical workflow is to convert an Opportunity to a Sales Order or Ticket. That action will create "Product Demand" for those products, which will appear under the ConnectWise Purchasing tab. From that Purchasing tab, you can choose items to include on a ConnectWise PO. When you follow this workflow, the items on the PO are associated with a customer/Ticket/Opportunity. So when they're received against the PO, the appropriate billing records will generate.
Step 5: The next window will let users select the ConnectWise vendor to be used for the PO.
If you already selected a vendor it will auto-fill the search with that vendor name for you. Users can also search for a different vendor by Company Name, First Name, Last Name, and Phone for the contact.
Click on the Select button once you have located your vendor.
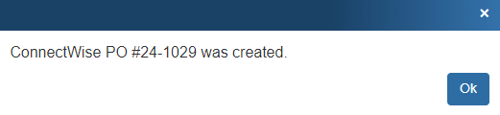
Step 6: A confirmation box will appear notifying you that your PO has been created for the selected vendor with the PO number you specified.
Step 7: To view the purchase order that was sent over to ConnectWise, open ConnectWise and click on the Procurement -> Purchase Orders menu.
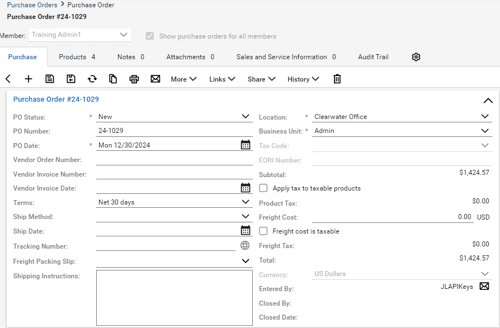
QuoteWerks will fill in the Purchase Order information for you such as the PO number, date, default terms, etc. The items will also be added to the Products tab of the PO in ConnectWise.

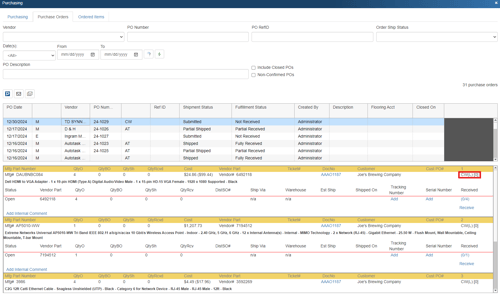
Viewing ConnectWise Purchase Orders in QuoteWerks
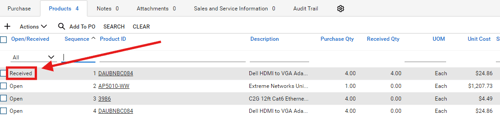
If the QuoteWerks purchase order item has been exported to ConnectWise as an item on a ConnectWise purchase order that QuoteWerks created, you'll see an indicator — "CW (L)" — on the right side of the item under the QuoteWerks Purchasing window's Purchase Orders tab. You'll also notice a numerical indicator to the right corner of the "CW (L)", which will display the quantity of that item that has been received in QuoteWerks but has not been sent over to ConnectWise as received yet. See Posting Received Items to ConnectWise Purchase Order below for more information on doing this.
Posting Received Items to ConnectWise Purchase Order
You can post items received in the QuoteWerks Purchasing window to any ConnectWise purchase order. This will perform the same function in ConnectWise as if you were receiving the items in ConnectWise itself, with the advantage that QuoteWerks will automatically supply all the serial numbers of the received items into the ConnectWise purchase-order item.
You need to receive one item at a time so that you can supply QuoteWerks with the serial number for each item.
IMPORTANT: The ConnectWise API cannot be used to receive partial quantities for a PO Item in ConnectWise, so if you have PO Item in ConnectWise with an Ordered Quantity of 5 and you have only received 3 in QuoteWerks, you cannot use the Post Received Item(s) against ConnectWise PO Item... menu option. The option will only be available once you have received the entire quantity that you have ordered on this PO Item in QuoteWerks.
ConnectWise requires that when you receive against a Inventory Serialized product in ConnectWise, you must supply a serial number for each quantity received. If for some reason in QuoteWerks you have not entered a serial number for each individual item, the Post Received Item(s) against ConnectWise PO Item... menu option will fail.
To post received items to a ConnectWise purchase order, right-click on the item and choose Post Received Item(s) against ConnectWise PO Item...
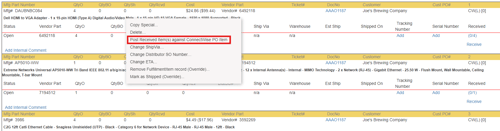
If the ConnectWise purchase order was NOT originally created by QuoteWerks, you'll get a pop-up window asking for the purchase order number.
Enter the purchase order number and click on the [OK] button.
Keep in mind that if the purchase order item is already fully received, or IsClosed, or the Quantity Received is not 0, then it won't appear in the list.
When you've finished, the ConnectWise purchase order will be updated to say the item was received:
NOTE: If you're using QuickBooks to manage your purchase orders, you'll use a different right-click option to mark your items as received within QuickBooks. See Mark Item Receipt as Exported to Accounting... for more information.
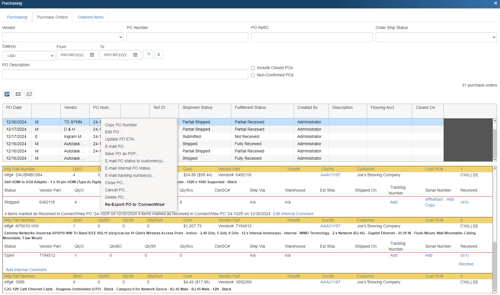
Re-Export PO to ConnectWise
Once a PO is sent to ConnectWise, the option to re-export it is available. This is useful if the original PO did not export correctly and you need to send it over to ConnectWise again with the corrections.
To Re-Export a PO, click on the Purchase Orders tab in QuoteWerks, find the PO that needs to be re-exported, and right-click. Select the Re-Export PO to 'ConnectWise' menu option.
IMPORTANT: When you re-export a PO to ConnectWise, this will create a brand new PO in ConnectWise, with a new PO number. You may need to delete or close the original PO in ConnectWise for your accounting records to be accurate.
In QuoteWerks, when you re-export a PO, the original PO is updated in QuoteWerks with the latest version of it. For example, if you export PO #4, and then re-export it, PO #4 will be updated in QuoteWerks and will become PO #5.
Opening ConnectWise Service Tickets from QuoteWerks
If you have a service ticket number associated with the purchase order item, you can click on it from an ordered item under the Purchase Orders or Ordered Items tab and the ConnectWise Service ticket will be opened in ConnectWise:

F2 Lookup Features
A list item in an F2 Lookup can be setup to retrieve information from your contact manager. For ConnectWise you can retrieve company or contact information. For a list of fields that you can use, go into the DataLink setup where you add a new field mapping and in the Contact Manager Field drop down you will see a list of all the available fields that can be used.
Example:
~ConnectWise_Macro (contact->phone_home)
NOTE: See the F2 Lookup section in Customizing QuoteWerks for more details on the F2 Lookup feature.
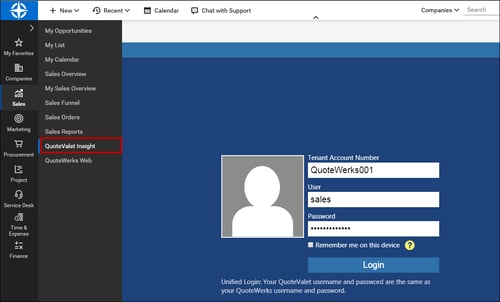
Accessing QuoteValet Insight from ConnectWise
IMPORTANT: The below feature requires ConnectWise 2015.1 or higher.
Starting with ConnectWise 2015.1 and higher, ConnectWise allows for external web applications to be accessed from within ConnectWise via its custom menu entries. This is a quick and easy customization which adds a quick way to access QuoteValet Insight without having to leave ConnectWise. QuoteValet Insight is the reporting engine for QuoteValet and provides companies with detailed analysis of all quotes and orders submitted via QuoteValet.
Setup
1. In ConnectWise, click on the "System" option and then select "Setup Tables".
2. The search criteria will be available to the right. In the "Table", type in "Custom Menu Entry".
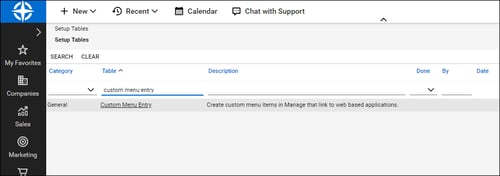
3. Click on the table option that appears and a list of current links in ConnectWise will be displayed.
TIP: You can delete links that are not in use by clicking on the link to open it and then clicking on the delete (![]() ) icon.
) icon.
4. Click on the new icon on the Menu Entry to create a new entry. Type in "QuoteValet Insight" for the menu caption. This is what will appear as the link name. For the menu location, click on the drop-down menu and select where you would like this link to be displayed in ConnectWise. In the "Link" field type in the URL, in this case, https://www.quotevalet.com/insight. If you would like this link to open in a new tab, check the box otherwise leave it unchecked. The last step would be to add an image for the link. You can use any image you would like for this link entry.
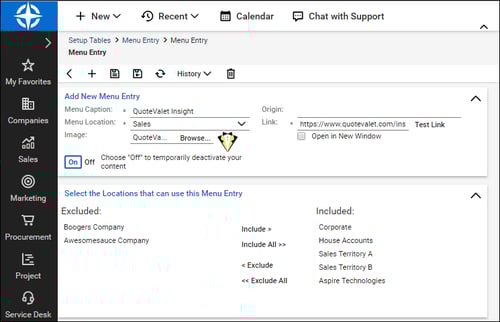
5. Once you have set the required fields, click on the save icon to save and close the new menu entry. Click on your location that you set and you should now see your new QuoteValet Insight link in the list.
Accessing QuoteWerks Web from ConnectWise
IMPORTANT: The below feature requires ConnectWise 2015.1 or higher.
Starting with ConnectWise 2015.1 and higher, ConnectWise allows for external web applications to be accessed from within ConnectWise via its custom menu entries. This is a quick and easy customization which adds a quick way to access QuoteWerks Web without having to leave ConnectWise. QuoteWerks Web is an add-on for QuoteWerks Desktop and provides companies with the ability to use QuoteWerks anywhere.
Setup
1. In ConnectWise, click on the "System" tab and then select "Setup Tables".
2. The search criteria will be available to the right. In the "Table", type in "Custom Menu Entry".

3. Click on the table option that appears and a list of current links in ConnectWise will be displayed.
TIP: You can delete links that are not in use by clicking on the link to open it and then clicking on the delete (![]() ) icon.
) icon.
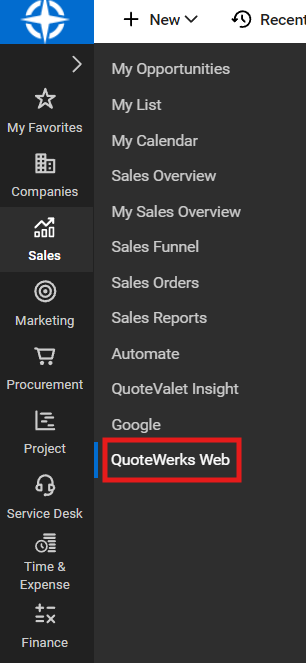
4. Click on the new icon on the Menu Entry to create a new entry. Type in "QuoteWerks Web" for the menu caption. This is what will appear as the link name.
5. For the menu location, click on the drop-down menu and select where you would like this link to be displayed in ConnectWise. In the "Link" field type in the URL, in this case, https://na.quotewerks.com/. If you would like this link to open in a new tab, check the box otherwise leave it unchecked. The last step would be to add an image for the link. You can use any image you would like for this link entry.

6. Once you have set the required fields, click on the save icon to save and close the new menu entry. Click on your location that you set and you should now see your new QuoteWerks Web link in the list.
DataLink Setup
The DataLink feature allows you to pull or push additional data from specified fields in QuoteWerks and ConnectWise. This data from ConnectWise can be used to complete fields in the QuoteWerks document such as a customer profile, the tax rate, customer terms, custom fields, etc. for the customer. Additionally, by being able to push additional data into ConnectWise opportunities, users can also control some of the line-item data that is sent over to ConnectWise such as the customer description, notes, custom fields, and more.
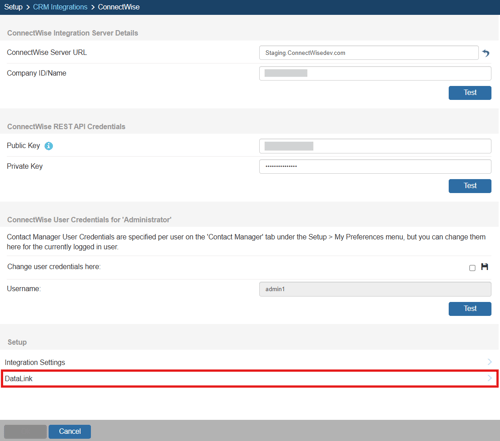
Clicking on the [DataLink] button on the Contact Manager Setup window will display the DataLink setup window.
Contact manager data fields can also be inserted into the print layouts so that the data is copied from the contact manager and then printed on your quote without being stored in the quote itself.
Pulling Additional ConnectWise Fields into QuoteWerks
To setup the DataLink, click on Contacts-> Setup Contact Manager menu selection. Click on ConnectWise and click on [DataLink] at the bottom of the window.

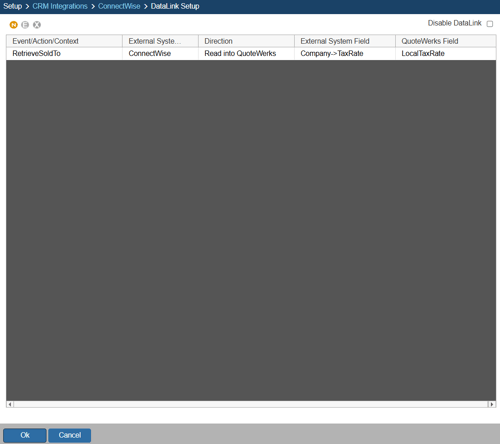
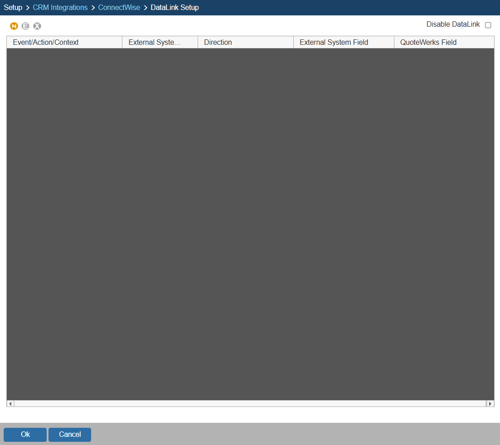
The DataLink Setup window will open. If you have not created a DataLink yet, the field will be blank:

Create, Edit, Delete DataLinks
The three icons on the top left of the window will allow you to create (![]() ), edit (
), edit (![]() ), and delete (
), and delete (![]() ) DataLinks.
) DataLinks.
Creating a new DataLink
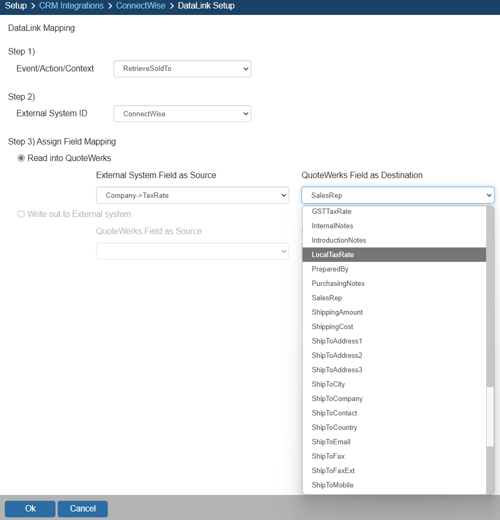
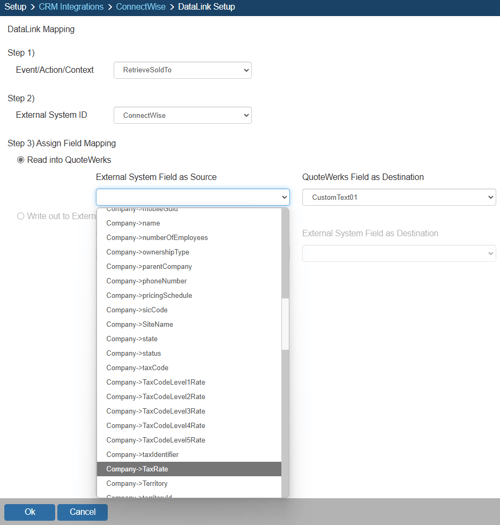
In the following example we are going to walk through how to pull the tax rate field from ConnectWise and have it populate the tax rate field on the Sale Info tab. You can pull this and many other fields through the DataLink mapping window. You will need to create a new DataLink for each field you would like to populate, however.
Step 1: Click on the create (![]() ) button.
) button.
Step 2: On the next window (DataLink Mapping), change the first drop-down menu to RetrieveSoldTo, RetrieveShipTo, or RetrieveBillTo. Your selection here will determine when the field from your CRM/PSA is pulled into QuoteWerks (i.e. the filed data is pulled in when pulling the contact details into the Sold to, Ship to, or Bill to fields).
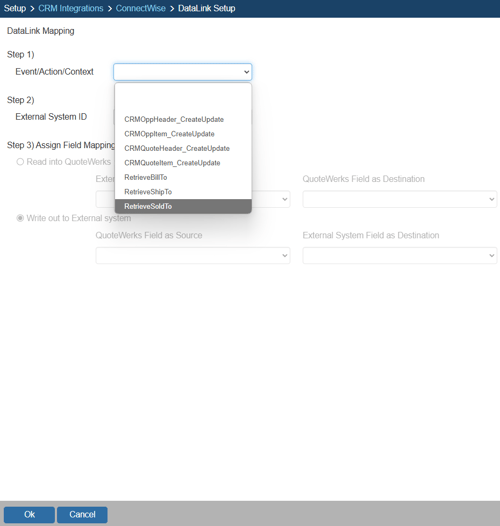
Step 3: Under the External System ID field, change the drop down to ConnectWise.
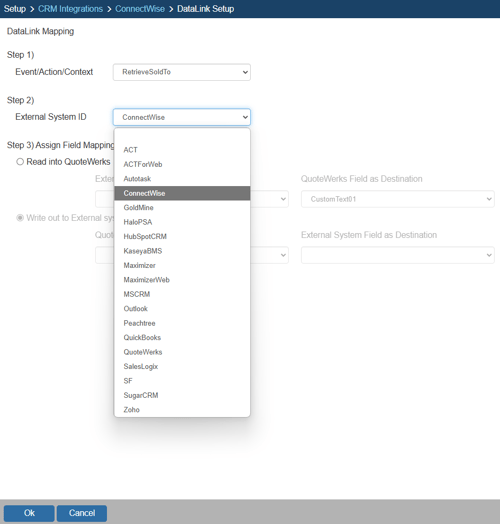
Step 4: On the next field of Assign Field Mapping click on the radial button for Read into QuoteWerks.
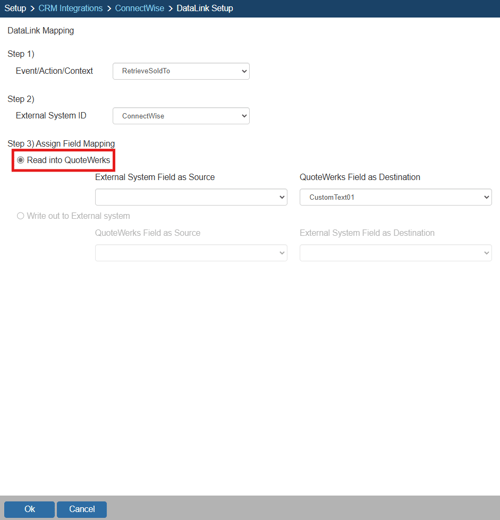
Step 5: The drop down for External System Field as Source will list the fields available from ConnectWise. Select the field you would like to pull into QuoteWerks.

Step 6: Once your External field as source is selected, choose the QuoteWerks field that you would like the data from ConnectWise to populate in the QuoteWerks Field as a Destination.
Step 7: Click [Ok] to complete the DataLink Mapping.
Editing an existing DataLink
To edit an existing DataLink, highlight the link and click on the edit (![]() ) button. This will open the DataLink Mapping window and allow you to change any of the fields previously set for that DataLink.
) button. This will open the DataLink Mapping window and allow you to change any of the fields previously set for that DataLink.
Deleting an existing DataLink
To delete an existing DataLink, highlight the link and click on the delete (![]() ) button. This will remove that specific DataLink from your system. Please note, this cannot be undone.
) button. This will remove that specific DataLink from your system. Please note, this cannot be undone.
Disabling a DataLink
Disabling a DataLink will let users disable the DataLink from working without having to remove the link. This is very useful if you need to stop a DataLink from working for a period of time, but do not want to remove it from the DataLink list.
To disable a DataLink, highlight the DataLink and click on the checkbox for Disable DataLink. Uncheck it to re-enable the DataLink.
Pulling in the ConnectWise Tax Rate
In ConnectWise, the tax is set individually for each company in the company’s sites. To ensure the tax rate is pulled in correctly, make sure to edit the site tax code in the ConnectWise setup tax table, then add that tax code to each site.
Pushing Additional QuoteWerks Fields to ConnectWise
To setup the DataLink, click on Contacts-> Setup Contact Manager menu selection. Click on ConnectWise and click on [DataLink] at the bottom of the window.
The DataLink Setup window will open. If you have not created a DataLink yet, the field will be blank:
Create, Edit, Delete DataLinks
The three icons on the top left of the window will allow you to create (![]() ), edit (
), edit (![]() ), and delete (
), and delete (![]() ) DataLinks.
) DataLinks.
Creating a new DataLink
In the following example we are going to walk through how to push a contract date from QuoteWerks and have it populate a Custom Field in ConnectWise. You can push other fields through the DataLink mapping window. You will need to create a new DataLink for each field you would like to populate however.
Step 1: Click on the create (![]() ) button.
) button.
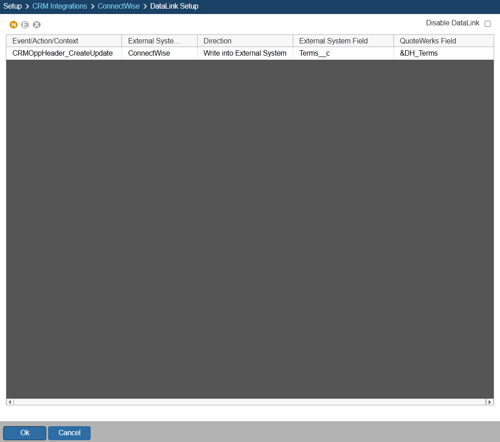
Step 2: On the next window (DataLink Mapping), change the first drop-down menu to CRMOppHeader_CreateUpdate to choose to push a DocumentHeader field from QuoteWerks to ConnectWise. To push specific line item information, select CRMOppItem_CreateUpdate option. Your selection here will determine the table that QuoteWerks will use to push data into ConnectWise.

Step 3: Under the External System ID field, change the drop down to ConnectWise.
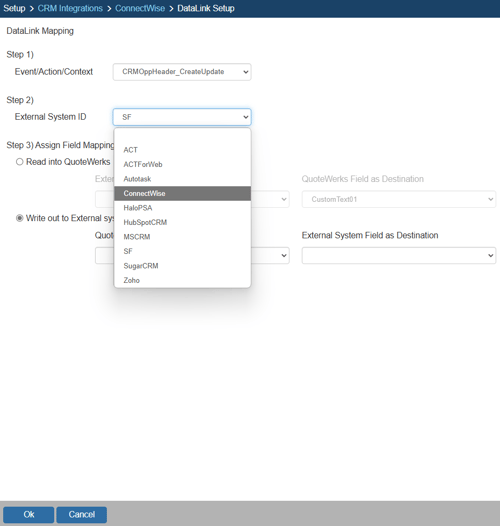
Step 4: On the next field of Assign Field Mapping click on the radial button for Write out to External System.
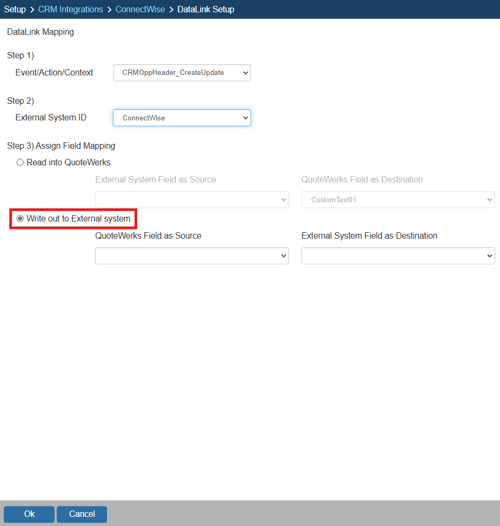
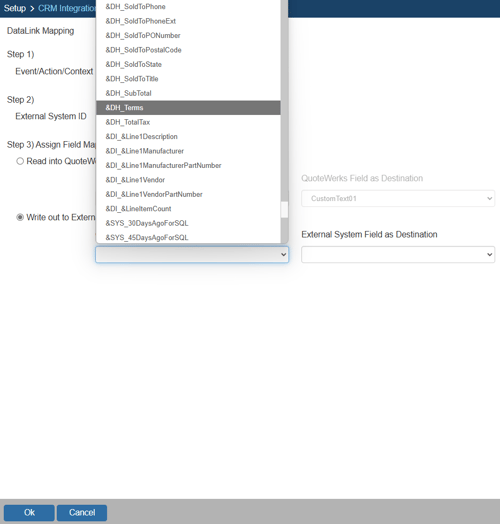
Step 5: The drop down for External Field as Source will list the fields available from QuoteWerks. Select the field you would like to push into ConnectWise.
Step 6: Once your External field as source is selected, choose the ConnectWise destination field where you would like the data to be populated in the External System Field as Destination.

Step 7: Click [Ok] to complete the DataLink Mapping.
Editing an existing DataLink
To edit an existing DataLink, highlight the link and click on the edit (![]() ) button. This will open the DataLink Mapping window and allow you to change any of the fields previously set for that DataLink.
) button. This will open the DataLink Mapping window and allow you to change any of the fields previously set for that DataLink.

Deleting an existing DataLink
To delete an existing DataLink, highlight the link and click on the delete (![]() ) button. This will remove that specific DataLink from your system. Please note, this cannot be undone.
) button. This will remove that specific DataLink from your system. Please note, this cannot be undone.
Disabling a DataLink
Disabling a DataLink will let users disable the DataLink from working without having to remove the link. This is very useful if you need to stop a DataLink from working for a period of time, but do not want to remove it from the DataLink list.
To disable a DataLink, highlight the DataLink and click on the checkbox for Disable DataLink. Uncheck it to re-enable the DataLink.