
This article takes you through using Pipedrive with QuoteWerks. This will allow you to pull Pipedrive customer records into sales quotes, create Pipedrive opportunities, and much more using a single application: QuoteWerks.
This article includes information on the following topics:
- QuoteWerks Searches for Your Pipedrive Contacts
- Create new Pipedrive Accounts and Contacts
- Pipedrive Online/Offline Status
- Automatically Create and Update Deals
- Attach Additional Documents/Files to the Deal
- Completing or Updating a Completed Sale in Pipedrive
- Linking to the Pipedrive Products List
- Datalink Setup
QuoteWerks searches for your Pipedrive Contacts
Select the Sold to / Ship to Tab in QuoteWerks:
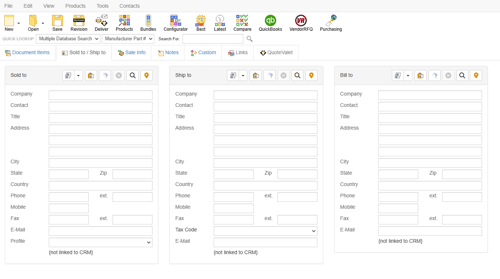
To select contacts for the Sold to / Ship to / Bill to fields click on the ![]() button:
button:
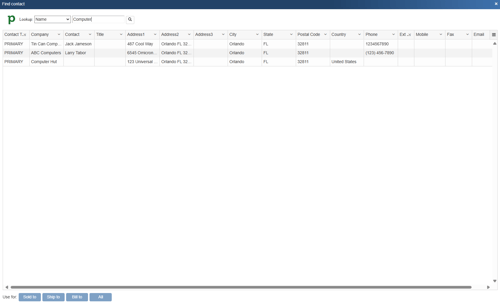
Once you have found the contact (or company) you are looking for, select the contact and click on the [Sold To] button to use this contact for the Sold to information. You can also select a contact and click on the [Ship To] button to use this contact for the Ship to information or you can click on the [Bill To] button to use this contact for the Bill to information. When you are finished selecting contacts, click on the [Close] button. You will be returned to the Sold to/ Ship to tab and the selected contacts will be pre-filled in the Sold to/Ship to/Bill to fields.
NOTE: Any columns widths customized in the search results grid are remembered per user.
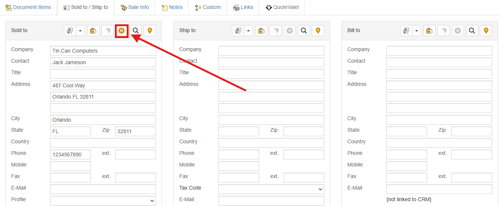
Create new Pipedrive Accounts and Contacts
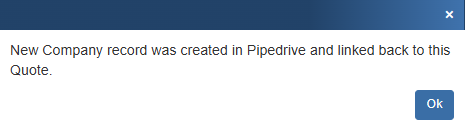
If the customer does not exist in Pipedrive, you can create them from QuoteWerks by filling in the required information on the Sold to/Ship to tab. When you fill in the required information the gold new button (![]() ) will be available and let you create the new account in Pipedrive. However, if the company does exist and you simply need to add a contact to an existing account in Pipedrive, you will have to add the contact to Pipedrive from Pipedrive.
) will be available and let you create the new account in Pipedrive. However, if the company does exist and you simply need to add a contact to an existing account in Pipedrive, you will have to add the contact to Pipedrive from Pipedrive.
Pipedrive Online/Offline Status
Writing information to Pipedrive requires that you have access to Pipedrive. If you are running QuoteWerks on a laptop and are not connected to Pipedrive, you will not be able to write information back to Pipedrive. On the Save window there is an “I’m Offline” option that enables you to save the quote and not attempt to integrate with Pipedrive:
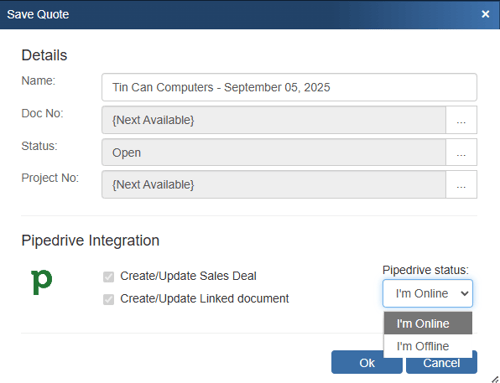
With this option, it is easy to still save quotes in QuoteWerks even though Pipedrive is not available. Please note, any quotes saved while offline will need to be re-opened, linked to an Pipedrive contact and saved in order to update Pipedrive online.
Automatically Create and Update Deals
When you're saving a document, the “Create/Update Sales Deal” checkbox will appear on the Save window.
NOTE: This checkbox will NOT appear if you are saving a quote template.
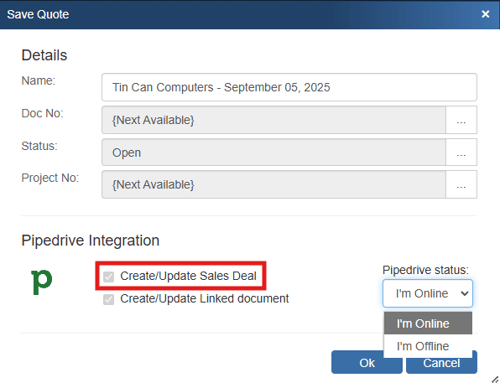
This option will create or update an Pipedrive deal or attach to an existing deal in Pipedrive.
Once you have pressed the [OK] button from the File -> Save window, the “Create/Update Pipedrive Deal” window will appear, enabling you to enter or adjust information about the deal such as the Deal Name, Pipeline, Stage, Status (based on ticket type), Create Date, Expected Close Date, Probability %, and owner.
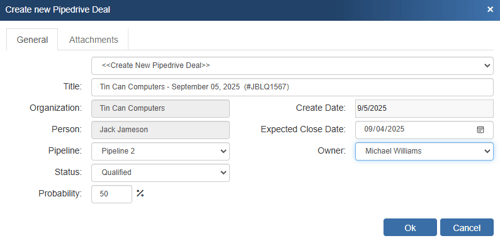
The Deal drop down will contain a list of all existing Pipedrive deals associated with the Pipedrive contact or company record on the Sold To / Ship To tab in QuoteWerks. If you have not already created a new deal for this quote, here you can select an existing deal to update with the current quote’s information.
NOTE: If you are using QuoteValet, when uploading the document to QuoteValet, a link to open the Sales Rep facing document in QuoteValet will be available as a note in the deal.
You can also click on the ![]() button to launch the Pipedrive deal you are linking to.
button to launch the Pipedrive deal you are linking to.

NOTE: When you attach to an existing deal, QuoteWerks will assume ownership of that deal.
Once the deal has been created, an Auto-Link will appear on the Links tab in QuoteWerks for that document.
Unlinking a Deal
If you accidentally attached a quote to the wrong deal in Pipedrive, you can use the ![]() button to remove the link. All entries relating to the QuoteWerks Quote will be removed from the Pipedrive deal. This button will only be displayed when updating an existing deal, so if you realize you made a mistake, choose to update the deal, and then at that point, use this button to unlink it.
button to remove the link. All entries relating to the QuoteWerks Quote will be removed from the Pipedrive deal. This button will only be displayed when updating an existing deal, so if you realize you made a mistake, choose to update the deal, and then at that point, use this button to unlink it.

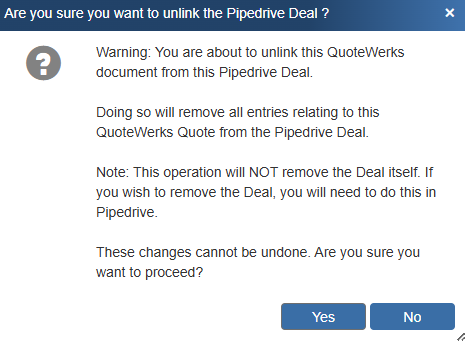
QuoteWerks claims ownership of Pipedrive deals that were created or updated from within QuoteWerks. It is not recommended that you manually make changes to the deal from within Pipedrive as these changes may be overwritten by QuoteWerks when QuoteWerks is updating the Pipedrive deal.
Attach Additional Documents/Files to the Deal
When saving a new quote, a “Create/Update linked document” checkbox will appear on the Save Quote As window (as shown in the screen shot below).
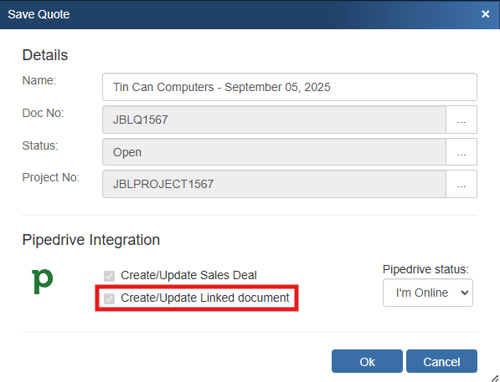
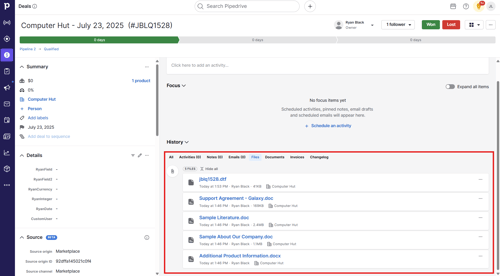
This option will create an attachment under the Pipedrive files tab of the deal allowing you to easily track all the quotes and other documents you have created with this deal.
Completing or Updating a Completed Sale in Pipedrive
The Close existing Pipedrive Deal as Won! window will appear when converting a quote to an order or invoice, so you can review and make changes to the completed sales deal before it is created/updated in Pipedrive. This includes the Pipeline, Status, Probability, Expected Close Date, and Owner.
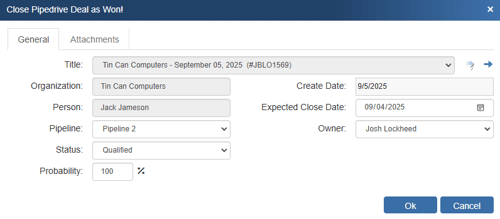
The deal will automatically be set to Won and the status will update based on your selection above.
Linking to the Pipedrive Products List
QuoteWerks can link to the Pipedrive Product list. This is valuable because you will have real-time access to your Pipedrive products.
In order for QuoteWerks to link to the Pipedrive product list, you must have Pipedrive set as your Contact Manager on the Contacts -> Setup Contact Manager menu and the integration must already be fully set up, including the Integrator Login. Otherwise, QuoteWerks will be unable to communicate with Pipedrive. Once this has been completed, follow these steps to link to Pipedrive product list:
Step 1: Launch QuoteWerks.
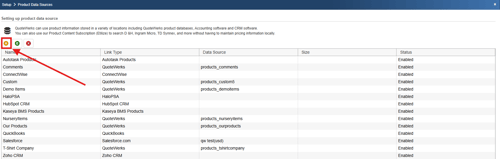
Step 2: In QuoteWerks, go to the Products -> Setup Product Sources menu, then select the [New] button on the Product Data Source Setup window:
Step 3: From the “Select Database Type” window, select “Pipedrive” from the drop-down menu:
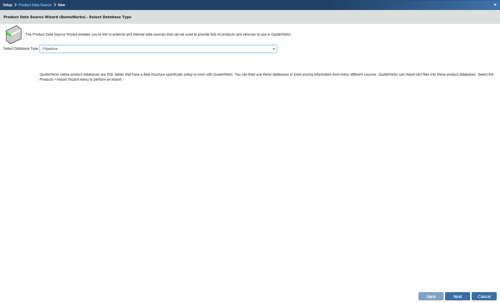
Then click on the [Next] button to move to the next step.
Step 4: This window allows you to map the Pipedrive item fields to their QuoteWerks counterpart. By default, we have already mapped the Pipedrive fields to QuoteWerks fields:
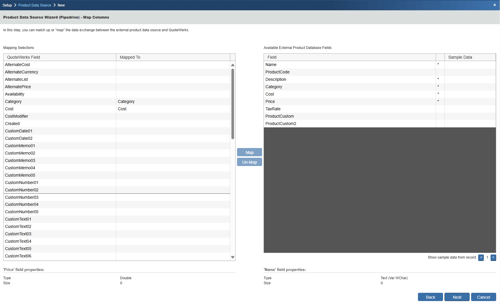
If you want to change our default selections, simply select the Pipedrive field on the right, then select the QuoteWerks field on the left and choose to map or un-map the fields.
Click on the [Next] button to move to the next step.
Step 5: On this window you can set the name of the product data source:
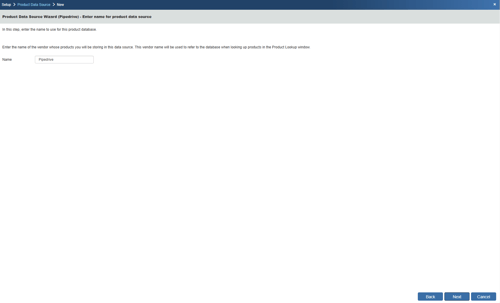
By default, it will be named Pipedrive, but you can define an alternate name of your choosing.
Step 6: On this window you can “Set Column Titles.” Column titles are the names of the columns as they will appear in the Product Lookup window for this product source.
For example, in QuoteWerks the field name is called ‘Cost' but the Column Title is 'Unit Cost'. You may want to refer to this as simply ‘Cost.’
By clicking on the [Change Title] button you can rename the column title:
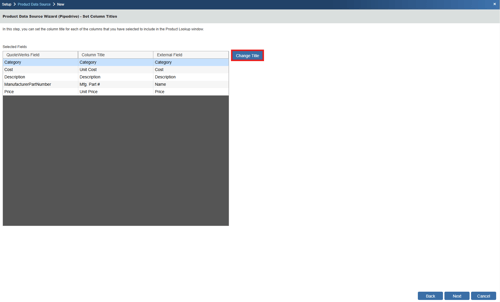
Click on the [Next] button to move to the next step.
Step 7: If the ‘Individual Product Data Source level security’ has been enabled, the Security step will appear next:
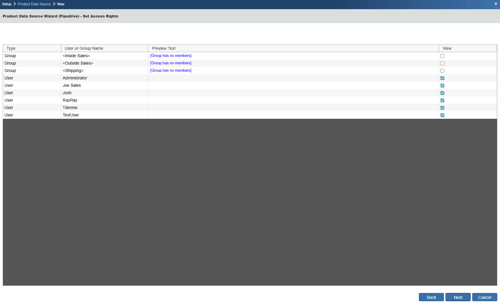
Here you can control the level of access each User or Group has to this Product Data Source.
Step 8: Here you can choose various options for the product database.
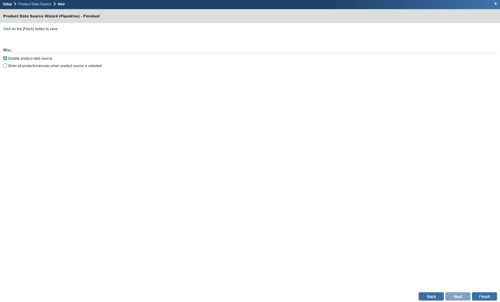
Show all products/services when product source is selected
Choose this option to display all of the products and services in the database when you select this product database from the Product Lookup window. If you have more than 5,000 items in your product database, it is recommended that you do not select this option.
Disable Product Data Source
Checking this option will "hide" the Pipedrive Product list from the Product Lookup window in QuoteWerks. No user will be able to add items from the Pipedrive Product Source when this option is selected. It is recommended you leave this setting unchecked.
Click on the [Finish] button to complete the link to the HaloPSA item list.
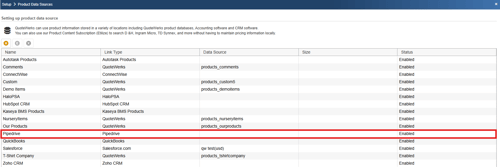
Step 9: Once you click on the [Finish] button it will return you to the Product Data Source Setup window where you can confirm that the link to the Pipedrive product list was established:
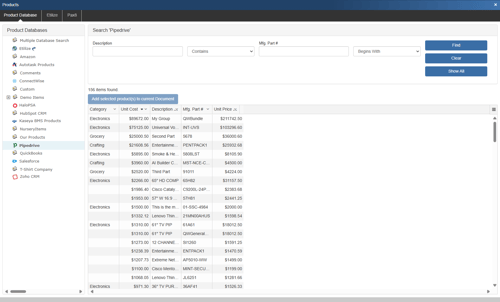
Step 10: To use the link, select the Products-> Lookup... menu and select the Pipedrive product data source.
DataLink Setup
The DataLink feature allows you to pull additional information from fields in your contact manager when retrieving the contact information from your contact manager. This data from your contact manager can be used to complete fields in the QuoteWerks document such as a customer profile, the tax rate, customer terms, custom fields, etc. for the customer. Clicking on the [DataLink] button on the Contact Manager Setup window will display the DataLink setup window.
To setup the DataLink, click on Setup then CRM Integrations. Click on Pipedrive, then click on the DataLink.

The DataLink Setup window will open. If you have not created a DataLink yet, the field will be blank. If you have, it will list the DataLinks here.
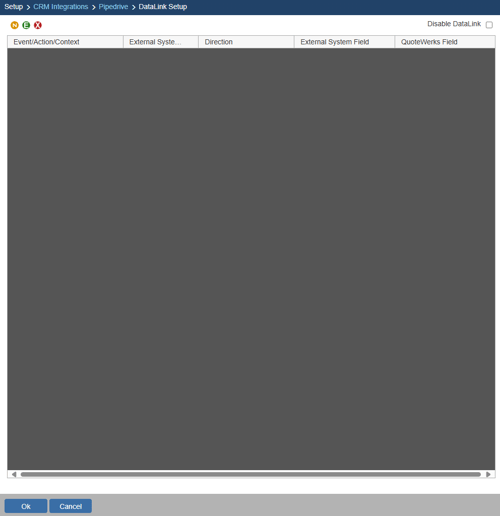
Create, Edit, Delete DataLinks
The three icons on the top left of the window will allow you to create (![]() ), edit (
), edit (![]() ), and delete (
), and delete (![]() ) DataLinks.
) DataLinks.
Creating a new DataLink
In the following example we are going to walk through how to pull the Organization ID from Pipedrive and have it populate the CustomText01 field on the Custom tab.
You can pull this and many other fields through the DataLink mapping window. You will need to create a new DataLink for each field you would like to populate however.
Step 1: Click on the create (![]() ) button.
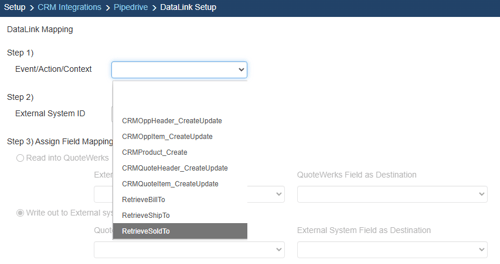
) button.
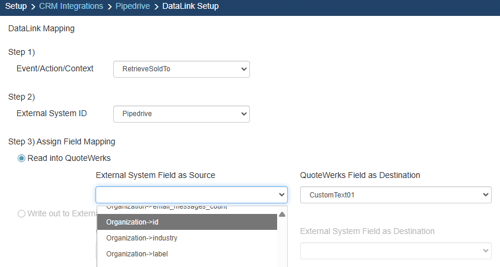
Step 2: On the next window (DataLink Mapping), change the first drop-down menu to RetrieveSoldTo, RetrieveShipTo, or RetrieveBillTo. Your selection here will determine when the field from your CRM/PSA is pulled into QuoteWerks (i.e. the filed data is pulled in when pulling the contact details into the Sold to, Ship to, or Bill to fields).
Step 3: Under the External System ID field, change the drop down to your CRM/PSA, in this case Pipedrive.
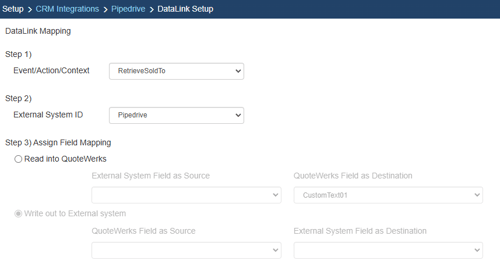
Step 4: On the next field of Assign Field Mapping click on the radial button for Read into QuoteWerks.
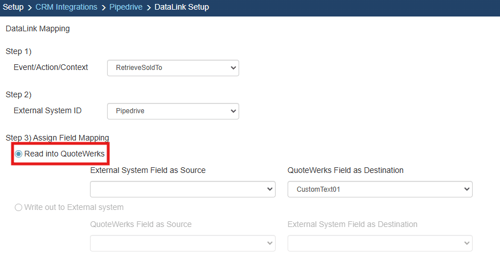
Step 5: The drop down for External System Field as Source will list the fields available from your CRM/PSA. Select the field you would like to pull into QuoteWerks.
Step 6: Once your External field as source is selected, choose the QuoteWerks field that you would like the data from your CRM/PSA to populate in the QuoteWerks Field as a Destination.
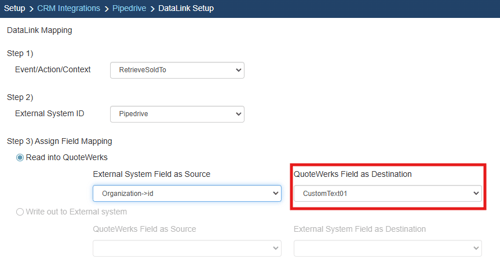
Step 7: Click [Ok] to complete the DataLink Mapping.
Editing an existing DataLink
To edit an existing DataLink, highlight the link and click on the edit (![]() ) button. This will open the DataLink Mapping window and allow you to change any of the fields previously set for that DataLink.
) button. This will open the DataLink Mapping window and allow you to change any of the fields previously set for that DataLink.
Deleting an existing DataLink
To delete an existing DataLink, highlight the link and click on the delete (![]() ) button. This will remove that specific DataLink from your system. Please note, this cannot be undone.
) button. This will remove that specific DataLink from your system. Please note, this cannot be undone.
Disabling a DataLink
Disabling a DataLink will let users disable the DataLink from working without having to remove the link. This is very useful if you need to stop a DataLink from working for a period of time, but do not want to remove it from the DataLink list.
To disable a DataLink, highlight the DataLink and click on the checkbox for Disable DataLink. Uncheck it to re-enable the DataLink.