
This article takes you through using the salesforce.com Integration in QuoteWerks. This will show you how to pull salesforce.com customer records into sales quotes, create opportunities, and more.
This article includes information on the following topics:
- Salesforce.com Online/Offline Status
- Creating or Attaching to an Opportunity in Salesforce.com
- Create or Update Opportunity as “Closed Won”
- Creating or Updating a Document Attachment in Salesforce.com
- Create or Update Follow Up Call
- Pulling Salesforce.com Account/Contact Information into QuoteWerks
- Starting a New Quote from Inside Salesforce.com
- Creating a New Quote from an Existing Salesforce.com Opportunity
- Auto-Links for Salesforce.com
- Linking to Salesforce.com Product Catalogs
- Adding QuoteValet Insight to a Tab in Salesforce
- Adding QuoteWerks Web to a tab in salesforce
- F2 Lookup Features
- DataLink Setup
Salesforce.com Online/Offline Status
Writing information to salesforce.com requires that you have access to salesforce.com online. If you are running QuoteWerks on a laptop and are not connected to the internet, you will not be able to write information back to salesforce.com.
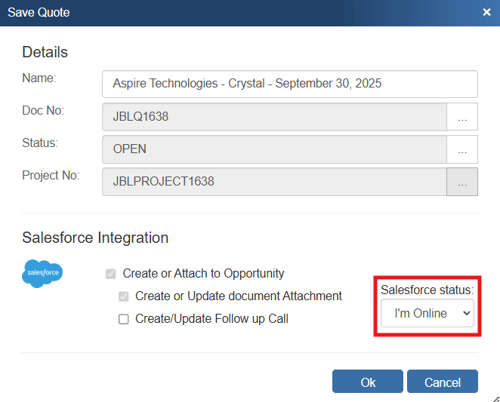
On the Save window there is an “I’m Offline” option that enables you to save the quote and not attempt to integrate with salesforce.com online. With this option, it is now easy to still save quotes in QuoteWerks even though salesforce.com is not available. Please note, any quotes saved while offline will need to be re-opened, linked to a salesforce.com contact and saved in order to update salesforce.com online.
Creating or Attaching to an Opportunity in Salesforce.com
When you save a quote, the Create or Attach to Opportunity checkbox will appear on the Save window.
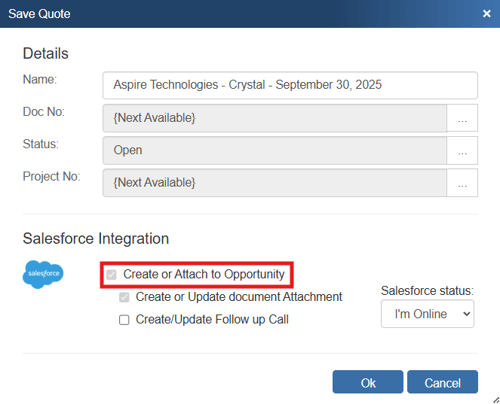
TIP: Unchecking the Create or Attach to Opportunity box (or, if you're saving an order or invoice, the Update Closed Won Opportunity box) will uncheck the Create or Update document Attachment box, since document attachments are only attached to the sales opportunity in salesforce.com. Otherwise, salesforce.com would automatically create a new Opportunity to house the document attachment, which you don't want if Create or Attach to Opportunity is unchecked.
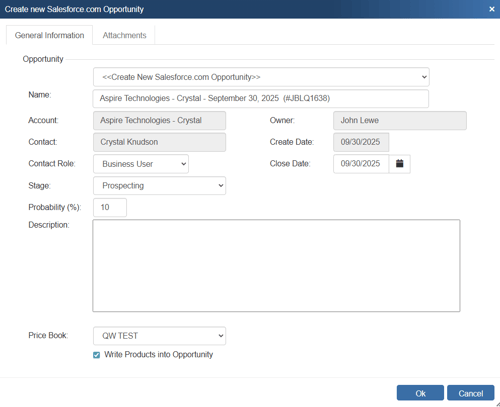
This option will create a salesforce.com opportunity or attach to an existing opportunity in salesforce.com under the Opportunities tab. Once you have pressed the [OK] button from the File -> Save window, the “Create a new salesforce.com Opportunity” window will appear.
TIP: Once you create the Opportunity, if you update it in QuoteWerks (make changes and click on the File -> Save menu again), the ![]() icon next to the Name: field above will turn yellow (
icon next to the Name: field above will turn yellow (![]() ). Clicking this yellow icon will open the Opportunity inside salesforce.com
). Clicking this yellow icon will open the Opportunity inside salesforce.com
Here, you can adjust information about the opportunity such as the Name, Contact Role, Close Date, Stage, Probability, and Price Book. You can even add a description for the opportunity, The salesforce.com Price Book you select is where the line items from the QuoteWerks document will be create/updated; they'll also be listed in the Products section of the Opportunity if you selected Write Products into Opportunity on the salesforce.com setup.
The Name drop down list will contain a list of all existing salesforce.com opportunities associated with the salesforce.com contact record you have linked to.

Here, you can select an existing Opportunity to attach the quote to. Once the opportunity has been saved in salesforce, a confirmation will appear in the bottom-right hand corner of the DocumentItems window.
NOTE: For salesforce.com users with multiple currencies activated for Price Books, you can control which currencies are displayed as choices Create/Update Opportunity window. Advanced users can use the Settings Manager to create or set SystemSettings\Contact Managers\SFPriceBookISOCurrencyCodeList=AUD,NZD,USD,CAD,EUR,GBP. If you want to limit which price books appear in the QuoteWerks Opportunity window, advanced users can use the Settings Manager to create or set SystemSettings\Contact Managers\SFOppPriceBookInclusionList=Silver Price List,Gold Price List. If you want to default the currency selected for the Opportunity PriceBook to be the Alternate Currency selection in QuoteWerks, advanced users can use the Settings Manager to create or set SystemSettings\Contact Managers\SFOppPriceBookCurrencyCodeDefaultToAlternateCurrency=-1.
Write Products Into Opportunity
This checkbox on the opportunity window in QuoteWerks will only appear if the Write Products into Opportunity option on the setup window is selected. This checkbox enables users to choose to write the products into the opportunity when the full list of items is on the document, rather than each time a change is made to help save time.
By creating Opportunities in salesforce.com you allow salesforce.com to help you estimate your sales pipeline. If you already have an opportunity for this quote, it will automatically update the existing one to reflect changes you have made to the quote. If you selected to have it do so, the line items from the QuoteWerks document will be written into the salesforce.com Opportunity.
IMPORTANT: When creating or updating the salesforce.com Opportunity, if you receive any errors, please see Salesforce.com Opportunity Setup for information on setting up the appropriate security rights in salesforce.com that are required to create Opportunities.
Create or Update Opportunity as “Closed Won”
This option will complete the opportunity in salesforce.com. This option is only available when the QuoteWerks document being saved is an ORDER or INVOICE.

A quote is converted to an order or invoice using the File -> Convert to Order/Invoice menu. When this menu is selected, the “Close existing SalesForce.com Opportunity as Won” window will be displayed if the QUOTE has been linked to a salesforce.com opportunity.
This “Closed Won” opportunity can originate in several ways. First, if there is an existing opportunity for this quote, QuoteWerks will convert that existing opportunity to “Closed Won”. If there is no existing opportunity and this option is checked, then QuoteWerks will create a new “Closed Won” opportunity. Lastly, if the “Closed Won” opportunity already exists and you have made some changes to the order/invoice, then the “Closed Won” opportunity record will be updated.
Once you have clicked the [OK] button from the File -> Save window, the “Close existing salesforce.com Opportunity as Won” window will appear allowing you to enter information about the completed sale such as Name, Amount, Close Date, Stage, and Probability.
Creating or Updating a Document Attachment in Salesforce.com
When saving a document, the “Create or Update document attachment” checkbox will appear on the Save window.

If you check this option, an attachment record that refers to the document you are saving will be created (or updated) under the salesforce.com Opportunities Notes & Attachments heading.

When using salesforce.com, you can choose to open this attachment clicking on the “View” link. It will launch QuoteWerks and open the document.
Create or Update Follow Up Call
When you save a quote, the Create/ Update Follow Up Call checkbox will appear on the Save window.
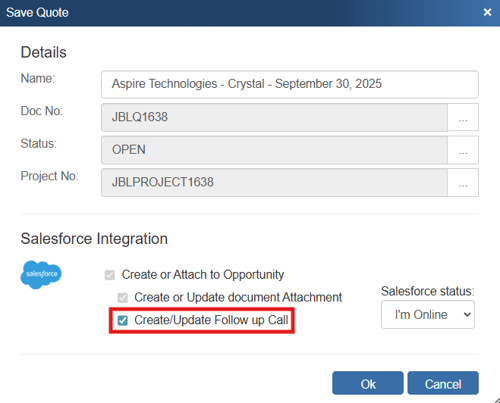
Here, you can adjust information about the call such as who it's assigned to, the status, due date, priority, as well as add comments, and set a reminder for the call.

TIP: Once you create the call, if you update it in QuoteWerks (make changes and click on the File -> Save menu again), the ![]() icon next to the Name: field above will turn yellow (
icon next to the Name: field above will turn yellow (![]() ). Clicking this yellow icon will view the call inside salesforce.com.
). Clicking this yellow icon will view the call inside salesforce.com.
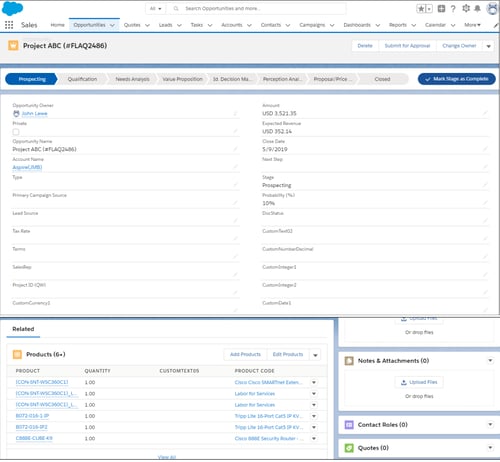
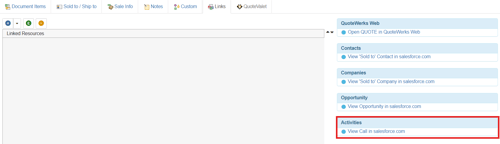
This option will create a salesforce.com follow up call that is attached to the opportunity and appears under the Open Activities section of the opportunity.
![]()
The follow-up call will also be available on the Links tab of the quote in QuoteWerks. This is a quick shortcut to the call in salesforce.com.
Pulling Salesforce.com Account/Contact Information into QuoteWerks
To retrieve account/contact information from salesforce.com into QuoteWerks, first select the Sold to / Ship to tab. Click on the ![]() button next to the Sold to / Ship to boxes.
button next to the Sold to / Ship to boxes.
The Lookup Salesforce.com contact window will appear:
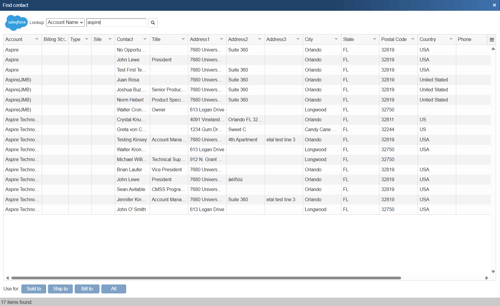
Select the field that you want to use in the search and then enter the value that you are searching for. When you click on the [Find] button, the results of your search will be displayed. Contacts, accounts, and related contacts will appear.
Once you have found the account or contact you are looking for, select the contact and click on the [Sold To] button to use this contact for the Sold to information. You can also select a contact and click on the [Ship To] button to use this contact for the Ship to information or you can click on the [Bill To] button to use this contact for the Bill to information. When you are finished selecting contacts, click on the [Close] button. You will be returned to the Sold to/ Ship to tab and the selected contacts will be pre-filled in the Sold to/Ship to/Bill to fields.
NOTE: When pulling a contact, if the contact address is empty, the company address will be used.
TIP: If you would rather launch/push contact details from salesforce.com into QuoteWerks, see Starting a New Quote from Inside Salesforce.com for more information.
Starting a New Quote from Inside Salesforce.com
The salesforce.com integration has a unique feature that enables the salesforce.com user to click on a hyperlink located on a salesforce.com opportunity window which will start QuoteWerks and copy all the account and opportunity information into a new quote to automate the creation of a new quote using the details from the salesforce.com window.
Setup
Before you can initiate the creation of a new quote by clicking on a hyperlink on the opportunity tab in salesforce.com, you will need to setup the hyperlink. This web integration link will launch QuoteWerks and pass it the necessary information from your opportunity.
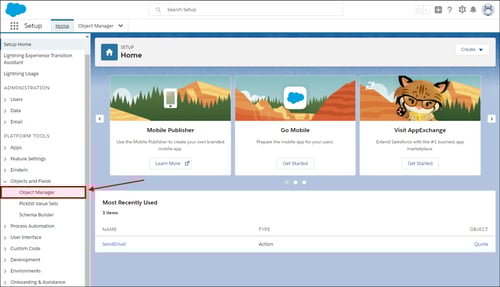
Step 1: From within salesforce.com go to Setup.
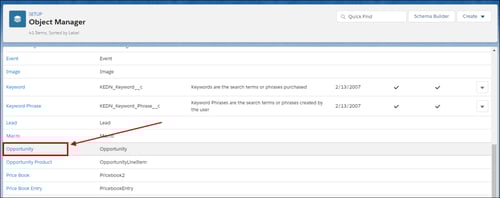
Step 2: Click on the “Objects and Fields” link and then the "Object Manager" link:
Step 3: Click on the “Opportunity” link:
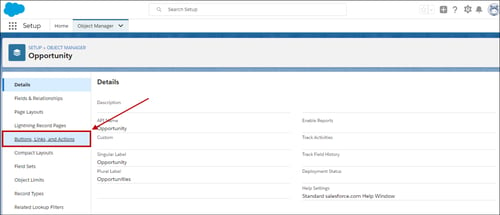
Step 4: Click on the “Button, Links, and Actions” link to create a new Web integration link:
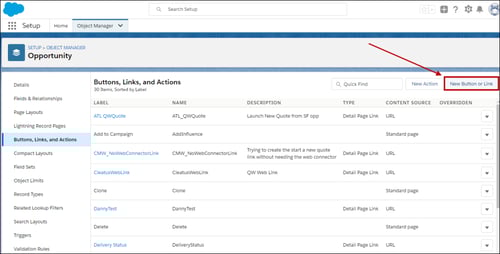
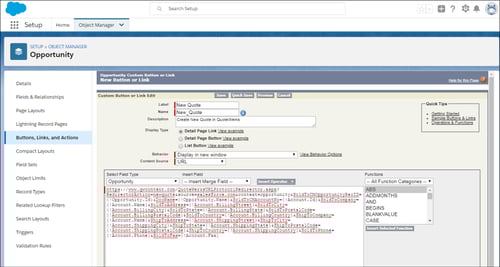
Step 5: Click on the "New Button or Link" button to create the link:
Step 6: First you will need to enter in a “Label” and “Name”. The Name cannot have a space. In our example we have titled ours “New Quote.” We recommend leaving the “Link encoding” as the default value
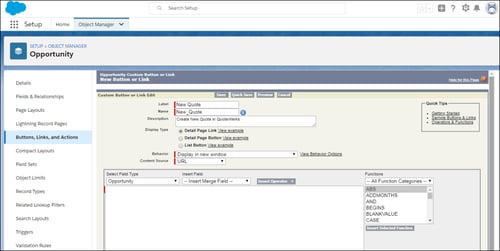
Step 7: Set the Behavior as “Display in new window". Set the “Content Source” to “URL”. Next, copy and paste this text:
https://www.qwcontent.com/QuoteWerksURLProtocolRedirector.aspx?RedirectorAction=newquote&source=salesforce.com&context=opportunity&SoldToCMOpportunityRecID={!Opportunity.Id}&DocName={!Opportunity.Name}&SoldToCMCompanyRecID={!Account.Id}&SoldToCompany={!Account.Name}&SoldToAddress={!Account.BillingStreet}&SoldToCity={!Account.BillingCity}&SoldToState={!Account.BillingState}&SoldToPostalCode={!Account.BillingPostalCode}&SoldToCountry={!Account.BillingCountry}&ShipToCompany={!Account.Name}&ShipToAddress={!Account.ShippingStreet}&ShipToCity={!Account.ShippingCity}&ShipToState={!Account.ShippingState}&ShipToPostalCode={!Account.ShippingPostalCode}&ShipToCountry={!Account.ShippingCountry}&SoldToPhone={!Account.Phone}&SoldToFax={!Account.Fax}&SoldToCMContactRecID={!Contact.Id}&SoldToContact={!Contact.Name}&SoldToEmail={!Contact.Email}
TIP: If you would like to utilize a QuoteWerks template instead of blank quote, use the following URL instead. You will need to add the template name to the URL in the bolded section (make sure you spell the template name correctly):
https://www.qwcontent.com/QuoteWerksURLProtocolRedirector.aspx?RedirectorAction=newfromtemplate&templatename=INSERTTEMPLATENAMEHERE&source=salesforce.com&context=opportunity&SoldToCMOpportunityRecID={!Opportunity.Id}&DocName={!Opportunity.Name}&SoldToCMCompanyRecID={!Account.Id}&SoldToCompany={!Account.Name}&SoldToAddress={!Account.BillingStreet}&SoldToCity={!Account.BillingCity}&SoldToState={!Account.BillingState}&SoldToPostalCode={!Account.BillingPostalCode}&SoldToCountry={!Account.BillingCountry}&ShipToCompany={!Account.Name}&ShipToAddress={!Account.ShippingStreet}&ShipToCity={!Account.ShippingCity}&ShipToState={!Account.ShippingState}&ShipToPostalCode={!Account.ShippingPostalCode}&ShipToCountry={!Account.ShippingCountry}&SoldToPhone={!Account.Phone}&SoldToFax={!Account.Fax}&SoldToCMContactRecID={!Contact.Id}&SoldToContact={!Contact.Name}&SoldToEmail={!Contact.Email}
Click Save.
Salesforce.com Special Setup Notes
The salesforce.com integration has a unique feature that enables the salesforce.com user to click on a hyperlink located on a salesforce.com window such as an opportunities window which will start QuoteWerks and copy all the account and opportunity information into a new quote to automate the creation of a new quote using the details from the salesforce.com window. The special “Link URL” that you need to use when setting up this hyperlink is below.
Link URL (for Opportunities tab):
https://www.qwcontent.com/QuoteWerksURLProtocolRedirector.aspx?RedirectorAction=newquote&source=salesforce.com&context=opportunity&SoldToCMOpportunityRecID={!Opportunity.Id}&DocName={!Opportunity.Name}&SoldToCMCompanyRecID={!Account.Id}&SoldToCompany={!Account.Name}&SoldToCMContactRecID={!Contact.Id}&SoldToContact={!Contact.Name}&SoldToEmail={!Contact.Email}&SoldToAddress={!Account.BillingStreet}&SoldToCity={!Account.BillingCity}&SoldToState={!Account.BillingState}&SoldToPostalCode={!Account.BillingPostalCode}&SoldToCountry={!Account.BillingCountry}&ShipToCMCompanyRecID={!Account.Id}&ShipToCompany={!Account.Name}&ShipToAddress={!Account.ShippingStreet}&ShipToCity={!Account.ShippingCity}&ShipToState={!Account.ShippingState}&ShipToPostalCode={!Account.ShippingPostalCode}&ShipToCountry={!Account.ShippingCountry}&SoldToPhone={!Account.Phone}&SoldToFax={!Account.Fax}
NOTE: You can see that the word “newquote” is bolded in the url string. If you would like to create a new order rather than a new quote, then change that word to “neworder”. The same can be done for “newinvoice”.
Link URL (for Contacts tab):
https://www.qwcontent.com/QuoteWerksURLProtocolRedirector.aspx?RedirectorAction=neworder&source=salesforce.com&context=contact&DocName={!Account_Name} &SoldToCMCompanyRecID={!Account_ID}&SoldToCMContactRecID={!Contact.Id}&SoldToContact={!Contact_FullName}&SoldToTitle={!Contact_Title}&SoldToPhone={!Contact_Phone}&SoldToFax={!Contact_Fax}&SoldToEmail={!Contact_Email}&SoldToCompany={!Account_Name}&SoldToAddress={!Contact_MailingStreet}&SoldToCity={!Contact_MailingCity}&SoldToState={!Contact_MailingState}&SoldToPostalCode={!Contact_MailingPostalCode}&SoldToCountry={!Contact_MailingCountry}&ShipToCMCompanyRecID={!Account.Id}&ShipToCompany={!Account_Name}&ShipToContact={!Contact_FullName}&ShipToTitle={!Contact_Title}&ShipToAddress={!Contact_MailingStreet}&ShipToCity={!Contact_MailingCity}&ShipToState={!Contact_MailingState}&ShipToPostalCode={!Contact_MailingPostalCode}&ShipToCountry={!Contact_MailingCountry}
Link URL (for Accounts tab):
https://www.qwcontent.com/QuoteWerksURLProtocolRedirector.aspx?RedirectorAction=newinvoice&source=salesforce.com&context=account&DocName={!Account.Name}&SoldToCMCompanyRecID={!Account.Id}&SoldToCompany={!Account.Name}&SoldToAddress={!Account.BillingStreet}&SoldToCity={!Account.BillingCity}&SoldToState={!Account.BillingState}&SoldToPostalCode={!Account.BillingPostalCode}&SoldToCountry={!Account.BillingCountry}&ShipToCMCompanyRecID={!Account.Id}&ShipToCompany={!Account.Name}&ShipToAddress={!Account.ShippingStreet}&ShipToCity={!Account.ShippingCity}&ShipToState={!Account.ShippingState}&ShipToPostalCode={!Account.ShippingPostalCode}&ShipToCountry={!Account.ShippingCountry}&SoldToPhone={!Account.Phone}&SoldToFax={!Account.Fax}
The hyperlink is listed here in the help file so that you can easily copy the hyperlink text from this help file in order to paste it into the salesforce.com setup window.
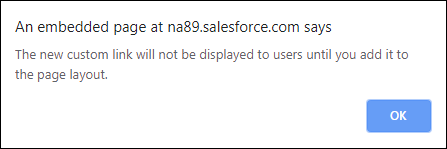
Step 8: Before you can use the web integration link you will need to add it to the Opportunities Tab Page Layout. Salesforce.com will remind you of you this by prompting you with the window below:
Step 9: Click on the “Page Layouts” link under the Setup-> Object Manager-> Opportunity Menu:

Then select the “Edit” action.
Step 10: To add the “New Quote” web integration link to the page layout, edit the Opportunity Layout (sales). To add this web integration link to the page layout, drag it into the Custom Links section:
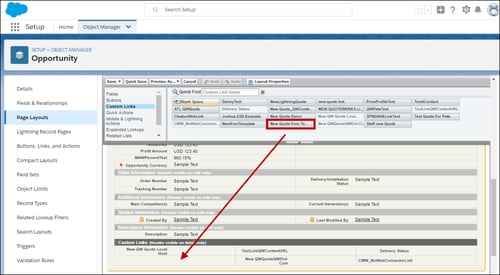
To save your changes, click on the [Save] button. To use the web integration link you will need to open/view an opportunity. Under the “Custom Links” heading you will see the “New Quote” link:

NOTE: The web browser "quotewerks:" protocol handler was introduced with QuoteValet as a way to open QuoteWerks quotes using a URL.
Creating a New Quote from an Existing Salesforce.com Opportunity
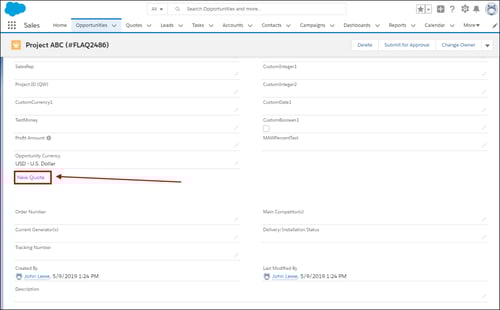
If you have an existing opportunity that was created within salesforce.com, you can initiate a new quote for this opportunity by clicking on the “New Quote” hyperlink found under the “Web Integration Link” or “Useful Links”section located on the opportunity screen. See prior section for details on setting up this “New Quote” hyperlink.
From the selected Opportunity click on the “New Quote” link:
This link will launch QuoteWerks and you will be prompted with a QuoteWerks login window.
Select your username if it has not already been selected and provide your password.
Once you log into QuoteWerks, information from the sales opportunity will be passed to QuoteWerks. This includes the account number, opportunity id, opportunity name, contact and address information.
At this point, you can use QuoteWerks to create the quote, and when you save the quote, the existing opportunity will be updated with the details from the quote.
Auto-Links for salesforce.com
The Auto-Links window creates dynamically generated links on the QuoteWerks Links tab that will link to specific details in salesforce.com from the QuoteWerks created quote. These links are automatically created and there is no setup involved to use them.
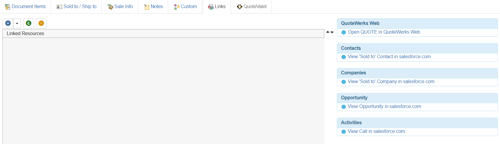
This functionality provides users with an easy way to view the contact(s) from the quote, the opportunity that was created based on this quote, the activity (such as follow up calls), and the salesforce.com quote associated with this opportunity. Clicking on one of these links will open salesforce.com and display the link information. For example, clicking on the "View Opportunity in salesforce.com" link would open this specific opportunity in salesforce.com for you.
Linking to Salesforce.com Product Catalogs
QuoteWerks can link to salesforce.com product catalogs. This will save time for customer’s using salesforce.com that have invested time creating their product catalogs in salesforce.com.
In order for QuoteWerks to link to salesforce.com product catalogs, salesforce.com must be selected as your contact manager. You can select salesforce.com as your preferred contact manager by navigating to Setup -> CRM Integrations. In addition, you will need to supply your Login ID and password for salesforce.com. You can enter these on the Contact Manager tab of the Setup -> My Preferences menu.
NOTE: You do not need to be logged into salesforce.com in order for QuoteWerks to link to the salesforce.com product catalogs; however you must have an internet connection.
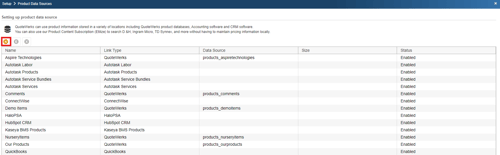
Step 1: In QuoteWerks, go to Setup -> Product Data Sources, then select the ![]() [New] button on the Product Data Source Setup window:
[New] button on the Product Data Source Setup window:
Step 2: From the “Select Database Type” window select “salesforce.com” from the drop-down menu:

Then click on the [Next] button to move to the next step.
Step 3: In this window you can select the “Salesforce.com Product Price Book” that you want to link to:
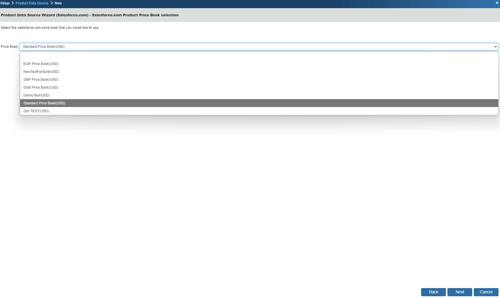
Click on the [Next] button to move to the next step.
NOTE: In order to link to multiple price books you will need to start from Step 1 of this process for each price book.
Step 4: This window allows you to map the salesforce.com item fields to their QuoteWerks counterpart. By default, we have already mapped some of the salesforce.com fields to QuoteWerks fields such as Description, Price, name, and Product Code.
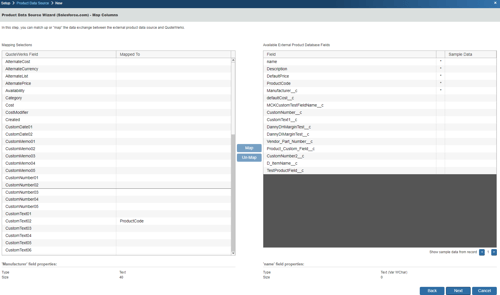
However, other fields are available to be mapped. Additionally, if a custom field in salesforce.com is named "Manufacturer__c" or "VendorPartNumber__c" these fields will be automatically mapped for you if the product list has already been linked in QuoteWerks. If this is the first time you are setting it up, you will need to map it manually.
To change any of the default selections, simply select the salesforce.com field on the right, then select the QuoteWerks field on the left and choose to map or un-map the fields.
Click on the [Next] button to move to the next step.
Step 5: In this window enter the name of the vendor whose products you will be storing in this data source. This vendor name will be used to refer to products when looking up products under the Product Lookup window.
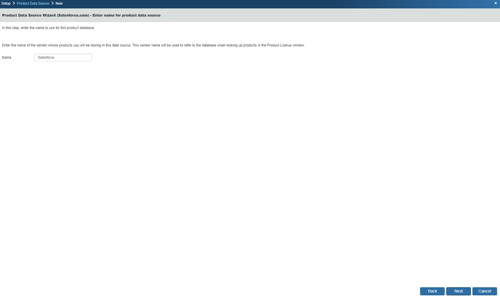
Click on the [Next] button to move to the next step.
Step 6: On this window you can “Set Column Titles.” Column titles are the names of the columns as they will appear in the Product Lookup window for this product source.
For example, in QuoteWerks the field name is called ‘Price,’ in the salesforce.com product list the field is called ‘DefaultPrice.’ You may want to refer to this as ‘Unit Price.’ By clicking on the [Change Title] button you can rename the column title.:
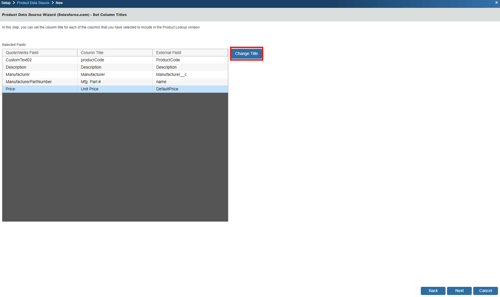
Click on the [Next] button to move to the next step.
Step 7: If the ‘Individual Product Data Source level security’ has been enabled, the Security step will appear next:
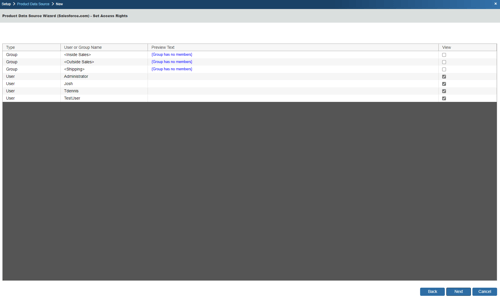
Here you can control the level of access each User or Group has to this Product Data Source. For details, see the User Maintenance and Security chapter.
Step 8: Here you can choose various options for the product database.
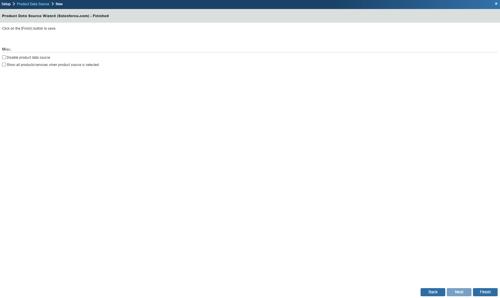
Show all products/services when product source is selected
Choose this option to display all of the products and services in the database when you select this product database from the Product Lookup window. If you have more than 5,000 items in your product database, it is recommended that you do not select this option.
Click on the [Finish] to complete the link to the salesforce.com product catalog.
Step 9: Once you click on the [Finish] button it will return you to the Product Data Source Setup window where you can confirm that the link to the salesforce.com product catalog was established:

Step 10: To use the link, select the Products -> Lookup menu and select the salesforce.com product catalog product data source.
To perform a wildcard search in the manufacturer part number field, you ca use the ‘Begins With’ checkbox and/or the wildcard % symbol.
Example: If you wanted to see every item with a description that began with the word “door”, you could check the ‘Begins With’ box and enter “door” in the Description. You could also enter “door%” in the Description. If you wanted to see everything that ended with the word “door”, you would enter “%door”. If you wanted to see every item that contained the word “door” you would enter “%door%”.
Adding QuoteValet Insight to a Tab in Salesforce
Salesforce.com provides users with a lot of customization options. This is a benefit for QuoteWerks users as you can add a new tab into salesforce.com for QuoteValet Insight. However, to do this, you will need to be able to add "Custom Tabs" to salesforce.com that will more than likely require administrative level access. Check your settings in salesforce.com to ensure you have this access before continuing.
Setup
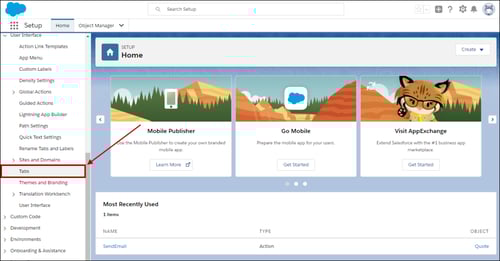
First, click on "Setup", at the top of salesforce.com to access the "Setup Menu". Expand the "User Interface" menu and click "Tabs".

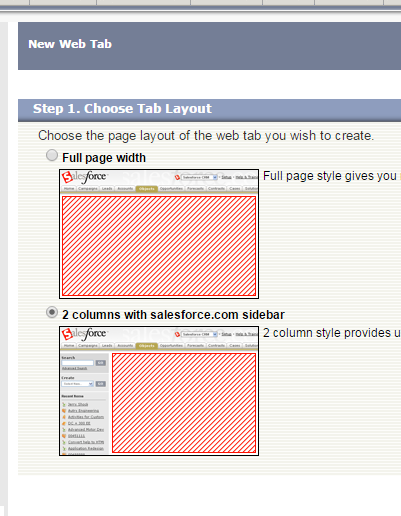
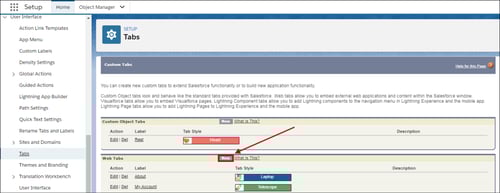
This will open the Custom Tabs option in salesforce.com. Under the "Web Tabs" option and click "New".

In this next step you will decide the layout you want to have when this tab is open. You can choose to have it take up all of the available space in the tab pane or choose to retain the salesforce.com menus in the left pane.
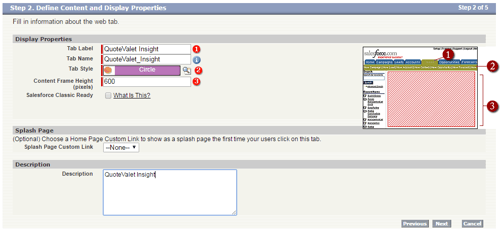
Click "Next" and for the tab label type in "QuoteValet Insight". The tab name will automatically be populated when you move to the next tab. This is a system reference so it is suggested to use the assigned name that salesforce.com populates. Next assign the tab style from the available list. Any of the tab styles will work. The "Content Frame Height" of 600 pixels is the default and can be used. To make this tab show and format correctly for the salesforce.com phone app, check the box for "Salesforce Classic Ready".

The final step on this page is to give the tab a description. "QuoteWerks" or "QuoteValet Insight" will work fine. Click "Next" after adding the description.
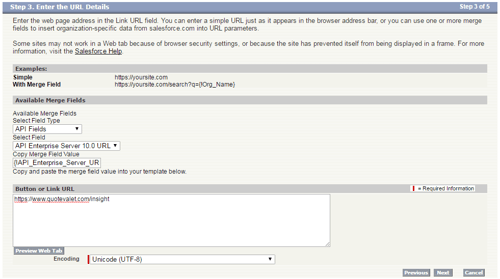
The next step (Enter the URL Details), only requires you to fill out the "Button or URL Link". You can enter the QuoteValet Insight url in this field. Here is the URL to use:
https://www.quotevalet.com/insight. The merge fields are not required and can be left blank or as the default settings. Once you have added that URL field, you can click "Next".
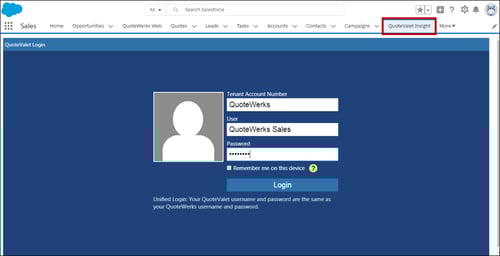
You can now complete the Custom Tab wizard within salesforce.com and a new tab will appear across your navigation bar within salesforce.com.
Adding QuoteWerks Web to a tab in salesforce
TIP: Salesforce.com provides users with a lot of customization options. This is a benefit for QuoteWerks users as you can add a new tab into salesforce.com for QuoteWerks Web. However, to do this, you will need to be able to add "Custom Tabs" to salesforce.com that will more than likely require administrative level access. Check your settings in salesforce.com to ensure you have this access before continuing.
Setup
First, click on "Setup", at the top of salesforce.com to access the "App Setup Menu" (left-hand side). Expand the "Create" tree option and click "Tabs".
This will open the Custom Tabs option in salesforce.com. Under the "Web Tabs" option and click "New".
In this next step you will decide the layout you want to have when this tab is open. You can choose to have it take up all of the available space in the tab pane or choose to retain the salesforce.com menus in the left pane.

Click "Next" and for the tab label type in "QuoteValet Insight". The tab name will automatically be populated when you move to the next tab. This is a system reference so it is suggested to use the assigned name that salesforce.com populates. Next assign the tab style from the available list. Any of the tab styles will work. The "Content Frame Height" of 600 pixels is the default display. Change this setting based on your monitor size. You may need to make it larger to fit correctly on your machine.
Add a description (QuoteWerks Web will work fine) and then click "Next" to move to the next step.

The next step (Enter the URL Details), only requires you to fill out the "Button or URL Link". You can enter the QuoteValet Web url in this field. Here is the URL to use:
https://na.quotewerks.com. The merge fields are not required and can be left blank or as the default settings. Once you have added that URL field, you can click "Save".

You should now see a new tab within salesforce.com with "QuoteWerks Web". You may need to edit your navigation panel to view it.

F2 Lookup Features
A list item in an F2 Lookup can be setup to retrieve information from your contact manager. For salesforce.com you can retrieve company or contact information. For a list of fields that you can use, go into the DataLink setup where you add a new field mapping and in the Contact Manager Field drop down you will see a list of all the available fields that can be used.
Example:
~Salesforce_Macro (contact->phone_home)
NOTE: See the F2 Lookup section in Customizing QuoteWerks for more details on the F2 Lookup feature.
DataLink Setup
The DataLink can be configured to copy information from QuoteWerks into salesforce.com opportunity fields when QuoteWerks creates or updates a salesforce.com opportunity. You can do this on the salesforce.com Opportunity level with the EventAction of "CRMOppHeader_CreateUpdate". Information can also be copied at the line item level when QuoteWerks is creating/updating salesforce.com Opportunity product items using the event action of "CRMOppItem_CreateUpdate".
The DataLink is bi-directional, so after you create/update the Opportunity in salesforce.com, you can set up a DataLink mapping to copy information from the salesforce.com Opportunity into the QuoteWerks quote. You can do this at the Opportunity level and also the Opportunity product items level, enabling you to update QuoteWerks line-item columns with information from the salesforce.com Opportunity or Opportunity product items.
Custom fields listed in the DataLink mappings will show the actual field names with the "__c" postfix rather than field ids. If you are updating from Version 5.0 Build 5 version of QuoteWerks, you may need to re-setup any DataLink mappings that mapped data to or from a salesforce.com custom field to use their new "__c" name.
To setup the DataLink, click on Contacts-> Setup Contact Manager menu selection. Click on salesforce.com then click on Datalink.
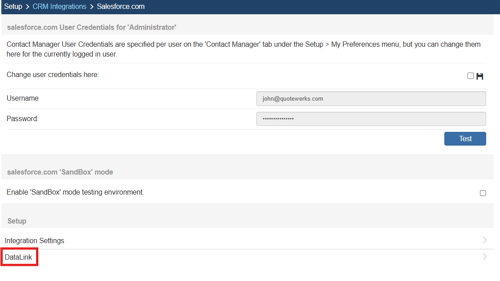
The DataLink Setup window will open. If you have not created a DataLink yet, the field will be blank:
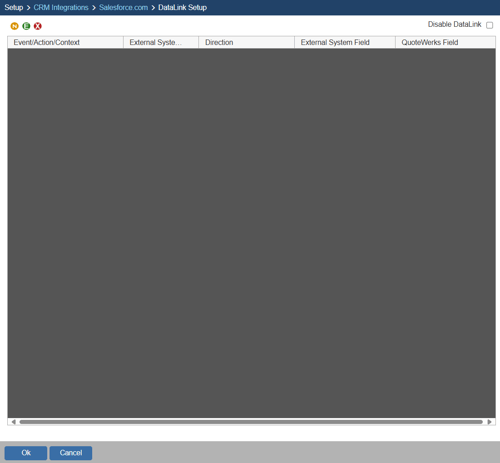
Create, Edit, Delete DataLinks
The three icons on the top left of the window will allow you to create (![]() ), edit (
), edit (![]() ), and delete (
), and delete (![]() ) DataLinks.
) DataLinks.
Creating a new DataLink
Step 1: Click on the create (![]() ) button.
) button.
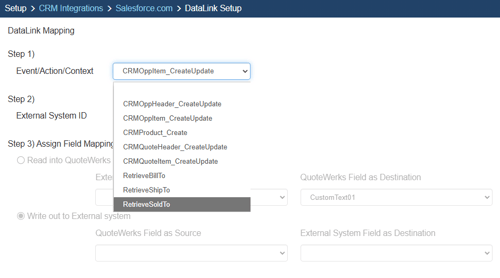
Step 2: On the next window (DataLink Mapping), change the first drop-down menu to:
a) RetrieveSoldTo, RetrieveShipTo, RetrieveBillTo to pull information from salesforce.com into QuoteWerks when selecting a contact
b) CRMOppHeader_CreateUpdate to pull opportunity header data from the salesforce.com opportunity into a QuoteWerks field
c) CRMOppItem_CreateUpdate to pull opportunity item data from the salesforce.com opportunity to a QuoteWerks field
Step 3: Under the External System ID field, change the drop down to SF.
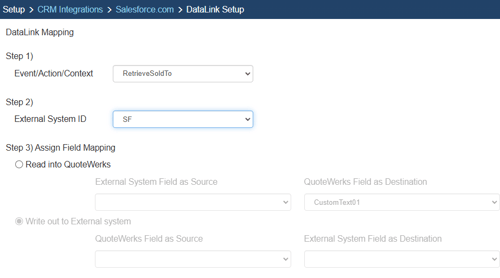
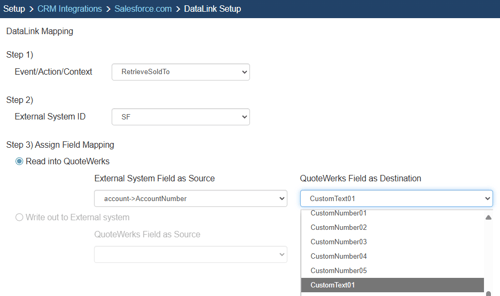
Step 4: On the next field of Assign Field Mapping click on the radial button choose Read into QuoteWerks to PULL salesforce.com field data from salesforce into QuoteWerks and select your field from the drop-down menu:

IMPORTANT: If you have selected RetrieveSoldTo, RetrieveShipTo, RetrieveBillTo under the Event/Action/Context drop down, the option Write out to External System will be grayed out.
Step 5: On the QuoteWerks field as Destination select which QuoteWerks field you want the mapped data from salesforce.com to populate.
Step 6: Click [Ok] to complete the DataLink Mapping.

Editing an existing DataLink
To edit an existing DataLink, highlight the link and click on the edit (![]() ) button. This will open the DataLink Mapping window and allow you to change any of the fields previously set for that DataLink.
) button. This will open the DataLink Mapping window and allow you to change any of the fields previously set for that DataLink.
Deleting an existing DataLink
To delete an existing DataLink, highlight the link and click on the delete (![]() ) button. This will remove that specific DataLink from your system. Please note, this cannot be undone.
) button. This will remove that specific DataLink from your system. Please note, this cannot be undone.
Disabling a DataLink
Disabling a DataLink will let users disable the DataLink from working without having to remove the link. This is very useful if you need to stop a DataLink from working for a period of time, but do not want to remove it from the DataLink list.
To disable a DataLink, highlight the DataLink and click on the checkbox for Disable DataLink. Uncheck it to re-enable the DataLink.